

On this page
Azure
This project provides integrations between Micronaut and Microsoft Azure.
For this project, you can find a list of releases (with release notes) here:
-
Micronaut Azure HTTP Functions pass the Micronaut HTTP Server TCK (Test Compatibility Kit). You can write your code as if you target the Netty runtime but deploy it as an Azure Function with an HTTP trigger.
The Azure SDK module provides integration between Micronaut and Microsoft Azure SDK for Java.
First you need add a dependency on the azure-sdk module:
implementation("io.micronaut.azure:micronaut-azure-sdk")The micronaut-azure-sdk module supports these authentication options:
DefaultAzureCredential
The DefaultAzureCredential is appropriate for most scenarios where the application ultimately runs in the Azure Cloud. It combines credentials that are commonly used to authenticate when deployed, with credentials that are used to authenticate in a development environment.
The DefaultAzureCredential is used when no other credential type is specified or explicitly enabled.
EnvironmentCredential
The EnvironmentCredential is credential provider that provides token credentials based on environment variables. The environment variables expected are:
-
AZURE_CLIENT_ID -
AZURE_CLIENT_SECRET -
AZURE_TENANT_ID
or:
-
AZURE_CLIENT_ID -
AZURE_CLIENT_CERTIFICATE_PATH -
AZURE_TENANT_ID
or:
-
AZURE_CLIENT_ID -
AZURE_USERNAME -
AZURE_PASSWORD
ClientCertificateCredential
The ClientCertificateCredential authenticates the created service principal through its client certificate. Visit Client certificate credential for more details.
The ClientCertificateCredential supports both PFX and PEM certificate file types.
azure.credential.client-certificate.client-id=<client-id>
azure.credential.client-certificate.pem-certificate-path=<path to pem certificate>azure.credential.client-certificate.client-id=<client-id>
azure.credential.client-certificate.pfx-certificate-path=<path to pfx certificate>
azure.credential.client-certificate.pfx-certificate-password=<pfx certificate password>Optionally you can configure the tenant id by setting the property azure.credential.client-certificate.tenant-id.
ClientSecretCredential
The ClientSecretCredential authenticates the created service principal through its client secret (password). See more on Client secret credential for more details.
azure.credential.client-secret.client-id=<client-id>
azure.credential.client-secret.tenant-id=<tenant-id>
azure.credential.client-secret.secret=<secret>UsernamePasswordCredential
The UsernamePasswordCredential helps to authenticate a public client application using the user credentials that don’t require multi-factor authentication. Visit Username password credential for more details.
azure.credential.username-password.client-id=<client-id>
azure.credential.username-password.username=<username>
azure.credential.username-password.password=<password>Optionally you can configure the tenant id by setting the property azure.credential.username-password.tenant-id.
ManagedIdentityCredential
The ManagedIdentityCredential authenticates the managed identity (system or user assigned) of an Azure resource. So, if the application is running inside an Azure resource that supports Managed Identity through IDENTITY/MSI, IMDS endpoints, or both, then this credential will get your application authenticated, and offers a great secretless authentication experience. Visit Managed Identity credential for more details.
azure.credential.managed-identity.enabled=trueNote, that for user-assigned identity you have to also set the azure.credential.managed-identity.client-id.
AzureCliCredential
The AzureCliCredential authenticates in a development environment with the enabled user or service principal in Azure CLI. It uses the Azure CLI given a user that is already logged into it, and uses the CLI to authenticate the application against Azure Active Directory. Visit Azure CLI credential for more details.
azure.credential.cli.enabled=trueIntelliJCredential
The IntelliJCredential authenticates in a development environment with the account in Azure Toolkit for IntelliJ. It uses the logged in user information on the IntelliJ IDE and uses it to authenticate the application against Azure Active Directory. Visit IntelliJ credential for more details.
azure.credential.intellij.enabled=trueNote, that for Windows platform the KeePass database path needs to be set by property azure.credential.intellij.kee-pass-database-path. The KeePass database path is used to read the cached credentials of Azure toolkit for IntelliJ plugin. For macOS and Linux platform native key chain / key ring will be accessed respectively to retrieve the cached credentials.
Optionally you can configure the tenant id by setting the property azure.credential.intellij.tenant-id.
VisualStudioCodeCredential
The VisualStudioCodeCredential enables authentication in development environments where VS Code is installed with the VS Code Azure Account extension. It uses the logged-in user information in the VS Code IDE and uses it to authenticate the application against Azure Active Directory. Visit Visual Studio Code credential for more details.
azure.credential.visual-studio-code.enabled=trueOptionally you can configure the tenant id by setting the property azure.credential.visual-studio-code.tenant-id.
StorageSharedKeyCredential
The StorageSharedKeyCredential is a Shared Key credential policy that is put into a header to authorize requests. It is useful when using Shared Key authorization.
Using an account name and key
azure.credential.storage-shared-key.account-name=devstoreaccount1
azure.credential.storage-shared-key.account-key=Eby8vdM02xNOcqFlqUwJPLlmEtlCDXJ1OUzFT50uSRZ6IFsuFq2UVErCz4I6tq/K1SZFPTOtr/KBHBeksoGMGw==From a connection string
azure.credential.storage-shared-key.connection-string=DefaultEndpointsProtocol=https;AccountName=devstoreaccount1;AccountKey=Eby8vdM02xNOcqFlqUwJPLlmEtlCDXJ1OUzFT50uSRZ6IFsuFq2UVErCz4I6tq/K1SZFPTOtr/KBHBeksoGMGw==;BlobEndpoint=https://127.0.0.1:10000/devstoreaccount1;The Azure SDK provides long list of management and client libraries. The example below illustrates on how to create a BlobServiceClient. The other Azure clients can be created similar way:
The Azure function module provides support for writing Serverless functions with Micronaut that target the Azure Function environment.
There are two modules, the first of which (micronaut-azure-function) is more low level and allows you to define functions that can be dependency injected with Micronaut.
To get started follow the instructions to create an Azure Function project with Gradle or with Maven.
Then add the following dependency to the project:
implementation("io.micronaut.azure:micronaut-azure-function")And ensure the Micronaut annotation processors are configured:
annotationProcessor("io.micronaut:micronaut-inject-java")You can then write a function that subclasses AzureFunction and it will be dependency injected when executed. For example:
An additional module exists called micronaut-azure-function-http that allows you to write regular Micronaut controllers and have them executed using Azure Function. To get started add the micronaut-azure-function-http module.
implementation("io.micronaut.azure:micronaut-azure-function-http")You then need to define a function that subclasses AzureHttpFunction and overrides the invoke method:
With this in place you can write regular Micronaut controllers as documented in the user guide for the HTTP server and incoming function requests will be routed to the controllers and executed.
This approach allows you to develop a regular Micronaut application and deploy slices of the application as Serverless functions as desired.
|
Tip
|
See the guide for Micronaut Azure HTTP Functions to learn more. |
|
Important
|
When you use Micronaut Azure HTTP Functions, you need to remove the api route prefix. You can set the property micronaut.server.context-path to achieve a route prefix.
|
By default, all function routes are prefixed with api. You can also customize or remove the prefix using the extensions.http.routePrefix property in your host.json file. The following example removes the api route prefix by using an empty string for the prefix in the host.json file.
For example, by defining a hosts.json file such as:
{
    "version": "2.0",
    "extensionBundle": {
        "id": "Microsoft.Azure.Functions.ExtensionBundle",
        "version": "[2.*, 3.0.0)"
    },
    "extensions": {
        "http": {
           "routePrefix": ""
        }
    }
}
Micronaut CLI and [Micronaut Launch generate a hosts.json with the necessary configuration if you select the azure-function feature.
You can bind the following types as a controller method’s parameters.
-
com.microsoft.azure.functions.ExecutionContext -
com.microsoft.azure.functions.HttpRequestMessage -
com.microsoft.azure.functions.TraceContext -
java.util.logging.Logger
Azure Key Vault is a secure and convenient storage system for API keys, passwords and other sensitive data. To add support for Azure Key Vault to an existing project, add the following dependencies to your build.
implementation("io.micronaut.azure:micronaut-azure-secret-manager")|
Note
|
Azure doesn’t allow _ and . in name of the secrets so the secret with name SECRET-ONE can be resolved also with SECRET_ONE and SECRET.ONE |
|
Tip
|
For distributed configuration, prefer micronaut.config.import=azure-key-vault://contoso-vault2. The vault name is expanded automatically to https://contoso-vault2.vault.azure.net. The older bootstrap/config-client path remains for compatibility but is deprecated by this module.
|
|
Tip
|
The importer supports multiple authentication modes including default, client-secret, client-certificate, username-password, managed-identity, environment, cli, intellij, and visual-studio-code.
|
|
Tip
|
Standard config-import retry options are also supported for Azure Key Vault imports, including retry-attempts, retry-delay, retry-max-delay, retry-multiplier, and retry-jitter.
|
|
Important
|
Azure Key Vault configuration is currently loaded as a startup snapshot. Secret values are re-read when a new application context starts, but no automatic watch/poll refresh support is provided by this module. |
|
Tip
|
See the guide for Securely store Micronaut application secrets in Azure Key Vault to learn more. |
Signing with Key Vault Keys
Azure Key Vault can store cryptographic keys and perform signing operations without ever exposing the private key material. This is ideal for signing JWTs, assertions, or other payloads where you want the private key to remain secured in the vault.
To enable signing with Key Vault keys:
azure.key-vault.vault-url=https://your-vault.vault.azure.net
azure.key-vault.keys.enabled=true
azure.key-vault.keys.signing.enabled=true
azure.key-vault.keys.signing.default-algorithm=RS256The KeyVaultKeySigner bean lets you sign arbitrary payloads:
@Singleton
class JwtSigner {
    private final KeyVaultKeySigner signer;

    JwtSigner(KeyVaultKeySigner signer) {
        this.signer = signer;
    }

    byte[] sign(byte[] payload) {
        return signer.sign("jwt-signing-key", payload); // uses default algorithm
    }
}
If you need to override the algorithm per call, use the overloaded method:
byte[] signature = signer.sign("jwt-signing-key", SignatureAlgorithm.RS256, payload);Supported algorithms include RS256, RS384, RS512, PS256, PS384, PS512, ES256, ES384, and ES512, depending on your key type.
You can leverage Distributed Configuration and rely on Azure Key Vault to store your Key/Value secret pairs.
The preferred configuration path is micronaut.config.import.
micronaut.application.name=hello-world
micronaut.config.import=azure-key-vault://contoso-vault2The azure-key-vault://contoso-vault2 declaration activates Azure Key Vault config import without requiring micronaut.config-client.enabled=true. The vault name is expanded automatically to https://contoso-vault2.vault.azure.net.
|
Note
|
optional:azure-key-vault://contoso-vault2 may be used when Azure Key Vault configuration should not fail startup if the import cannot be resolved.
|
Because the Azure Key Vault importer now extends Micronaut’s standard RetryablePropertySourceImporter, you can apply the same retry settings supported by other remote config importers.
These options work for both URI-based and map-based declarations: retry-attempts (or retry-count), retry-delay, retry-max-delay, retry-multiplier, and retry-jitter.
For example, to retry transient startup failures when reaching the vault:
micronaut.config.import=azure-key-vault://contoso-vault2?retry-attempts=5&retry-delay=250ms&retry-max-delay=3s&retry-multiplier=1.5&retry-jitter=0.2As an alternative to the connection-string form, the importer also supports the provider-name map syntax:
micronaut.config.import[0].provider=azure-key-vault
micronaut.config.import[0].name=contoso-vault2
micronaut.config.import[0].credential-mode=client-secret
micronaut.config.import[0].client-id=<client-id>
micronaut.config.import[0].tenant-id=<tenant-id>
micronaut.config.import[0].client-secret=<client-secret>
micronaut.config.import[0].retry-attempts=5
micronaut.config.import[0].retry-delay=250msWith the map-based syntax, name is expanded the same way as the URI path, so contoso-vault2 resolves to https://contoso-vault2.vault.azure.net. You can also provide vault-url explicitly instead of name.
The importer also supports credential customization options in the import declaration. For example, client-secret auth can be configured with:
micronaut.config.import=azure-key-vault://contoso-vault2?credential-mode=client-secret&client-id=<client-id>&tenant-id=<tenant-id>&client-secret=<client-secret>Supported credential-mode values are:
-
default- usesDefaultAzureCredential -
client-secret- requiresclient-id,tenant-id, andclient-secret -
client-certificate- requiresclient-id,tenant-id, andcertificate-path;certificate-passwordmay be supplied for PFX files -
username-password- requiresclient-idplus username/password via URI user-info orusername/passwordoptions -
managed-identity- optionally acceptsmanaged-identity-client-id -
environment- usesEnvironmentCredential -
cli- usesAzureCliCredential -
intellij- optionally acceptstenant-id -
visual-studio-code- optionally acceptstenant-id
For username/password mode, the user-info portion of the connection string is supported:
micronaut.config.import=azure-key-vault://alice:secret@localhost/contoso-vault2?credential-mode=username-password&client-id=<client-id>&tenant-id=<tenant-id>The importer caches and reuses the underlying Key Vault client for repeated imports during configuration loading for the duration of import processing, and closes importer-managed clients when import processing finishes.
Bootstrap-based distributed configuration remains available for compatibility, but it is deprecated and should only be used while migrating existing applications:
micronaut.application.name=hello-world
micronaut.config-client.enabled=true
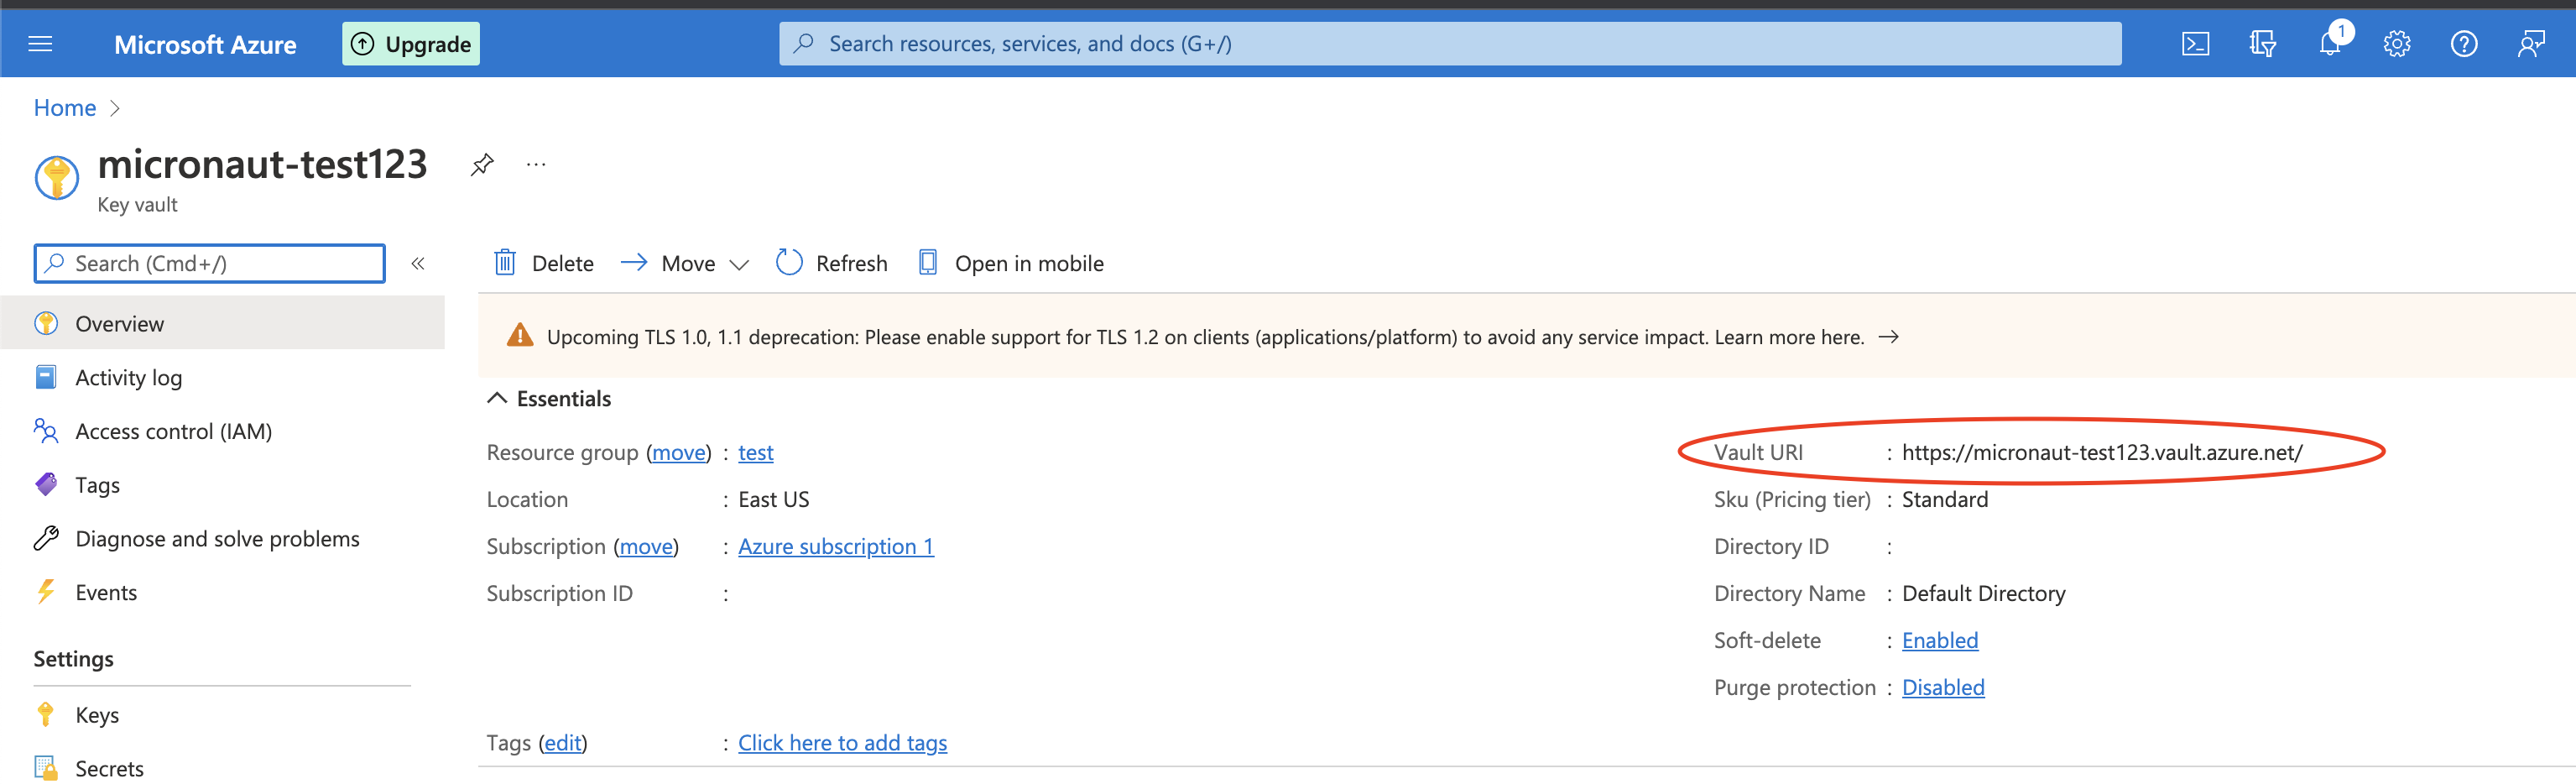
azure.key-vault.vault-url=<key_vault_url>vaultUrl can be obtained from the Azure portal:
|
Important
|
Make sure you have configured the correct credentials on your project following the Setting up Azure SDK section. And that the service account you designated your application has proper rights to read secrets. Follow the official Access Control guide for Azure Key Vault if you need more information. |
|
Important
|
Azure Key Vault configuration is loaded as a startup snapshot. This module does not currently provide automatic watch, polling, or live refresh support. |
To enable Key Vault key signing support (for example, to sign JWT assertions without exposing private key material), see the "Signing with Key Vault Keys" section.
Micronaut provides a high-level, uniform object storage API that works across the major cloud providers: Micronaut Object Storage.
To get started, select the object-storage-azure feature in Micronaut Launch, or add the following dependency:
implementation("io.micronaut.objectstorage:micronaut-object-storage-azure")For more information, check the Micronaut Object Storage Azure support documentation.
Azure Cosmos DB is a fully managed NoSQL database for modern app development. Single-digit millisecond response times, and automatic and instant scalability, guarantee speed at any scale.
To add support for Azure Cosmos DB to an existing project, add the following dependency to your build. dependency::micronaut-azure-cosmos[groupId="io.micronaut.azure"]
This is an example configuration that can be used when creating CosmosClient or CosmosAsyncClient:
micronaut.application.name=azure-cosmos-demo
azure.cosmos.consistency-level=SESSION
azure.cosmos.endpoint=<endpoint-from-connectionstring>
azure.cosmos.key=<key-from-connectionstring>
azure.cosmos.default-gateway-mode=true
azure.cosmos.endpoint-discovery-enabled=falseCosmosClientBuilder will be available also when dependencies and configuration are added to the project.
To use Azure Monitor Logs, add the following dependency to your project:
implementation("io.micronaut.azure:micronaut-azure-logging")Refer to the Micronaut Azure Logging guide for information about creating the required Azure resources.
There are three application configuration properties required to configure the Logback appender that pushes Logback log events to Azure Monitor Logs. In addition, you can enable or disable the appender, which defaults to being enabled.
| Property | Type | Required | Default value | Description |
|---|---|---|---|---|
|
|
|
|
Whether the Logback appender is enabled |
|
|
|
none |
Azure Monitor data collection endpoint URL |
|
|
|
none |
The Azure Monitor data collection rule id that is configured to collect and transform the logs |
|
|
|
none |
The Azure Monitor stream name configured in the data collection rule, for example a table in a Log Analytics workspace |
Edit your src/main/resources/logback.xml file to look like this:
<configuration>

    <appender name='AZURE' class='io.micronaut.azure.logging.AzureAppender'>
        <!-- <blackListLoggerName>example.app.Application</blackListLoggerName> -->
        <encoder class='ch.qos.logback.core.encoder.LayoutWrappingEncoder'>
            <layout class='ch.qos.logback.contrib.json.classic.JsonLayout'>
                <jsonFormatter class='io.micronaut.azure.logging.AzureJsonFormatter' />
            </layout>
        </encoder>
    </appender>

    <root level='INFO'>
        <appender-ref ref='AZURE' />
    </root>

</configuration>
You can customize your JsonLayout with additional parameters that are described in the Logback JsonLayout documentation.
The AzureAppender supports blacklisting loggers by specifying the logger name(s) to exclude in blackListLoggerName elements.
| Property | Type | Required | Default value | Description |
|---|---|---|---|---|
|
|
false |
application-name |
the subject of the log |
|
|
false |
host-name |
the source of the log |
|
|
false |
100 |
Time in ms between two batch publishing of logs |
|
|
false |
128 |
The maximum number of log events that will be sent in one batch request |
|
|
false |
128 |
The size of publishing log queue |
|
|
false |
none |
Logger name(s) that will be excluded |
Since the Azure appender queues log messages and then writes them remotely, there are situations which might result in log events not getting remoted correctly. To address such scenarios you can configure the emergency appender to preserve those messages.
Configure an appender element in your src/main/resources/logback.xml; in the example it is STDOUT, but any valid Logback appender can be used.
Inside the AzureAppender element, add an appender-ref element that references the emergency appender.
<configuration>

    <appender name='STDOUT' class='ch.qos.logback.core.ConsoleAppender'>
        <encoder>
            <pattern>%cyan(%d{HH:mm:ss.SSS}) %gray([%thread]) %highlight(%-5level) %magenta(%logger{36}) - %msg%n</pattern>
        </encoder>
    </appender>

    <appender name='AZURE' class='io.micronaut.azure.logging.AzureAppender'>
        <appender-ref ref='STDOUT'/>
        <blackListLoggerName>org.apache.http.impl.conn.PoolingHttpClientConnectionManager</blackListLoggerName>
        <encoder class='ch.qos.logback.core.encoder.LayoutWrappingEncoder'>
            <layout class='ch.qos.logback.contrib.json.classic.JsonLayout'>
                <jsonFormatter class='io.micronaut.azure.logging.AzureJsonFormatter' />
            </layout>
        </encoder>
    </appender>

    <root level='INFO'>
        <appender-ref ref='AZURE' />
    </root>

</configuration>Refer to the Micronaut Azure Logging guide for how to retrieve log entries published to Azure Monitor Logs.
If you have any troubles with configuring the Azure Appender you can try to add <configuration debug='false'> into your Logback configuration.
To use Azure Monitor Tracing, add the following dependency to your project:
implementation("io.micronaut.azure:micronaut-azure-tracing")To configure publishing application trace data to Azure Monitor, specify the Azure Monitor workspace connection string in your application configuration.
| Property | Type | Required | Default value | Description |
|---|---|---|---|---|
|
|
|
none |
Azure Monitor workspace connection string, e.g. |
See the following list of guides to learn more about working with Microsoft Azure in the Micronaut Framework:
You can find the source code of this project in this repository: