

On this page
Core
The Micronaut Framework is a modern, JVM-based, full stack Java framework designed for building modular, easily testable JVM applications with support for Java, Kotlin, and Groovy.
The Micronaut framework was originally created by a team who had also worked on the Grails framework. The Micronaut framework takes inspiration from lessons learned over the years building real-world applications from monoliths to microservices using Spring, Spring Boot and the Grails framework. The core team continues to develop and maintain the Micronaut project through the support of the Micronaut Foundation.
The Micronaut framework aims to provide all the tools necessary to build JVM applications including:
-
Dependency Injection and Inversion of Control (IoC)
-
Aspect Oriented Programming (AOP)
-
Sensible Defaults and Auto-Configuration
With the Micronaut framework you can build Message-Driven Applications, Command Line Applications, HTTP Servers and more whilst for Microservices in particular Micronaut also provides:
-
Distributed Configuration
-
Service Discovery
-
HTTP Routing
-
Client-Side Load Balancing
At the same time, the Micronaut framework aims to avoid the downsides of frameworks like Spring, Spring Boot and Grails by providing:
-
Fast startup time
-
Reduced memory footprint
-
Minimal use of reflection
-
Minimal use of proxies
-
No runtime bytecode generation
-
Easy Unit Testing
Historically, frameworks such as Spring and Grails were not designed to run in scenarios such as serverless functions, Android apps, or low memory footprint microservices. In contrast, the Micronaut framework is designed to be suitable for all of these scenarios.
This goal is achieved through the use of Java’s annotation processors, which are usable on any JVM language that supports them, as well as an HTTP Server (with several runtimes Netty, Jetty, Tomcat, Undertow…) and an HTTP Client (with several runtimes Netty, Java HTTP Client, …). To provide a similar programming model to Spring and Grails, these annotation processors precompile the necessary metadata to perform DI, define AOP proxies and configure your application to run in a low-memory environment.
Many APIs in the Micronaut framework are heavily inspired by Spring and Grails. This is by design, and helps bring developers up to speed quickly.
Upgrading between Micronaut Framework versions
Check Micronaut Upgrade documentation to help you upgrade your Micronaut applications.
To learn what’s new, check the GitHub Release notes for each module you’re interested in. They contain a summary of all changes broken down by type.
Breaking Changes
Review the section on Breaking Changes and update your affected application code.
The following sections walk you through a Quick Start on how to use the Micronaut framework to set up a basic "Hello World" application.
Before getting started ensure you have a Java 8 or higher JDK installed, and it is recommended that you use a suitable IDE such as IntelliJ IDEA.
The Micronaut CLI is an optional but convenient way to create Micronaut applications. The best way to install Micronaut CLI on Unix systems is with SDKMAN which greatly simplifies installing and managing multiple Micronaut versions.
To see all available installation methods, check the Micronaut Starter documentation.
Using the Micronaut CLI you can create a new Micronaut application in either Groovy, Java, or Kotlin (the default is Java).
The following command creates a new "Hello World" server application in Java with a Gradle build:
|
Note
|
Applications generated via our CLI include Gradle or Maven wrappers, so it is not even necessary to have Gradle or Maven installed on your machine to begin running the applications. Simply use the mvnw or gradlew command, as explained further below.
|
$ mn create-app hello-world|
Tip
|
Supply --build maven to create a Maven-based build instead
|
If you don’t have the CLI installed then you can also create the same application by visiting Micronaut Launch and clicking the "Generate Project" button or by using the following curl command on Unix systems:
curl https://launch.micronaut.io/hello-world.zip -o hello-world.zip
unzip hello-world.zip
cd hello-world|
Tip
|
Add ?build=maven to the URL passed to curl to generate a Maven project.
|
The previous steps created a new Java application in a directory called hello-world featuring a Gradle build. You can run the application with ./gradlew run:
$ ./gradlew run
> Task :run
[main] INFO io.micronaut.runtime.Micronaut - Startup completed in 540ms. Server Running: http://localhost:28933If you have created a Maven-based project, use ./mvnw mn:run instead.
|
Note
|
For Windows the ./ before commands is not needed |
By default, the Micronaut HTTP server is configured to run on port 8080. See the section Running Server on a Specific Port for more options.
To create a service that responds to "Hello World" you first need a controller. The following is an example:
If you use Java, place the previous file in src/main/java/hello/world.
If you use Groovy, place the previous file in src/main/groovy/hello/world.
If you use Kotlin, place the previous file in src/main/kotlin/hello/world.
If you start the application and send a GET request to the /hello URI, the text "Hello World" is returned:
$ curl http://localhost:8080/hello
Hello World|
Tip
|
See the guide for Creating your First Micronaut Application to learn more. |
The application created in the previous section contains a main class located in src/main/java that looks like the following:
imports
import io.micronaut.runtime.Micronaut;public class Application {
public static void main(String[] args) {
Micronaut.run(Application.class);
}
}This is the class that is run when starting the application via Gradle/Maven or via deployment. You can also run the main class directly within your IDE.
To import a Micronaut project into IntelliJ IDEA, open the build.gradle or pom.xml file and follow the instructions to import the project.
For IntelliJ IDEA, if you plan to use the IntelliJ compiler, enable annotation processing under "Build, Execution, Deployment → Compiler → Annotation Processors" by ticking the "Enable annotation processing" checkbox:
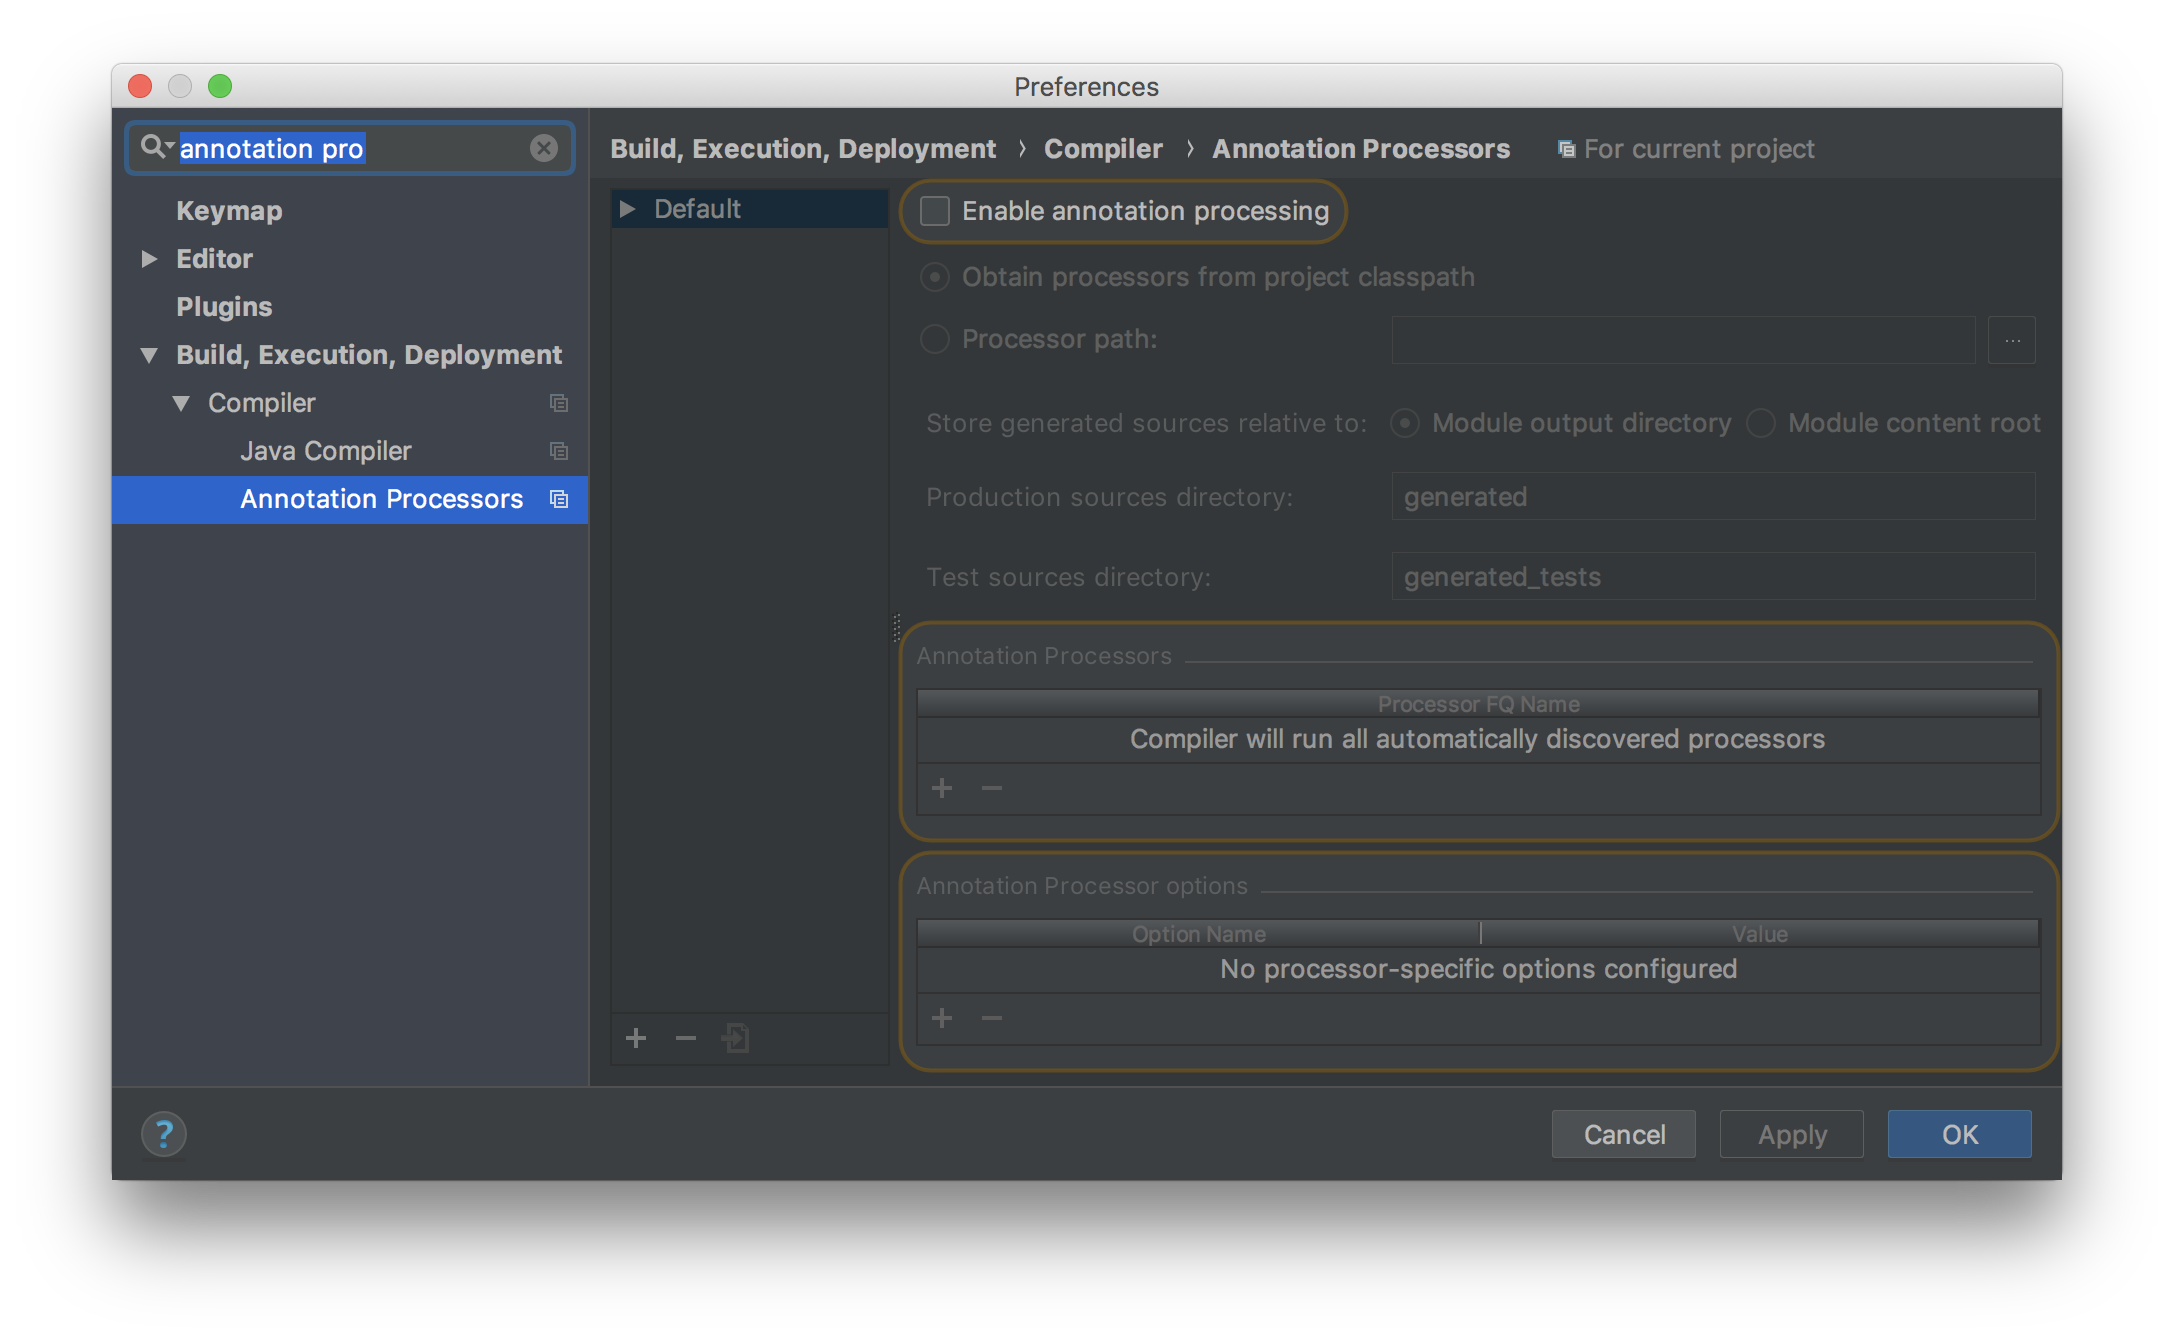
Once you have enabled annotation processing in IntelliJ you can run the application and tests directly within the IDE without the need of an external build tool such as Gradle or Maven.
|
Tip
|
See the guide for Using IntelliJ IDEA to Develop Micronaut Applications to learn more. |
The Micronaut framework can easily be set up within Visual Studio Code by installing the following two extensions:
These extensions can be installed by clicking on the Install button in the banner of the pages linked above, or, by searching for the extensions within VS Code.
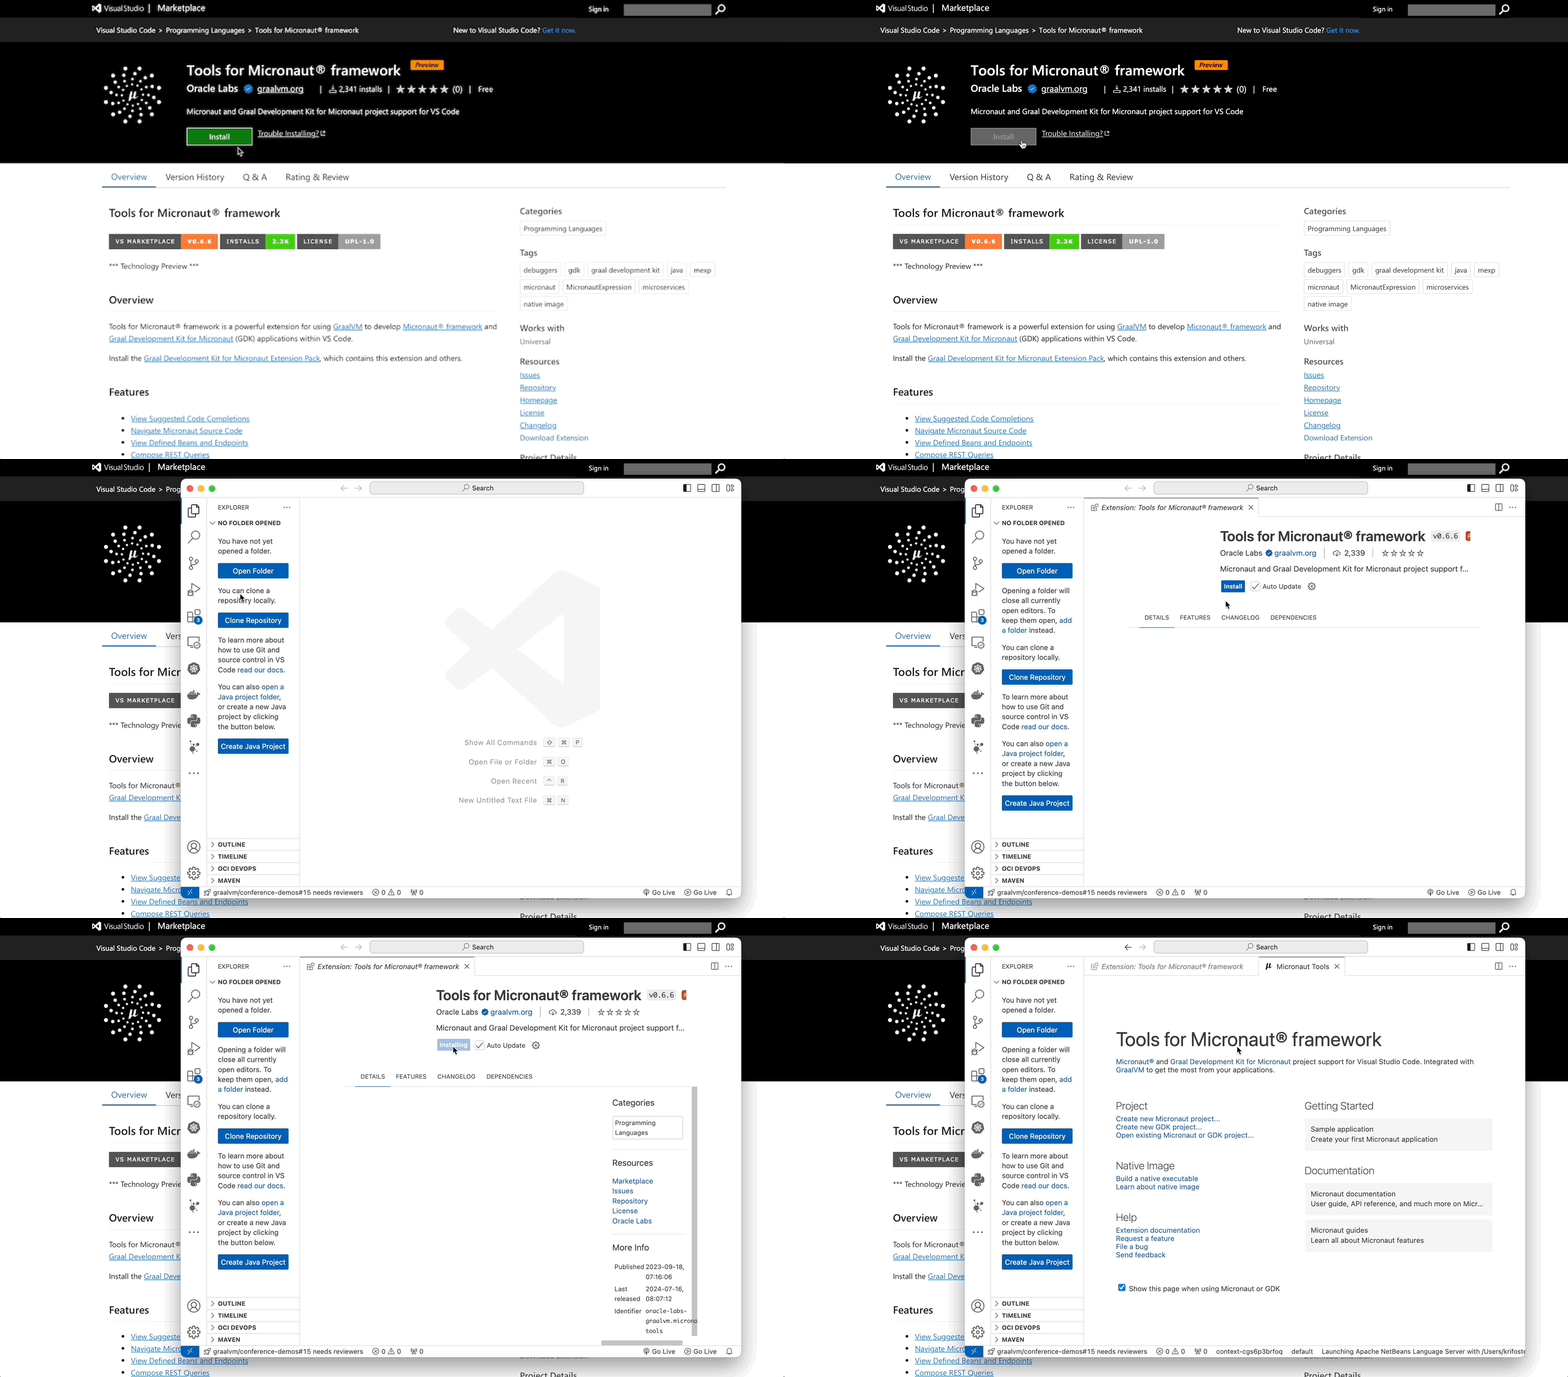
Once they are installed they will give you access to a host of Micronaut specific features such as:
Once the extensions are installed just type code . in any Micronaut project directory and the project will be opened within VS Code.
|
Note
|
For macOS, you need to install the code command by following these instructions.
|
To use Eclipse IDE, it is recommended you import your Micronaut project into Eclipse using either Gradle BuildShip for Gradle or M2Eclipse for Maven.
|
Note
|
The Micronaut framework requires Eclipse IDE 4.9 or higher |
Eclipse and Gradle
Once you have set up Eclipse 4.9 or higher with Gradle BuildShip, first run the gradle eclipse task from the root of your project, then import the project by selecting File → Import and choosing Gradle → Existing Gradle Project and navigating to the root directory of your project (where the build.gradle file is located).
Eclipse and Maven
For Eclipse 4.9 and above with Maven you need the following Eclipse plugins:
Once these are installed, import the project by selecting File → Import and choosing Maven → Existing Maven Project and navigating to the root directory of your project (where the pom.xml file is located).
Then enable annotation processing by opening Eclipse → Preferences and navigating to Maven → Annotation Processing and selecting the option Automatically configure JDT APT.
Apache NetBeans can open Maven and Gradle projects out of the box.
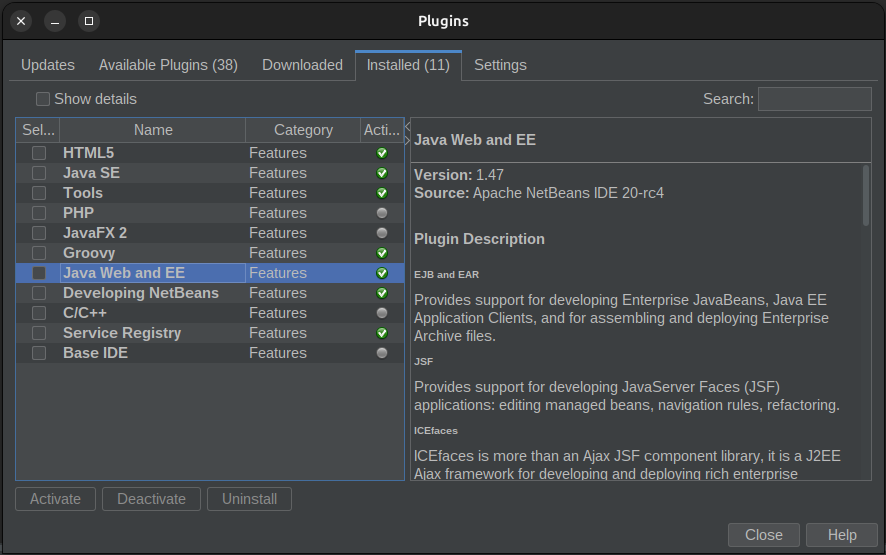
Make sure that the Java Web and EE feature is enabled at Tools → Plugins → Installed,
in order to have additional support for Micronaut, like code completion for configuration
and data elements.
As mentioned previously, the Micronaut framework includes both an HTTP server and an HTTP client. A low-level HTTP client is provided which you can use to test the HelloController created in the previous section.
In addition to a low-level client, the Micronaut framework features a declarative, compile-time HTTP client, powered by the Client annotation.
To create a client, create an interface annotated with @Client, for example:
To test the HelloClient, retrieve it from the ApplicationContext associated with the server:
The Client annotation produces an implementation automatically for you at compile time without the using proxies or runtime reflection.
The Client annotation is very flexible. See the section on the Micronaut HTTP Client for more information.
To deploy a Micronaut application you create an executable JAR file by running ./gradlew assemble or ./mvnw package.
The constructed JAR file can then be executed with java -jar. For example:
$ java -jar build/libs/hello-world-0.1-all.jarif building with Gradle, or
$ java -jar target/hello-world.jarif building with Maven.
The executable JAR can be run locally, or deployed to a virtual machine or managed Cloud service that supports executable JARs.
To publish a layered application to a Docker container registry, configure your Docker image name in build.gradle for Gradle:
dockerBuild {
images = ["[REPO_URL]/[NAMESPACE]/my-image:$project.version"]
}Then use dockerPush to push a built image of the application:
$ ./gradlew dockerPushFor Maven, define the following plugin in your POM:
<plugin>
<groupId>com.google.cloud.tools</groupId>
<artifactId>jib-maven-plugin</artifactId>
<configuration>
<to>
<image>docker.io/my-company/my-image:${project.version}</image>
</to>
</configuration>
</plugin>Then invoke the deploy lifecycle phase specifying the packaging type as either docker or docker-native:
$ ./mvnw deploy -Dpackaging=dockerDeployment Guides
See the following guides to learn more about deploying Micronaut Applications:
Dependency Injection (often referred to as Inversion of Control) is a pattern that allows your code to remain independent of configuration and allows the definition of loosely coupled applications. Reducing coupling increases the ability to test your application by ensuring code is not tied directly to an external systems (like a database).
Unlike other frameworks which rely on runtime reflection and proxies, the Micronaut framework uses compile time data to implement dependency injection.
This is a similar approach taken by tools such as Google Dagger, which is designed primarily with Android in mind. Micronaut, on the other hand, is designed for building server-side microservices and provides many of the same tools and utilities as other frameworks but without using reflection or caching excessive amounts of reflection metadata.
The goals of the Micronaut IoC container are summarized as:
-
Use reflection as a last resort
-
Avoid runtime-generated proxies
-
Optimize start-up time
-
Reduce memory footprint
-
Provide clear, understandable error handling
Note that the IoC part of the Micronaut framework can be used completely independently of Micronaut for whatever application type you wish to build.
To do so, configure your build to include the micronaut-inject-java dependency as an annotation processor.
The easiest way to do this is with Micronaut’s Gradle or Maven plugins. For example with Gradle:
The entry point for IoC is then the ApplicationContext interface, which includes a run method. The following example demonstrates using it:
ApplicationContext|
Note
|
The example uses Java try-with-resources syntax to ensure the ApplicationContext is cleanly shutdown when the application exits. |
A bean is an object whose lifecycle is managed by the Micronaut IoC container. That lifecycle may include creation, execution, and destruction. Micronaut implements the JSR-330 (jakarta.inject) - Dependency Injection for Java specification, hence to use Micronaut you simply use the annotations provided by jakarta.inject.
The following is a simple example:
public interface Engine { //
int getCylinders();
String start();
}@Singleton//
public class V8Engine implements Engine {
private int cylinders = 8;
@Override
public String start() {
return "Starting V8";
}
@Override
public int getCylinders() {
return cylinders;
}
public void setCylinders(int cylinders) {
this.cylinders = cylinders;
}
}To perform dependency injection, run the BeanContext using the run() method and lookup a bean using getBean(Class), as per the following example:
final ApplicationContext context = ApplicationContext.run();
Vehicle vehicle = context.getBean(Vehicle.class);
System.out.println(vehicle.start());The Micronaut framework automatically discovers dependency injection metadata on the classpath and wires the beans together according to injection points you define.
At this point, you may be wondering how Micronaut framework performs the above dependency injection without requiring reflection.
The key is a set of AST transformations (for Groovy) and annotation processors (for Java) that generate classes that implement the BeanDefinition interface.
Micronaut framework uses the ASM bytecode library to generate classes, and because Micronaut knows ahead of time the injection points, there is no need to scan all methods, fields, constructors, etc. at runtime like other frameworks such as Spring do.
Also, since reflection is not used when constructing the bean, the JVM can inline and optimize the code far better, resulting in better runtime performance and reduced memory consumption. This is particularly important for non-singleton scopes where application performance depends on bean creation performance.
In addition, with Micronaut framework your application startup time and memory consumption are not affected by the size of your codebase in the same way as with a framework that uses reflection. Reflection-based IoC frameworks load and cache reflection data for every single field, method, and constructor in your code. Thus, as your code grows in size so do your memory requirements, whilst with Micronaut this is not the case.
To help you easily understand what Micronaut is doing at startup and when a particular bean is created Micronaut includes a dependency injection tracing feature which can be activated in a number of different ways including via the ApplicationContextBuilder API.
The simplest way to activate injection trace mode is using an environment variable. For example if you are running your application locally you can do:
MICRONAUT_INJECT_TRACE=.+ ./gradlew runOr for Maven:
MICRONAUT_INJECT_TRACE=.+ ./mvnw mn:runTrace mode will output useful information such as:
-
The Configuration profile of the application
-
The applicable configuration and where it came from
-
The beans that are created, where they were created and how long was taken to create the bean.
The BeanContext is a container object for all your bean definitions (it also implements BeanDefinitionRegistry).
It is also the point of initialization for Micronaut. Generally speaking however, you don’t interact directly with the BeanContext API and can simply use jakarta.inject annotations and the annotations in the io.micronaut.context.annotation package for your dependency injection needs.
The Micronaut framework supports the following types of dependency injection:
-
Constructor injection (with an access level of public, protected, or default - and in case of multiple constructors, you can specify the one to be chosen, annotating it with
@Inject) -
Field injection
-
JavaBean property injection
-
Method parameter injection
|
Note
|
Classes or particular fields, methods can be excluded by adding an annotation @Vetoed |
|
Tip
|
See the guide for Micronaut Dependency Injection Types to learn more. |
Constructor injection is when dependencies are injected into the constructor for a type.
Constructor injection is the preferred and recommended injection type because Constructor injection:
-
Allows immutable types
-
Doesn’t require an additional annotation
-
Is less likely to result in a
NullPointerException -
More clearly expresses the dependencies of a particular type in one place.
The example in the next section uses constructor injection. Note that if you have multiple constructors you can disambiguate which constructor to invoke with the jakarta.inject.Inject annotation or the @Creator annotation:
In the above example retrieving the Vehicle type from the BeanContext will result in calling the Vehicle(Engine engine) constructor which will in turn resolve the Engine using the getDefault() method since it is annotated with @Creator.
|
Note
|
If no @Inject or @Creator is specified Micronaut will try to locate the first public constructor in the class otherwise a compilation error will occur.
|
If there are multiple possible candidates for a particular constructor argument a qualifier can be specified (such as jakarta.inject.Named) to disambiguate the injection. If it is not possible to disambiguate then the result will be a NonUniqueBeanException. See the Qualifiers section for more information.
|
Warning
|
If you use @Inject on a private constructor then the type will be instantiated via the Java reflection API which is not recommended.
|
You can inject non-final Java fields by annotating the field with jakarta.inject.Inject, for example:
-
Note that for Kotlin instead of an optional type (a type ending with
?) you can uselateinit var
Trying to inject a field that is declared final will result in a compilation error. Field injection should be seen as inferior to constructor injection as explained in the previous sections since it can result in the code being less-structured, harder to read and harder to test.
|
Warning
|
If the field is private scope or inaccessible then the field will be injected using the Java reflection API which is not recommended.
|
You can inject methods by annotating the method with jakarta.inject.Inject. For each argument of the method Micronaut will attempt to resolve the method argument as a bean. If any of the methods are not resolvable a NoSuchBeanException will be thrown.
|
Warning
|
If the method is private scope or inaccessible then the method will be injected using the Java reflection API which is not recommended.
|
Method injection can be useful if you need post construction initializers, however in general should be avoided in favour of constructor injection where possible.
Occasionally it is desirable for injection to be optional (ie. not fail with a NoSuchBeanException if there is no candidate bean available).
For example if you are trying to build an extensible system where a default implementation is provided by the type but consumers of your API can provide a bean that, if available, will be injected.
One way to make injection optional is to annotate the injected type with @Nullable which will result in null being injected by the framework if the bean is unavailable:
nullUsing @Nullable has the following considerations:
-
Can be used with any of the injection types (constructor, method or field injection)
-
Somewhere the code has to handle what happens if
nullis injected, for constructors this is easy since the constructor can handle thenull, but for fields and methods a@PostConstructmethod would need to be implemented to handlenullifnullis not desirable. -
Finally,
@Nullablecannot be used on primitive types likeint,longetc. when using configuration injection. To handle primitives you need to specify@Bindable(defaultValue="..")and provide a default value.
In addition to being able to inject beans, Micronaut framework natively supports injecting the following types:
| Type | Description | Example |
|---|---|---|
An |
|
|
An |
|
|
An |
|
|
A lazy |
|
|
A native array of beans of a given type |
|
|
A |
|
|
A |
|
|
Note
|
There are 3 different provider types supported, however the BeanProvider is the one we suggest to use.
|
|
Note
|
When injecting a In this example, the injected member variable |
|
Tip
|
A prototype bean will have one instance created per place the bean is injected. When a prototype bean is injected as a provider, each call to get() creates a new instance.
|
Collection Ordering
When injecting a collection of beans, they are not ordered by default. Implement the Ordered interface to inject an ordered collection. If the requested bean type does not implement Ordered, Micronaut framework searches for the @Order annotation on beans.
The @Order annotation is especially useful for ordering beans created by factories where the bean type is a class in a third-party library. In this example, both LowRateLimit and HighRateLimit implement the RateLimit interface.
imports
import io.micronaut.context.annotation.Factory;
import io.micronaut.core.annotation.Order;
import jakarta.inject.Singleton;
import java.time.Duration;@Factory
public class RateLimitsFactory {
@Singleton
@Order(20)
LowRateLimit rateLimit2() {
return new LowRateLimit(Duration.ofMinutes(50), 100);
}
@Singleton
@Order(10)
HighRateLimit rateLimit1() {
return new HighRateLimit(Duration.ofMinutes(50), 1000);
}
}When a collection of RateLimit beans are requested from the context, they are returned in ascending order based on the value in the annotation.
Injecting a Bean by Order
When injecting a single instance of a bean the @Order annotation can also be used to define which bean has the highest precedence and hence should be injected.
|
Note
|
The Ordered interface is not taken into account when selecting a single instance as this would require instantiating the bean to resolve the order. |
If you have multiple possible implementations for a given interface to inject, you need to use a qualifier.
Once again Micronaut framework leverages JSR-330 and the Qualifier and Named annotations to support this use case.
Qualifying By Name
To qualify by name, use the Named annotation. For example, consider the following classes:
public interface Engine { //
int getCylinders();
String start();
}@Singleton
public class V6Engine implements Engine { //
@Override
public String start() {
return "Starting V6";
}
@Override
public int getCylinders() {
return 6;
}
}@Singleton
public class V8Engine implements Engine { //
@Override
public String start() {
return "Starting V8";
}
@Override
public int getCylinders() {
return 8;
}
}Micronaut framework is capable of injecting V8Engine in the previous example, because:
@Named qualifier value (v8) + type being injected simple name (Engine) == (case-insensitive) == The simple name of a bean of type Engine (V8Engine)
You can also declare @Named at the class level of a bean to explicitly define the name of the bean.
Qualifying By Annotation
In addition to being able to qualify by name, you can build your own qualifiers using the Qualifier annotation. For example, consider the following annotation:
imports
import jakarta.inject.Qualifier;
import java.lang.annotation.Retention;
import static java.lang.annotation.RetentionPolicy.RUNTIME;@Qualifier
@Retention(RUNTIME)
public @interface V8 {
}The above annotation is itself annotated with the @Qualifier annotation to designate it as a qualifier. You can then use the annotation at any injection point in your code. For example:
@Inject Vehicle(@V8 Engine engine) {
this.engine = engine;
}Qualifying By Annotation Members
Since Micronaut framework 3.0, annotation qualifiers can also use annotation members to resolve the correct bean to inject. For example, consider the following annotation:
You can then use the @Cylinders annotation on any bean and the members that are not annotated with @NonBinding are considered during dependency resolution:
You can then use the @Cylinders qualifier on any injection point to select the correct bean to inject. For example:
@Inject Vehicle(@Cylinders(8) Engine engine) {
this.engine = engine;
}Qualifying by Generic Type Arguments
Since Micronaut framework 3.0, it is possible to select which bean to inject based on the generic type arguments of the class or interface. Consider the following example:
public interface CylinderProvider {
int getCylinders();
}The CylinderProvider interface provides the number of cylinders.
You can define implementations of the Engine interface with different generic type arguments. For example for a V6 engine:
public class V6 implements CylinderProvider {
@Override
public int getCylinders() {
return 6;
}
}The above defines a V6 class that implements the CylinderProvider interface.
And a V8 engine:
public class V8 implements CylinderProvider {
@Override
public int getCylinders() {
return 8;
}
}The above defines a V8 class that implements the CylinderProvider interface.
You can then use the generic arguments when defining the injection point and Micronaut framework will pick the correct bean to inject based on the specific generic type arguments:
@Inject
public Vehicle(Engine<V8> engine) {
this.engine = engine;
}In the above example the V8Engine bean is injected.
Primary and Secondary Beans
Primary is a qualifier that indicates that a bean is the primary bean to be selected in the case of multiple interface implementations.
Consider the following example:
public interface ColorPicker {
String color();
}ColorPicker is implemented by these classes:
imports
import io.micronaut.context.annotation.Primary;
import jakarta.inject.Singleton;@Primary
@Singleton
class Green implements ColorPicker {
@Override
public String color() {
return "green";
}
}The Green bean class implements ColorPicker and is annotated with @Primary.
imports
import jakarta.inject.Singleton;@Singleton
public class Blue implements ColorPicker {
@Override
public String color() {
return "blue";
}
}The Blue bean class also implements ColorPicker and hence you have two possible candidates when injecting the ColorPicker interface. Since Green is the primary, it will always be favoured.
If multiple possible candidates are present and no @Primary is defined a NonUniqueBeanException is thrown.
In addition to @Primary, there is also a Secondary annotation which causes the opposite effect and allows de-prioritizing a bean.
|
Tip
|
See the guide for Micronaut Patterns - Composite to learn more. |
Injecting Any Bean
If you are not particular about which bean gets injected then you can use the @Any qualifier which will inject the first available bean, for example:
@Inject @Any
Engine engine;The @Any qualifier is typically used in conjunction with the BeanProvider interface to allow more dynamic use cases. For example the following Vehicle implementation will start the Engine if the bean is present:
If there are multiple beans you can also adapt the behaviour. The following example starts all the engines installed in the Vehicle if any are present:
By default, when you annotate a bean with a scope such as @Singleton the bean class and all interfaces it implements and super classes it extends from become injectable via @Inject.
Consider the following example from the previous section on defining beans:
@Singleton
public class V8Engine implements Engine { //
@Override
public String start() {
return "Starting V8";
}
@Override
public int getCylinders() {
return 8;
}
}In the above case other classes in your application can choose to either inject the interface Engine or the concrete implementation V8Engine.
If this is undesirable you can use the typed member of the @Bean annotation to limit the exposed types. For example:
The following test demonstrates the behaviour of typed using programmatic lookup and the BeanContext API:
Micronaut framework features an extensible bean scoping mechanism based on JSR-330. The following default scopes are supported:
| Type | Description |
|---|---|
Singleton scope indicates only one instance of the bean will exist |
|
Context scope indicates that the bean will be created at the same time as the |
|
Prototype scope indicates that a new instance of the bean is created each time it is injected |
|
Infrastructure scope represents a bean that cannot be overridden or replaced using @Replaces because it is critical to the functioning of the system. |
|
|
|
|
|
|
|
Note
|
The @Prototype annotation is a synonym for @Bean because the default scope is prototype. |
Additional scopes can be added by defining a @Singleton bean that implements the CustomScope interface.
Note that when starting an ApplicationContext, by default @Singleton-scoped beans are created lazily and on-demand. This is by design to optimize startup time.
If this presents a problem for your use case you have the option of using the @Context annotation which binds the lifecycle of your object to the lifecycle of the ApplicationContext. In other words when the ApplicationContext is started your bean will be created.
Alternatively, annotate any @Singleton-scoped bean with @Parallel which allows parallel initialization of your bean without impacting overall startup time.
|
Note
|
If your bean fails to initialize in parallel, the application will be automatically shut down. |
Eager initialization of @Singleton beans maybe desirable in certain scenarios, such as on AWS Lambda where more CPU resources are assigned to Lambda construction than execution.
You can specify whether to eagerly initialize @Singleton-scoped beans using the ApplicationContextBuilder interface:
When you use Micronaut framework in environments such as Serverless Functions, you will not have an Application class, and instead you extend a Micronaut-provided class. In those cases, Micronaut provides methods which you can override to enhance the ApplicationContextBuilder
public class MyFunctionHandler extends MicronautRequestHandler<APIGatewayProxyRequestEvent, APIGatewayProxyResponseEvent> {
...
@Nonnull
@Override
protected ApplicationContextBuilder newApplicationContextBuilder() {
ApplicationContextBuilder builder = super.newApplicationContextBuilder();
builder.eagerInitSingletons(true);
return builder;
}
...
}@ConfigurationReader beans such as @EachProperty or @ConfigurationProperties are singleton beans. To eagerly init configuration but keep other @Singleton-scoped bean creation lazy, use eagerInitConfiguration:
The Refreshable scope is a custom scope that allows a bean’s state to be refreshed via:
-
/refreshendpoint. -
Publication of a RefreshEvent.
The following example illustrates @Refreshable scope behavior.
If you invoke latestForecast() twice, you will see identical responses such as "Scattered Clouds 01/Feb/18 10:29.199".
When the /refresh endpoint is invoked or a RefreshEvent is published, the instance is invalidated and a new instance is created the next time the object is requested. For example:
applicationContext.publishEvent(new RefreshEvent());Scopes can be defined on meta annotations that you can then apply to your classes. Consider the following example meta annotation:
In the example above the @Singleton annotation is applied to the @Driver annotation which results in every class that is annotated with @Driver being regarded as singleton.
Note that in this case it is not possible to alter the scope when the annotation is applied. For example, the following will not override the scope declared by @Driver and is invalid:
@Driver
@Prototype
class Foo {}For the scope to be overridable, instead use the DefaultScope annotation on @Driver which allows a default scope to be specified if none other is present:
In many cases, you may want to make available as a bean a class that is not part of your codebase such as those provided by third-party libraries. In this case, you cannot annotate the compiled class. Instead, implement a @Factory.
A factory is a class annotated with the Factory annotation that provides one or more methods annotated with a bean scope annotation. Which annotation you use depends on what scope you want the bean to be in. See the section on bean scopes for more information.
|
Note
|
The factory has the default scope singleton and will be destroyed with the context. If you want to dispose the factory after it produces a bean, use @Prototype scope. |
The return types of methods annotated with a bean scope annotation are the bean types. This is best illustrated by an example:
@Singleton
class CrankShaft {
}class V8Engine implements Engine {
private final int cylinders = 8;
private final CrankShaft crankShaft;
public V8Engine(CrankShaft crankShaft) {
this.crankShaft = crankShaft;
}
@Override
public String start() {
return "Starting V8";
}
}@Factory
class EngineFactory {
@Singleton
Engine v8Engine(CrankShaft crankShaft) {
return new V8Engine(crankShaft);
}
}In this case, a V8Engine is created by the EngineFactory class' v8Engine method. Note that you can inject parameters into the method, and they will be resolved as beans. The resulting V8Engine bean will be a singleton.
A factory can have multiple methods annotated with bean scope annotations, each one returning a distinct bean type.
|
Note
|
If you take this approach you should not invoke other bean methods internally within the class. Instead, inject the types via parameters. |
|
Tip
|
To allow the resulting bean to participate in the application context shutdown process, annotate the method with @Bean and set the preDestroy argument to the name of the method to be called to close the bean.
|
Beans from Fields
With Micronaut framework 3.0 or above it is also possible to produce beans from fields by declaring the @Bean annotation on a field.
Whilst generally this approach should be discouraged in favour for factory methods, which provide more flexibility it does simplify testing code. For example with bean fields you can easily produce mocks in your test code:
Note that only public or package protected fields are supported on non-primitive types. If the field is static, private, or protected a compilation error will occur.
|
Note
|
If the bean method/field includes a scope or a qualifier any scope or qualifiers from the type will be omitted. |
|
Note
|
Qualifiers from the factory instance aren’t inherited to the beans. |
Primitive Beans and Arrays
Since Micronaut framework 3.1 it is possible to define and inject primitive types and array types from factories.
For example:
Primitive beans can be injected like any other bean:
imports
import jakarta.inject.Named;
import jakarta.inject.Singleton;@Singleton
public class V8Engine {
private final int cylinders;
public V8Engine(@Named("V8") int cylinders) { //
this.cylinders = cylinders;
}
public int getCylinders() {
return cylinders;
}
}Note that primitive beans and primitive array beans have the following limitations:
-
AOP advice cannot be applied to primitives or wrapper types
-
Due to the above custom scopes that proxy are not supported
-
The
@Bean(preDestroy=..)member is not supported
Programmatically Disabling Beans
Factory methods can throw DisabledBeanException to conditionally disable beans. Using @Requires should always be the preferred method to conditionally create beans; throwing an exception in a factory method should only be done if using @Requires is not possible.
For example:
public interface Engine {
Integer getCylinders();
}@EachProperty("engines")
public class EngineConfiguration implements Toggleable {
private boolean enabled = true;
private Integer cylinders;
@NotNull
public Integer getCylinders() {
return cylinders;
}
public void setCylinders(Integer cylinders) {
this.cylinders = cylinders;
}
@Override
public boolean isEnabled() {
return enabled;
}
public void setEnabled(boolean enabled) {
this.enabled = enabled;
}
}@Factory
public class EngineFactory {
@EachBean(EngineConfiguration.class)
public Engine buildEngine(EngineConfiguration engineConfiguration) {
if (engineConfiguration.isEnabled()) {
return engineConfiguration::getCylinders;
} else {
throw new DisabledBeanException("Engine configuration disabled");
}
}
}Injection Point
A common use case with factories is to take advantage of annotation metadata from the point at which an object is injected such that behaviour can be modified based on said metadata.
Consider an annotation such as the following:
@Documented
@Retention(RUNTIME)
@Target(ElementType.PARAMETER)
public @interface Cylinders {
int value() default 8;
}The above annotation could be used to customize the type of engine we want to inject into a vehicle at the point at which the injection point is defined:
@Singleton
class Vehicle {
private final Engine engine;
Vehicle(@Cylinders(6) Engine engine) {
this.engine = engine;
}
String start() {
return engine.start();
}
}The above Vehicle class specifies an annotation value of @Cylinders(6) indicating an Engine of six cylinders is required.
To implement this use case, define a factory that accepts the InjectionPoint instance to analyze the defined annotation values:
|
Note
|
It is important to note that the factory is declared as @Prototype scope so the method is invoked for each injection point. If the V8Engine and V6Engine types are required to be singletons, the factory should use a Map to ensure the objects are only constructed once.
|
At times, you may want a bean to load conditionally based on various potential factors including the classpath, the configuration, the presence of other beans, etc.
The Requires annotation provides the ability to define one or many conditions on a bean.
Consider the following example:
@Singleton
@Requires(beans = DataSource.class)
@Requires(property = "datasource.url")
public class JdbcBookService implements BookService {
DataSource dataSource;
public JdbcBookService(DataSource dataSource) {
this.dataSource = dataSource;
}The above bean defines two requirements. The first indicates that a DataSource bean must be present for the bean to load. The second requirement ensures that the datasource.url property is set before loading the JdbcBookService bean.
If multiple beans require the same combination of requirements, you can define a meta-annotation with the requirements:
@Documented
@Retention(RetentionPolicy.RUNTIME)
@Target({ElementType.PACKAGE, ElementType.TYPE})
@Requires(beans = DataSource.class)
@Requires(property = "datasource.url")
public @interface RequiresJdbc {
}In the above example the RequiresJdbc annotation can be used on the JdbcBookService instead:
@RequiresJdbc
public class JdbcBookService implements BookService {
...
}If you have multiple beans that need to fulfill a given requirement before loading, you may want to consider a bean configuration group, as explained in the next section.
Configuration Requirements
The @Requires annotation is very flexible and can be used for a variety of use cases. The following table summarizes some possibilities:
| Requirement | Example |
|---|---|
Require the presence of one or more classes |
|
Require the absence of one or more classes |
|
Require the presence one or more beans |
|
Require the absence of one or more beans |
|
Require the environment to be applied |
|
Require the environment to not be applied |
|
Require the presence of another configuration package |
|
Require the absence of another configuration package |
|
Require particular SDK version |
|
Requires classes annotated with the given annotations to be available to the application via package scanning |
|
Require a property with an optional value |
|
Require a property to not be part of the configuration |
|
Require the presence of one or more files in the file system |
|
Require the presence of one or more classpath resources |
|
Require the current operating system to be in the list |
|
Require the current operating system to not be in the list |
|
Requires bean to be present in case no beanProperty specified |
|
Requires the specified property of bean to be present |
|
Additional Notes on Property Requirements.
Adding a requirement on a property has some additional functionality. You can require the property to be a certain value, not be a certain value, and use a default in those checks if it is not set.
Referencing bean properties in @Requires.
You can also reference other beans properties in @Requires to conditionally load beans. Similar to property requirements, you can specify required value or set the value bean property should not be equal to using notEquals annotation member. For the bean property to be checked, the bean of type specified in bean annotation member should be present within context, otherwise conditional bean will not be loaded.
Specified bean property is accessed through respective getter method whose presence and availability will be checked at compilation time.
Note that bean property is considered to be present in case it’s value is not null. Keep in mind that primitive properties are initialized with default values such as false for boolean and 0 for int, so they are considered to be set even if no value is explicitly specified for them.
Debugging Conditional Beans
If you have multiple conditions and complex requirements it may become difficult to understand why a particular bean has not been loaded.
To help resolve issues with conditional beans you can enable debug logging for the io.micronaut.context.condition package which will log the reasons why beans were not loaded.
<logger name="io.micronaut.context.condition" level="DEBUG"/>Consult the logging chapter for details howto setup logging.
One significant difference between Micronaut’s Dependency Injection system and Spring’s is the way beans are replaced.
In a Spring application, beans have names and are overridden by creating a bean with the same name, regardless of the type of the bean. Spring also has the notion of bean registration order, hence in Spring Boot you have @AutoConfigureBefore and @AutoConfigureAfter annotations that control how beans override each other.
This strategy leads to problems that are difficult to debug, for example:
-
Bean loading order changes, leading to unexpected results
-
A bean with the same name overrides another bean with a different type
To avoid these problems, Micronaut’s DI has no concept of bean names or load order. Beans have a type and a Qualifier. You cannot override a bean of a completely different type with another.
A useful benefit of Spring’s approach is that it allows overriding existing beans to customize behaviour. To support the same ability, Micronaut’s DI provides an explicit @Replaces annotation, which integrates nicely with support for Conditional Beans and clearly documents and expresses the intention of the developer.
Any existing bean can be replaced by another bean that declares @Replaces. For example, consider the following class:
@Singleton
@Requires(beans = DataSource.class)
@Requires(property = "datasource.url")
public class JdbcBookService implements BookService {
DataSource dataSource;
public JdbcBookService(DataSource dataSource) {
this.dataSource = dataSource;
}You can define a class in src/test/java that replaces this class just for your tests:
Factory Replacement
The @Replaces annotation also supports a factory argument. That argument allows the replacement of factory beans in their entirety or specific types created by the factory.
For example, it may be desired to replace all or part of the given factory class:
@Factory
public class BookFactory {
@Singleton
Book novel() {
return new Book("A Great Novel");
}
@Singleton
TextBook textBook() {
return new TextBook("Learning 101");
}
}|
Warning
|
To replace a factory entirely, your factory methods must match the return types of all methods in the replaced factory. |
In this example, BookFactory#textBook() is not replaced because this factory does not have a factory method that returns a TextBook.
@Factory
@Replaces(factory = BookFactory.class)
public class CustomBookFactory {
@Singleton
Book otherNovel() {
return new Book("An OK Novel");
}
}To replace one or more factory methods but retain the rest, apply the @Replaces annotation on the method(s) and denote the factory to apply to.
@Factory
public class TextBookFactory {
@Singleton
@Replaces(value = TextBook.class, factory = BookFactory.class)
TextBook textBook() {
return new TextBook("Learning 305");
}
}The BookFactory#novel() method will not be replaced because the TextBook class is defined in the annotation.
Default Implementation
When exposing an API, you may want to define an implementation of the interface that is used as the default when injecting a particular interface. For this you can use the @DefaultImplementation annotation.
It may also be desirable to not expose the default implementation of an interface as part of the public API by making it package private in Java.
Doing so prevents users from being able to replace the implementation because they will not be able to reference the class.
The @DefaultImplementation annotation allows the framework to establish the implementation to replace if a user creates a bean that declares @Replaces(YourInterface.class).
For example consider:
A public API contract
imports
import io.micronaut.context.annotation.DefaultImplementation;@DefaultImplementation(DefaultResponseStrategy.class)
public interface ResponseStrategy {
}The default implementation
imports
import jakarta.inject.Singleton;@Singleton
class DefaultResponseStrategy implements ResponseStrategy {
}The custom implementation
imports
import io.micronaut.context.annotation.Replaces;
import jakarta.inject.Singleton;@Singleton
@Replaces(ResponseStrategy.class)
public class CustomResponseStrategy implements ResponseStrategy {
}In the above example, the CustomResponseStrategy replaces the DefaultResponseStrategy because the DefaultImplementation annotation points to the DefaultResponseStrategy.
A bean @Configuration is a grouping of multiple bean definitions within a package.
The @Configuration annotation is applied at the package level and informs the Micronaut framework that the beans defined with the package form a logical grouping.
The @Configuration annotation is typically applied to package-info classes. For example:
@Configuration
package my.package
import io.micronaut.context.annotation.ConfigurationWhere this grouping becomes useful is when the bean configuration is made conditional via the @Requires annotation. For example:
@Configuration
@Requires(beans = javax.sql.DataSource)
package my.packageIn the above example, all bean definitions within the annotated package are only loaded and made available if a javax.sql.DataSource bean is present. This lets you implement conditional autoconfiguration of bean definitions.
|
Note
|
Java and Kotlin also support this functionality via package-info.java. Kotlin does not support a package-info.kt as of version 1.3.
|
When The Bean Is Constructed
To invoke a method when the bean is constructed, use the jakarta.annotation.PostConstruct annotation:
To manage when a bean is constructed, see the section on bean scopes.
When The Bean Is Destroyed
To invoke a method when the bean is destroyed, use the jakarta.annotation.PreDestroy annotation:
For factory beans, the preDestroy value in the Bean annotation tells Micronaut framework which method to invoke.
imports
import io.micronaut.context.annotation.Bean;
import io.micronaut.context.annotation.Factory;
import jakarta.inject.Singleton;@Factory
public class ConnectionFactory {
@Bean(preDestroy = "stop") //
@Singleton
public Connection connection() {
return new Connection();
}
}-
The
preDestroyvalue is set on the annotation
|
Note
|
Simply implementing the Closeable or AutoCloseable interface is not enough for a bean to be closed with the context. One of the above methods must be used.
|
Dependent Beans
Dependent beans are the beans used in the construction of your bean.
If the dependent bean’s scope is @Prototype or unknown, it will be destroyed along with your instance.
In some deployments, it is desirable to "gracefully" shut down an application, that is, to stop accepting new work but to finish in-progress tasks. In the Micronaut framework, a graceful shutdown means the following:
-
No new HTTP connections will be accepted
-
Existing connections will serve no new requests, but in-progress requests will still be served
-
Scheduled tasks will stop running, but in-progress tasks will finish uninterrupted
If the micronaut.lifecycle.graceful-shutdown.enabled config property is set to true, a graceful shutdown is
triggered automatically when the context stops (ApplicationContext.stop()). There is also a programmatic
GracefulShutdownManager API if you want more control over the shutdown process.
Graceful shutdown status can be read using the health management endpoint. This also returns the number of still-active tasks (e.g. connections or running scheduled tasks).
If you want to add graceful shutdown support to your own beans, implement
GracefulShutdownCapable. You will implement a shutdownGracefully method that triggers shutdown
and returns a future that should complete once the graceful shutdown is complete (e.g. all clients have closed their
connection). You can also optionally implement reportActiveTasks to give a number of active tasks for the health
endpoint.
The Micronaut framework supports a general event system through the context. The ApplicationEventPublisher API publishes events and the ApplicationEventListener API is used to listen to events. The event system is not limited to events that Micronaut publishes and supports custom events created by users. Context Events require Micronaut Context dependency:
implementation("io.micronaut:micronaut-context")micronaut-context is a transitive dependency of micronaut-http. If you use a Micronaut HTTP runtime, your project already includes the Micronaut-context dependency.
Publishing Events
The ApplicationEventPublisher API supports events of any type, although all events that the Micronaut framework publishes extend ApplicationEvent.
To publish an event, use dependency injection to obtain an instance of ApplicationEventPublisher where the generic type is the type of event and invoke the publishEvent method with your event object.
public class SampleEvent {
private String message = "Something happened";
public String getMessage() {
return message;
}
public void setMessage(String message) {
this.message = message;
}
}imports
import io.micronaut.context.event.ApplicationEventPublisher;
import jakarta.inject.Inject;
import jakarta.inject.Singleton;@Singleton
public class SampleEventEmitterBean {
@Inject
ApplicationEventPublisher<SampleEvent> eventPublisher;
public void publishSampleEvent() {
eventPublisher.publishEvent(new SampleEvent());
}
}|
Warning
|
Publishing an event is synchronous by default! The publishEvent method will not return until all listeners have been executed. Move this work off to a thread pool if it is time-intensive.
|
Listening for Events
To listen to an event, register a bean that implements ApplicationEventListener where the generic type is the type of event.
ApplicationEventListenerimports
import io.micronaut.context.event.ApplicationEventListener;
import io.micronaut.docs.context.events.SampleEvent;
import jakarta.inject.Singleton;@Singleton
public class SampleEventListener implements ApplicationEventListener<SampleEvent> {
private int invocationCounter = 0;
@Override
public void onApplicationEvent(SampleEvent event) {
invocationCounter++;
}
public int getInvocationCounter() {
return invocationCounter;
}
}imports
import io.micronaut.context.ApplicationContext;
import io.micronaut.docs.context.events.SampleEventEmitterBean;
import org.junit.jupiter.api.Test;
import static org.junit.jupiter.api.Assertions.assertEquals;class SampleEventListenerSpec {
@Test
void testEventListenerIsNotified() {
try (ApplicationContext context = ApplicationContext.run()) {
SampleEventEmitterBean emitter = context.getBean(SampleEventEmitterBean.class);
SampleEventListener listener = context.getBean(SampleEventListener.class);
assertEquals(0, listener.getInvocationCounter());
emitter.publishSampleEvent();
assertEquals(1, listener.getInvocationCounter());
}
}
}|
Note
|
The supports method can be overridden to further clarify events to be processed. |
Alternatively, use the @EventListener annotation if you do not wish to implement an interface or utilize one of the built-in events like StartupEvent and ShutdownEvent:
@EventListenerimports
import io.micronaut.docs.context.events.SampleEvent;
import io.micronaut.context.event.StartupEvent;
import io.micronaut.context.event.ShutdownEvent;
import io.micronaut.runtime.event.annotation.EventListener;@Singleton
public class SampleEventListener {
private int invocationCounter = 0;
@EventListener
public void onSampleEvent(SampleEvent event) {
invocationCounter++;
}
@EventListener
public void onStartupEvent(StartupEvent event) {
// startup logic here
}
@EventListener
public void onShutdownEvent(ShutdownEvent event) {
// shutdown logic here
}
public int getInvocationCounter() {
return invocationCounter;
}
}If your listener performs work that might take a while, use the @Async annotation to run the operation on a separate thread:
@EventListenerimports
import io.micronaut.docs.context.events.SampleEvent;
import io.micronaut.runtime.event.annotation.EventListener;
import io.micronaut.scheduling.annotation.Async;@Singleton
public class SampleEventListener {
private AtomicInteger invocationCounter = new AtomicInteger(0);
@EventListener
@Async
public void onSampleEvent(SampleEvent event) {
invocationCounter.getAndIncrement();
}
public int getInvocationCounter() {
return invocationCounter.get();
}
}imports
import io.micronaut.context.ApplicationContext;
import io.micronaut.docs.context.events.SampleEventEmitterBean;
import org.junit.jupiter.api.Test;
import static java.util.concurrent.TimeUnit.SECONDS;
import static org.awaitility.Awaitility.await;
import static org.hamcrest.Matchers.equalTo;
import static org.junit.jupiter.api.Assertions.assertEquals;class SampleEventListenerSpec {
@Test
void testEventListenerIsNotified() {
try (ApplicationContext context = ApplicationContext.run()) {
SampleEventEmitterBean emitter = context.getBean(SampleEventEmitterBean.class);
SampleEventListener listener = context.getBean(SampleEventListener.class);
assertEquals(0, listener.getInvocationCounter());
emitter.publishSampleEvent();
await().atMost(5, SECONDS).until(listener::getInvocationCounter, equalTo(1));
}
}
}The event listener by default runs on the scheduled executor. You can configure this thread pool as required in your configuration file (e.g application.yml):
micronaut.executors.scheduled.type=scheduled
micronaut.executors.scheduled.core-pool-size=30You can hook into the creation of beans using one of the following interfaces:
-
BeanInitializedEventListener - allows modifying or replacing a bean after properties have been set but prior to
@PostConstructevent hooks. -
BeanCreatedEventListener - allows modifying or replacing a bean after the bean is fully initialized and all
@PostConstructhooks called.
The BeanInitializedEventListener interface is commonly used in combination with Factory beans. Consider the following example:
public class V8Engine implements Engine {
private final int cylinders = 8;
private double rodLength; //
public V8Engine(double rodLength) {
this.rodLength = rodLength;
}
@Override
public String start() {
return "Starting V" + getCylinders() + " [rodLength=" + getRodLength() + ']';
}
@Override
public final int getCylinders() {
return cylinders;
}
public double getRodLength() {
return rodLength;
}
public void setRodLength(double rodLength) {
this.rodLength = rodLength;
}
}@Factory
public class EngineFactory {
private V8Engine engine;
private double rodLength = 5.7;
@PostConstruct
public void initialize() {
engine = new V8Engine(rodLength); //
}
@Singleton
public Engine v8Engine() {
return engine;//
}
public void setRodLength(double rodLength) {
this.rodLength = rodLength;
}
}The BeanCreatedEventListener interface is more typically used to decorate or enhance a fully initialized bean, for example by creating a proxy.
|
Important
|
Bean event listeners are initialized before type converters. If your event listener relies on type conversion either by relying on a configuration properties bean or by any other mechanism, you may see errors related to type conversion. |
Since Micronaut framework 1.1, a compile-time replacement for the JDK’s Introspector class has been included.
The BeanIntrospector and BeanIntrospection interfaces allow looking up bean introspections to instantiate and read/write bean properties without using reflection or caching reflective metadata, which consume excessive memory for large beans.
Unlike the JDK’s Introspector, every class is not automatically available for introspection. To make a class available for introspection you must at a minimum enable Micronaut’s annotation processor (micronaut-inject-java for Java and Kotlin and micronaut-inject-groovy for Groovy) in your build and ensure you have a runtime time dependency on micronaut-core.
annotationProcessor("io.micronaut:micronaut-inject-java")|
Note
|
For Kotlin, add the micronaut-inject-java dependency in kapt scope, and for Groovy add micronaut-inject-groovy in compileOnly scope.
|
runtimeOnly("io.micronaut:micronaut-core")Once your build is configured you have a few ways to generate introspection data.
The @Introspected annotation can be used on any class to make it available for introspection. Simply annotate the class with @Introspected:
imports
import io.micronaut.core.annotation.Introspected;@Introspected
public class Person {
private String name;
private int age = 18;
public Person(String name) {
this.name = name;
}
public String getName() {
return name;
}
public void setName(String name) {
this.name = name;
}
public int getAge() {
return age;
}
public void setAge(int age) {
this.age = age;
}
}Once introspection data has been produced at compile time, retrieve it via the BeanIntrospection API:
It’s possible to apply the introspection to all the classes in one package. Simply create package-info file and annotate the package with @Introspected.
@Introspected
@AccessorsStyle(readPrefixes = "", writePrefixes = "")
package io.micronaut.docs.ioc.introspection.pck.foobar;
import io.micronaut.core.annotation.AccessorsStyle;
import io.micronaut.core.annotation.Introspected;|
Warning
|
The package should contain only classes that can be introspected. |
|
Note
|
Only classes located directly within the package are processed; subpackages are ignored. |
It is possible to use the @AccessorsStyle annotation with @Introspected:
Now it is possible to retrieve the compile time generated introspection using the BeanIntrospection API:
val introspection = BeanIntrospection.getIntrospection(Person::class.java)
val person = introspection.instantiate("John", 42)
Assertions.assertEquals("John", person.name())
Assertions.assertEquals(42, person.age())By default, Java introspections treat only JavaBean getters/setters or Java 16 record components as bean properties. You can however define classes with public or package protected fields in Java using the accessKind member of the @Introspected annotation:
|
Note
|
The accessKind accepts an array, so it is possible to allow for both types of accessors but prefer one or the other depending on the order they appear in the annotation. The first one in the list has priority.
|
|
Important
|
Introspections on fields are not possible in Kotlin because it is not possible to declare fields directly. |
For classes with multiple constructors, apply the @Creator annotation to the constructor to use.
|
Note
|
This class has no default constructor, so calls to instantiate without arguments throw an InstantiationException. |
The @Creator annotation can be applied to static methods that create class instances.
|
Tip
|
There can be multiple "creator" methods annotated. If there is one without arguments, it will be the default construction method. The first method with arguments will be used as the primary construction method. |
If a type can only be constructed via the builder pattern then you can use the builder member of the @Introspected annotation to generate a dynamic builder. For example given this class:
@Introspected(builder = @Introspected.IntrospectionBuilder(
builderClass = Person.Builder.class
))
public class Person {
private final String name;
private final int age;
private Person(String name, int age) {
this.name = name;
this.age = age;
}
public String getName() {
return name;
}
public int getAge() {
return age;
}
public static Builder builder() {
return new Builder();
}
@Override
public boolean equals(Object o) {
if (this == o) return true;
if (o == null || getClass() != o.getClass()) return false;
Person person = (Person) o;
if (age != person.age) return false;
return Objects.equals(name, person.name);
}
@Override
public int hashCode() {
int result = name != null ? name.hashCode() : 0;
result = 31 * result + age;
return result;
}
public static final class Builder {
private String name;
private int age;
public Builder name(String name) {
this.name = name;
return this;
}
public Builder age(int age) {
this.age = age;
return this;
}
public Person build() {
Objects.requireNonNull(name);
if (age < 1) {
throw new IllegalArgumentException("Age must be a positive number");
}
return new Person(name, age);
}
}
}You can use the builder() method of the BeanIntrospection API to construct the instance:
BeanIntrospection<Person> introspection = BeanIntrospection.getIntrospection(Person.class);
BeanIntrospection.Builder<Person> builder = introspection.builder();
Person person = builder
.with("age", 25)
.with("name", "Fred")
.build();|
Tip
|
The builder() method also works regardless if the type uses a builder and can be used as a general abstraction for object construction. Note however that there is a slight performance overhead vs direct instantiation via the instantiate() method, hence the hasBuilder() method can be checked if optimized code paths are needed.
|
|
Note
|
Introspection Builder does not work with Groovy @Builder AST.
|
It is possible to introspect enums as well. Add the annotation to the enum, and it can be constructed through the standard valueOf method.
If the class to introspect is already compiled and not under your control, an alternative option is to define a configuration class with the classes member of the @Introspected annotation set.
imports
import io.micronaut.core.annotation.Introspected;@Introspected(classes = Person.class)
public class PersonConfiguration {
}In the above example the PersonConfiguration class generates introspections for the Person class.
|
Note
|
You can also use the packages member of the @Introspected which package scans at compile time and generates introspections for all classes within a package. Note however this feature is currently regarded as experimental.
|
If there is an existing annotation that you wish to introspect by default you can write an AnnotationMapper.
An example of this is EntityIntrospectedAnnotationMapper which ensures all beans annotated with javax.persistence.Entity are introspectable by default.
|
Note
|
The AnnotationMapper must be on the annotation processor classpath.
|
A BeanProperty provides raw access to read and write a property value for a given class and does not provide any automatic type conversion.
It is expected that the values you pass to the set and get methods match the underlying property type, otherwise an exception will occur.
To provide additional type conversion smarts the BeanWrapper interface allows wrapping an existing bean instance and setting and getting properties from the bean, plus performing type conversion as necessary.
Jackson is configured to use the BeanIntrospection API to read and write property values and construct objects, resulting in reflection-free serialization/deserialization. This is beneficial from a performance perspective and requires less configuration to operate correctly with runtimes such as GraalVM native.
This feature is enabled by default; disable it by setting the jackson.bean-introspection-module configuration to false.
|
Note
|
Currently only bean properties (private field with public getter/setter) are supported and usage of public fields is not supported. |
You can annotate a Kotlin Data Class with @Introspected:
@Introspected
data class UserDataClass(val name: String)and instantiate it with the BeanIntrospection API:
val introspection: BeanIntrospection<UserDataClass> = BeanIntrospection.getIntrospection(UserDataClass::class.java)
val user: UserDataClass = introspection.instantiate("John")|
Warning
|
Kotlin Inline Value Classes are not supported yet by the BeanIntrospection API. |
Since 4.1.x the @Mapper annotation can be used on any abstract method to automatically create a mapping between one type and another. Since 4.8.x the annotation can also be used for merging beans.
Inspired by similar functionality in libraries like Map Struct, a Mapper uses the Bean Introspection and Expressions features, built into the Micronaut Framework, which are already reflection free.
|
Note
|
For Mapping, base and target types need to be introspected. |
@Mapper Example
Given the following types:
@Introspected
public record ContactForm(String firstName, String lastName) {
}@Introspected
public record ContactEntity(Long id, String firstName, String lastName) {
}You can write an interface to define a mapping between both types by simply annotating a method with @Mapper.
imports
import io.micronaut.context.annotation.Mapper;public interface ContactMappers {
@Mapper
ContactEntity toEntity(ContactForm contactForm);
}The Micronaut compiler generates an implementation the previous an interface at compilation-time.
You can then inject a bean of type ContactMappers and easily map from one type to another.
ContactMappers contactMappers = context.getBean(ContactMappers.class);
ContactEntity contactEntity = contactMappers.toEntity(new ContactForm("John", "Snow"));
assertEquals("John", contactEntity.firstName());
assertEquals("Snow", contactEntity.lastName());@Mapping Example
Each abstract method can define a single @Mapper annotation or one or many @Mapping annotations to define how properties map onto the target type.
For example, given the following type:
imports
import io.micronaut.core.annotation.Introspected;@Introspected
public record Product(
String name,
double price,
String manufacturer) {
}It is common to want to alter this type’s representation in HTTP responses. For example, consider this response type:
imports
import io.micronaut.core.annotation.Introspected;@Introspected
public record ProductDTO(String name, String price, String distributor) {
}Here the price property is of a different type and an extra property exists called distributor. You could write manual logic to deal the mapping and these differences, or you could define a mapping:
imports
import io.micronaut.context.annotation.Mapper.Mapping;
import jakarta.inject.Singleton;@Singleton
public interface ProductMappers {
@Mapping(
to = "price",
from = "#{product.price * 2}",
format = "$#.00"
)
@Mapping(
to = "distributor",
from = "#{this.getDistributor()}"
)
ProductDTO toProductDTO(Product product);
default String getDistributor() {
return "Great Product Company";
}
}The from member can be used to define either a property name on the source type or an expression that reads values from the method argument and transforms them in whatever way you choose, including invoking other methods of the instance.
|
Note
|
A @Mapping definition is only needed if you need to apply a transformation for the mapping to be successful. Other properties will be automatically mapped and converted.
|
You can retrieve from the context or inject a bean of type ProductMappers. Then, you can use the toProductDTO method to map from the Product type to the ProductDTO type:
ProductMappers productMappers = context.getBean(ProductMappers.class);
ProductDTO productDTO = productMappers.toProductDTO(new Product(
"MacBook",
910.50,
"Apple"
));
assertEquals("MacBook", productDTO.name());
assertEquals("$1821.00", productDTO.price());
assertEquals("Great Product Company", productDTO.distributor());Given the following types:
@Introspected
record ChristmasPresent(
String packagingColor,
String type,
Float weight,
String greetingCard
) {
}
@Introspected
record PresentPackaging(
Float weight,
String color
) {
}
@Introspected
record Present(
Float weight,
String type
) {
}You can write an interface and method to merge the types by simply specifying two or more arguments to the method and annotating the method with @Mapper. Optionally, define custom mapping rules using @Mapping.
imports
import io.micronaut.context.annotation.Mapper.Mapping;public interface ChristmasMappers {
@Mapping(from = "packaging.color", to = "packagingColor")
@Mapping(from = "#{packaging.weight + present.weight}", to = "weight")
@Mapping(from = "#{'Merry christmas'}", to = "greetingCard")
ChristmasPresent merge(PresentPackaging packaging, Present present);
}You can then inject the type ChristmasMappers and easily merge the types.
ChristmasMappers mappers = context.getBean(ChristmasMappers.class);
ChristmasPresent result = mappers.merge(
new PresentPackaging(1f, "red"),
new Present(10f, "teddy bear")
);
assertEquals(11f, result.weight());
assertEquals("red", result.packagingColor());
assertEquals("teddy bear", result.type());
assertEquals("Merry christmas", result.greetingCard());And much more is possible! See more mapping examples in the following snippet.
See the Micronaut Validation documentation.
The methods provided by Java’s AnnotatedElement API in general don’t provide the ability to introspect annotations without loading the annotations themselves. Nor do they provide any ability to introspect annotation stereotypes (often called meta-annotations; an annotation stereotype is where an annotation is annotated with another annotation, essentially inheriting its behaviour).
To solve this problem many frameworks produce runtime metadata or perform expensive reflection to analyze the annotations of a class.
The Micronaut framework instead produces this annotation metadata at compile time, avoiding expensive reflection and saving memory.
The BeanContext API can be used to obtain a reference to a BeanDefinition which implements the AnnotationMetadata interface.
For example the following code obtains all bean definitions annotated with a particular stereotype:
BeanContext beanContext = ... // obtain the bean context
Collection<BeanDefinition> definitions =
beanContext.getBeanDefinitions(Qualifiers.byStereotype(Controller.class))
for (BeanDefinition definition : definitions) {
AnnotationValue<Controller> controllerAnn = definition.getAnnotation(Controller.class);
// do something with the annotation
}The above example finds all BeanDefinition instances annotated with @Controller whether @Controller is used directly or inherited via an annotation stereotype.
Note that the getAnnotation method and the variations of the method return an AnnotationValue type and not a Java annotation. This is by design, and you should generally try to work with this API when reading annotation values, since synthesizing a proxy implementation is worse from a performance and memory consumption perspective.
If you require a reference to an annotation instance you can use the synthesize method, which creates a runtime proxy that implements the annotation interface:
Controller controllerAnn = definition.synthesize(Controller.class);This approach is not recommended however, as it requires reflection and increases memory consumption due to the use of runtime generated proxies, and should be used as a last resort, for example if you need an instance of the annotation to integrate with a third-party library.
Annotation Inheritance
The Micronaut framework will respect the rules defined in Java’s AnnotatedElement API with regard to annotation inheritance:
-
Annotations meta-annotated with Inherited will be available via the
getAnnotation*methods of the AnnotationMetadata API whilst those directly declared are available via thegetDeclaredAnnotation*methods. -
Annotations not meta-annotated with Inherited will not be included in the metadata
The Micronaut framework differs from the AnnotatedElement API in that it extends these rules to methods and method parameters such that:
-
Any annotations annotated with AnnotatedElement and present on a method of interface or super class
Athat is overridden by child interface or classBwill be inherited into the AnnotationMetadata retrievable via the ExecutableMethod API from a BeanDefinition or an AOP interceptor. -
Any annotations annotated with Inherited and present on a method parameter of interface or super class
Athat is overridden by child interface or classBwill be inherited into the AnnotationMetadata retrievable via the Argument interface from thegetArgumentsmethod of the ExecutableMethod API.
In general behaviour which you may wish to override is not inherited by default including Bean Scopes, Bean Qualifiers, Bean Conditions, Validation Rules and so on.
If you wish a particular scope, qualifier, or set of requirements to be inherited when subclassing then you can define a meta-annotation that is annotated with @Inherited. For example:
With this meta-annotation in place you can add the annotation to a super class:
@SqlRepository
public abstract class BaseSqlRepository {
}And then a subclass will inherit all the annotations:
imports
import jakarta.inject.Named;
import javax.sql.DataSource;@Named("bookRepository")
public class BookRepository extends BaseSqlRepository {
private final DataSource dataSource;
public BookRepository(DataSource dataSource) {
this.dataSource = dataSource;
}
}|
Note
|
A child class must at least have one bean definition annotation such as a scope or qualifier. |
Aliasing / Mapping Annotations
There are times when you may want to alias the value of an annotation member to the value of another annotation member. To do this, use the @AliasFor annotation.
A common use case is for example when an annotation defines the value() member, but also supports other members. for example the @Client annotation:
With these aliases in place, whether you define @Client("foo") or @Client(id="core-foo"), both the value and id members will be set, making it easier to parse and work with the annotation.
If you do not have control over the annotation, another approach is to use an AnnotationMapper. To create an AnnotationMapper, do the following:
-
Implement the AnnotationMapper interface
-
Define a
META-INF/services/io.micronaut.inject.annotation.AnnotationMapperfile referencing the implementation class -
Add the JAR file containing the implementation to the
annotationProcessorclasspath (kaptfor Kotlin)
|
Note
|
Because AnnotationMapper implementations must be on the annotation processor classpath, they should generally be in a project that includes few external dependencies to avoid polluting the annotation processor classpath.
|
The following is an example AnnotationMapper that improves the introspection capabilities of JPA entities.
|
Note
|
The example above implements the NamedAnnotationMapper interface which allows for annotations to be mixed with runtime code. To operate against a concrete annotation type, use TypedAnnotationMapper instead, although note it requires the annotation class itself to be on the annotation processor classpath. |
You can use the @Import annotation to import beans from external, already compiled libraries that use JSR-330 annotations.
|
Note
|
Bean import is currently only supported in the Java language as other languages have limitations on classpath scanning during source code processing. |
For example, to import the JSR-330 TCK into an application, add a dependency on the TCK:
implementation("jakarta.inject:jakarta.inject-tck:2.0.1")Then define the @Import annotation on your Application class:
|
Note
|
In general @Import should be used in applications rather than libraries since if two libraries import the same beans the result will likely be a NonUniqueBeanException
|
As an alternative to the @Import annotation the @ClassImport annotation allows to process already compiled classes as if they were ordinary non-compiled classes. Internally all the type visitors will be run, allowing to create necessary metadata.
|
Note
|
Class import is currently only supported in the Java language as other languages have limitations on classpath scanning during source code processing. |
For example, to import the JSR-330 TCK into an application, add a dependency on the TCK:
implementation("jakarta.inject:jakarta.inject-tck:2.0.1")Then define the @ClassImport annotation on your Application class:
In the same way, it’s possible to import classes required for Micronaut Serialization or Micronaut Validation.
imports
package example;
import io.micronaut.context.annotation.ClassImport;
import io.micronaut.serde.annotation.Serdeable;@ClassImport(
packages = "my.external.library",
annotate = Serdeable.class)
public class Application {
}|
Note
|
At this moment, Micronaut doesn’t support reimporting classes already processed by the Micronaut annotation processor. |
There are scenarios where a class cannot be accessed to add or remove annotations for the annotation processor
The most used scenario is to modify the annotations when the class is imported with @ClassImport or a scenario when classes are generated and cannot be modified.
It’s possible to define a mixin class by annotating it with @Mixin and specifying which class does it reference.
All the annotations of the mixin will be copied to the original class and all the annotations of the constructor with matching parameters, fields of the same name and methods of the same name with matching parameters will be copied.
In this example we have a simple bean class included in an external library for which we want to apply Micronaut Serialization:
imports
package my.external.library;class MyBean {
String name;
}To add serialization annotations we can create a mixin that is referencing the original class:
|
Note
|
Mixins currently supported only for the Java language. |
Following the example from Importing Classes from Libraries of importing Jakarta Inject TCK, most of the beans from the TCK have the correct Jakarta Inject annotations except one bean which is not annotated at all, to fix that we can create a mixin to fix that:
imports
package example;
import io.micronaut.context.annotation.Bean;
import io.micronaut.context.annotation.ClassImport;
import io.micronaut.context.annotation.Mixin;
import org.atinject.tck.auto.FuelTank;@Mixin(FuelTank.class)
@Bean
class FuelTankMixin {
}
@ClassImport(packages = {"org.atinject.tck.auto", "org.atinject.tck.auto.accessories"})
class BeanImportTest {
}The mixin supports copying only specific annotations
by defining includeAnnotations, the set of annotations or packages that should be copied. Alternatively there is excludeAnnotation that will copy only annotations not excluded.
Each mixin point (constructor, method, field, parameter) can have specific rules of copying using @Filter.
The annotation @Filter also support removing existing annotations of the original class.
In this example all the Jakarta Validation are removed from the original method referenced by the mixin:
|
Note
|
Mixins only modify the Micronaut annotations metadata model. Original classes are not modified in any way. |
In Java, you can use annotations showing whether a variable can or cannot be null. Such annotations aren’t part of the standard library.
Micronaut’s Nullability Annotations
Micronaut framework provides first-class nullability annotations:
-
@NonNull — the annotated element must never be null.
-
@Nullable — the annotated element may be null.
-
@NullMarked — sets a default non-null policy within the annotated scope (package, type, or method), unless overridden.
These annotations are designed for use on parameters, return values, fields, and type-use positions (for example, generic type arguments).
|
Note
|
Micronaut will default to the non-null policy in most of the places if not defined explicitly as nullable |
Why does the Micronaut framework add its own set of nullability annotations instead of using one of the existing nullability annotations libraries?
Throughout the history of the framework, we used other nullability annotation libraries. However, licensing issues made us change nullability annotations several times. To avoid having to change nullability annotations in the future, we added our own set of nullability annotations in Micronaut framework 2.4
Are Micronaut Nullability annotations recognized by Kotlin?
Kotlin does not recognize Micronaut framework’s nullability annotations. However, Micronaut supports other nullability annotations via AnnotationMapper.
|
Note
|
Micronaut framework supports other known nullability annotations from: Android, FindBugs, Javax, Eclipse, JetBrains, JSpecify |
To better support Kotlin, we recommended to use JSpecify or any other Kotlin recognizable nullability annotations.
Micronaut supports JSpecify annotations as an alternative to its own. Internally they are simply remapped to the Micronaut ones.
-
org.jspecify.annotations.Nullable— the annotated value may be null. -
org.jspecify.annotations.NonNull— expresses a not-null contract for the annotated element. -
org.jspecify.annotations.NullMarked— sets a default non-null policy within the annotated scope (package, type, or method), unless overridden.
|
Warning
|
There is a difference how the annotations should be put on an array field. Micronaut supports @io.micronaut.core.annotation.Nullable String[] myField but for JSpecify the correct syntax is String @org.jspecify.annotations.Nullable [] myField, the opposite will only mark the array component as nullable.
|
|
Note
|
You may mix JSpecify with Micronaut’s nullability annotations; however, prefer a single, consistent approach within a module or package to keep intent clear and reduce ambiguity. |
|
Tip
|
Adopt @NullMarked on a package or type to make non-null the default, then annotate only the exceptional cases with @Nullable.
|
The following class uses JSpecify to declare non-null by default with @NullMarked, and annotates only the few nullable cases:
imports
import org.jspecify.annotations.NullMarked;
import org.jspecify.annotations.Nullable;
import org.jspecify.annotations.NonNull;
import jakarta.inject.Singleton;@Singleton
@NullMarked
final class AccountService {
// Non-null by default due to @NullMarked
String greet(String name) {
return "Hello, " + name;
}
// Nullable return and parameter explicitly marked
@Nullable
String findNickname(@Nullable String userId) {
if (userId == null) {
return null;
}
// Lookup may return null if not found
return null;
}
}Micronaut framework has integrations with Spring in several forms. See the Micronaut Spring Documentation for more information.
Since Micronaut dependency injection is based on annotation processors and doesn’t rely on reflection, it can be used on Android when using the Android plugin 3.0.0 or higher.
This lets you use the same application framework for both your Android client and server implementation.
Configuring Your Android Build
To get started, add the Micronaut annotation processors to the processor classpath using the annotationProcessor dependency configuration.
Include the Micronaut micronaut-inject-java dependency in both the annotationProcessor and compileOnly scopes of your Android build configuration:
dependencies {
...
annotationProcessor "io.micronaut:micronaut-inject-java:4.10.31"
compileOnly "io.micronaut:micronaut-inject-java:4.10.31"
...
}If you use lint as part of your build you may also need to disable the invalid packages check since Android includes a hard-coded check that regards the jakarta.inject package as invalid unless you use Dagger:
android {
...
lintOptions {
lintOptions { warning 'InvalidPackage' }
}
}You can find more information on configuring annotations processors in the Android documentation.
|
Note
|
Micronaut inject-java dependency uses Android Java 8 support features.
|
Enabling Dependency Injection
Once you have configured the classpath correctly, the next step is start the ApplicationContext.
The following example demonstrates creating a subclass of android.app.Application for that purpose:
Micronaut features a flexible configuration mechanism that allows reading configuration from a variety of sources into a unified model that can be bound to Java types annotated with @ConfigurationProperties.
Configuration can by default be provided in Java properties files or JSON with the ability to add support for more formats (such as YAML or Groovy configuration) by adding additional third-party libraries to your classpath. The convention is to search for a file named application.properties or application.json with support for other formats requiring additional dependencies as described by the following table:
| Format | File | Dependency Required |
|---|---|---|
|
|
|
|
|
|
|
|
|
|
|
In addition, Micronaut framework allows overriding any property via system properties or environment variables.
Each source of configuration is modeled with the PropertySource interface and the mechanism is extensible, allowing the implementation of additional PropertySourceLoader implementations.
The application environment is modelled by the Environment interface, which allows specifying one or many unique environment names when creating an ApplicationContext.
ApplicationContext applicationContext = ApplicationContext.run("test", "android");
Environment environment = applicationContext.getEnvironment();
assertTrue(environment.getActiveNames().contains("test"));
assertTrue(environment.getActiveNames().contains("android"));The active environment names allow loading different configuration files depending on the environment, and also using the @Requires annotation to conditionally load beans or bean @Configuration packages.
In addition, the Micronaut framework attempts to detect the current environments. For example within a Spock or JUnit test the TEST environment is automatically active.
Additional active environments can be specified using the micronaut.environments system property or the MICRONAUT_ENVIRONMENTS environment variable. These are specified as a comma-separated list. For example:
$ java -Dmicronaut.environments=foo,bar -jar myapp.jarThe above activates environments called foo and bar.
It is also possible to enable the detection of the Cloud environment the application is deployed to (this feature is disabled by default since Micronaut framework 4). See the section on Cloud Configuration for more information.
The Micronaut framework loads property sources based on the environments specified, and if the same property key exists in multiple property sources specific to an environment, the environment order determines which value to use.
The Micronaut framework uses the following hierarchy for environment processing (lowest to highest priority):
-
Deduced environments
-
Environments from the
micronaut.environmentssystem property -
Environments from the
MICRONAUT_ENVIRONMENTSenvironment variable -
Environments specified explicitly through the application context builder
NoteThis also applies to @MicronautTest(environments = …)
Automatic detection of environments can be disabled by setting the micronaut.env.deduction system property or the MICRONAUT_ENV_DEDUCTION environment variable to false. This prevents the Micronaut framework from detecting current environments, while still using any environments that are specifically provided as shown above.
$ java -Dmicronaut.env.deduction=false -jar myapp.jarAlternatively, you can disable environment deduction using the ApplicationContextBuilder deduceEnvironment method when setting up your application.
@Test
void testDisableEnvironmentDeductionViaBuilder() {
ApplicationContext ctx = ApplicationContext.builder()
.deduceEnvironment(false)
.properties(Collections.singletonMap("micronaut.server.port", -1))
.start();
assertFalse(ctx.getEnvironment().getActiveNames().contains(Environment.TEST));
ctx.close();
}The Micronaut framework supports the concept of one or many default environments.
A default environment is one that is only applied if no other environments are explicitly specified or deduced.
Environments can be explicitly specified either through the application context builder Micronaut.build().environments(…), through the micronaut.environments system property, or the MICRONAUT_ENVIRONMENTS environment variable.
Environments can be deduced to automatically apply the environment appropriate for cloud deployments.
If an environment is found through any of the above means, the default environment will not be applied.
To set the default environments, include a public static class that implements ApplicationContextConfigurer and is annotated with ContextConfigurer:
public class Application {
@ContextConfigurer
public static class DefaultEnvironmentConfigurer implements ApplicationContextConfigurer {
@Override
public void configure(@NonNull ApplicationContextBuilder builder) {
builder.defaultEnvironments(defaultEnvironment);
}
}
public static void main(String[] args) {
Micronaut.run(Application.class, args);
}
}|
Note
|
Previously, we recommended using Micronaut.defaultEnvironments("dev") however this does not allow the Ahead of Time (AOT) compiler to detect the default environments.
|
Since Micronaut framework 2.3 a banner is shown when the application starts. It is enabled by default, and it also shows the Micronaut version.
$ ./gradlew run
__ __ _ _
| \/ (_) ___ _ __ ___ _ __ __ _ _ _| |_
| |\/| | |/ __| '__/ _ \| '_ \ / _` | | | | __|
| | | | | (__| | | (_) | | | | (_| | |_| | |_
|_| |_|_|\___|_| \___/|_| |_|\__,_|\__,_|\__|
Micronaut (4.10.31)
17:07:22.997 [main] INFO io.micronaut.runtime.Micronaut - Startup completed in 611ms. Server Running: http://localhost:8080To customize the banner with your own ASCII Art (just plain ASCII at this moment), create the file src/main/resources/micronaut-banner.txt and it will be used instead.
To disable it, modify your Application class:
Additional PropertySource instances can be added to the environment prior to initializing the ApplicationContext.
ApplicationContext applicationContext = ApplicationContext.run(
PropertySource.of(
"test",
CollectionUtils.mapOf(
"micronaut.server.host", "foo",
"micronaut.server.port", 8080
)
),
"test", "android");
Environment environment = applicationContext.getEnvironment();
assertEquals("foo", environment.getProperty("micronaut.server.host", String.class).orElse("localhost"));The PropertySource.of method can be used to create a PropertySource from a map of values.
Alternatively one can register a PropertySourceLoader by creating a META-INF/services/io.micronaut.context.env.PropertySourceLoader file containing a reference to the class name of the PropertySourceLoader.
Included PropertySource Loaders
Micronaut framework by default contains PropertySourceLoader implementations that load properties from the given locations and priority:
-
Command line arguments
-
Properties from
SPRING_APPLICATION_JSON(for Spring compatibility) -
Properties from
MICRONAUT_APPLICATION_JSON -
Java System Properties
-
OS environment variables
-
Configuration files loaded in order from the system property 'micronaut.config.files' or the environment variable
MICRONAUT_CONFIG_FILES. The value can be a comma-separated list of paths with the last file having precedence. The files can be referenced from:-
the file system as an absolute path (without any prefix),
-
the classpath with a
classpath:prefix.
-
-
Environment-specific properties from
application-{environment}.{extension} -
Application-specific properties from
application.{extension}
|
Note
|
'micronaut.config.files' will be ignored in bootstrap.yml or application.yml. Loading additional configuration files from a configuration file is not supported |
|
Tip
|
.properties, .json, .yml are supported out of the box. For Groovy users .groovy is supported as well.
|
Note that if you want full control of where your application loads configuration from you can disable the default PropertySourceLoader implementations listed above by calling the enableDefaultPropertySources(false) method of the ApplicationContextBuilder interface when starting your application.
In this case only explicit PropertySource instances that you add via the propertySources(..) method of the ApplicationContextBuilder interface will be used.
Supplying Configuration via Command Line
Configuration can be supplied at the command line using Gradle or our Maven plugin. For example:
$ ./gradlew run --args="-endpoints.health.enabled=true -config.property=test"$ ./mvnw mn:run -Dmn.appArgs="-endpoints.health.enabled=true -config.property=test"For the configuration to be a part of the context, the args from the main method must be passed to the context builder. For example:
imports
import io.micronaut.runtime.Micronaut;public class Application {
public static void main(String[] args) {
Micronaut.run(Application.class, args); // passing args
}
}Secrets and Sensitive Configuration
It is important to note that it is not recommended to store sensitive configuration such as passwords and tokens within configuration files that can potentially be checked into source control systems.
It is good practise to instead externalize sensitive configuration completely from the application code using preferably an external secret manager system (there are many options here, many provided by Cloud providers) or environment variables that are set during the deployment of the application. You can also use property placeholders (see the following section), to customize names of the environment variables to use and supply default values:
datasources.default.url=${JDBC_URL:`jdbc:mysql://localhost:3306/db`}
datasources.default.username=${JDBC_USER:root}
datasources.default.password=${JDBC_PASSWORD:}
datasources.default.dialect=MYSQL
datasources.default.driverClassName=${JDBC_DRIVER:com.mysql.cj.jdbc.Driver}To securely externalize configuration consider using a secrets manager system supported by the Micronaut framework such as:
Property Value Placeholders
As mentioned in the previous section, the Micronaut framework includes a property placeholder syntax to reference configuration properties both within configuration values and with any Micronaut annotation. See @Value and the section on Configuration Injection.
|
Tip
|
Programmatic usage is also possible via the PropertyPlaceholderResolver interface. |
The basic syntax is to wrap a reference to a property in ${…}. For example:
myapp.endpoint=http://${micronaut.server.host}:${micronaut.server.port}/fooThe above example embeds references to the micronaut.server.host and micronaut.server.port properties.
You can specify default values by defining a value after the : character. For example:
myapp.endpoint=http://${micronaut.server.host:localhost}:${micronaut.server.port:8080}/fooThe above example defaults to localhost and port 8080 if no value is found (rather than throwing an exception). Note that if the default value contains a : character, you must escape it using backticks:
myapp.endpoint=${server.address:`http://localhost:8080`}/fooThe above example looks for a server.address property and defaults to http://localhost:8080. This default value is escaped with backticks since it has a : character.
Property Value Binding
Note that these property references should be in kebab case (lowercase and hyphen-separated) when placing references in code or in placeholder values. For example, use micronaut.server.default-charset and not micronaut.server.defaultCharset.
The Micronaut framework still allows specifying the latter in configuration, but normalizes the properties into kebab case form to optimize memory consumption and reduce complexity when resolving properties. The following table summarizes how properties are normalized from different sources:
| Configuration Value | Resulting Properties | Property Source |
|---|---|---|
|
|
Properties, YAML etc. |
|
|
Properties, YAML etc. |
|
|
Properties, YAML etc. |
|
|
Environment Variable |
|
|
Environment Variable |
Environment variables are treated specially to allow more flexibility. Note that there is no way to reference an environment variable with camel-case.
|
Important
|
Because the number of properties generated is exponential based on the number of _ characters in an environment variable, it is recommended to refine which, if any, environment variables are included in configuration if the number of environment variables with multiple underscores is high.
|
|
Important
|
Because of the way |
To control how environment properties participate in configuration, call the respective methods on the Micronaut builder.
imports
import io.micronaut.runtime.Micronaut;public class Application {
public static void main(String[] args) {
Micronaut.build(args)
.mainClass(Application.class)
.environmentPropertySource(false)
//or
.environmentVariableIncludes("THIS_ENV_ONLY")
//or
.environmentVariableExcludes("EXCLUDED_ENV")
.start();
}
}|
Note
|
The configuration above does not have any impact on property placeholders. It is still possible to reference an environment variable in a placeholder regardless of whether environment configuration is disabled, or even if the specific property is explicitly excluded. |
Using Random Properties
You can use random values by using the following properties. These can be used in configuration files as variables like the following.
micronaut.application.name=myapplication
micronaut.application.instance.id=${random.shortuuid}| Property | Value |
|---|---|
random.port |
An available random port number |
random.int |
Random int |
random.integer |
Random int |
random.long |
Random long |
random.float |
Random float |
random.shortuuid |
Random UUID of only 10 chars in length (Note: As this isn’t full UUID, collision COULD occur) |
random.uuid |
Random UUID with dashes |
random.uuid2 |
Random UUID without dashes |
The random.int, random.integer, random.long and random.float properties supports a range suffix whose syntax is one of as follows:
-
(max)where max is an exclusive value -
[min,max]where min being inclusive and max being exclusive values.
instance.id=${random.int[5,10]}
instance.count=${random.int(5)}|
Note
|
The range could vary from negative to positive as well. |
Fail Fast Property Injection
For beans that inject required properties, the injection and potential failure will not occur until the bean is requested. To verify at startup that the properties exist and can be injected, the bean can be annotated with @Context. Context-scoped beans are injected at startup, and startup fails if any required properties are missing or cannot be converted to the required type.
|
Important
|
It is recommended to use this feature sparingly to ensure fast startup. |
You can inject configuration values into beans using the @Value annotation.
Using the @Value Annotation
Consider the following example:
Note that @Value can also be used to inject a static value. For example the following injects the number 10:
@Value("10")
int number;This is even more useful when used to compose injected values combining static content and placeholders. For example to set up a URL:
@Value("http://${my.host}:${my.port}")
URL url;In the above example the URL is constructed from two placeholder properties that must be present in configuration: my.host and my.port.
Remember that to specify a default value in a placeholder expression, you use the colon : character. However, if the default you specify includes a colon, you must escape the value with backticks. For example:
@Value("${my.url:`http://foo.com`}")
URL url;Note that there is nothing special about @Value itself regarding the resolution of property value placeholders.
Due to Micronaut’s extensive support for annotation metadata you can use property placeholder expressions on any annotation. For example, to make the path of a @Controller configurable you can do:
@Controller("${hello.controller.path:/hello}")
class HelloController {
...
}In the above case, if hello.controller.path is specified in configuration the controller will be mapped to the specified path, otherwise it will be mapped to /hello.
You can also make the target server for @Client configurable (although service discovery approaches are often better), for example:
@Client("${my.server.url:`http://localhost:8080`}")
interface HelloClient {
...
}In the above example the property my.server.url can be used to configure the client, otherwise the client falls back to a localhost address.
Using the @Property Annotation
Recall that the @Value annotation receives a String value which can be a mix of static content and placeholder expressions. This can lead to confusion if you attempt to do the following:
@Value@Value("my.url")
String url;In the above case the literal string value my.url is injected and set to the url field and not the value of the my.url property from your application configuration. This is because @Value only resolves placeholders within the value specified to it.
To inject a specific property name, you may be better off using @Property:
|
Note
|
Because it is not possible to define a default value with @Property, if the value doesn’t exist or cannot be converted to the required type, bean instantiation will fail.
|
The above instead injects the value of the my.engine.cylinders property resolved from application configuration. If the property cannot be found in configuration, an exception is thrown. As with other types of injection, the injection point can also be annotated with @Nullable to make the injection optional.
You can also use this feature to resolve sub maps. For example, consider the following configuration:
datasources.default.name=mydb
jpa.default.properties.hibernate.hbm2ddl.auto=update
jpa.default.properties.hibernate.show_sql=trueTo resolve a flattened map containing only the properties starting with hibernate, use @Property, for example:
@Property@Property(name = "jpa.default.properties")
Map<String, String> jpaProperties;The injected map will contain the keys hibernate.hbm2ddl.auto and hibernate.show_sql and their values.
|
Tip
|
The @MapFormat annotation can be used to customize the injected map depending on whether you want nested keys or flat keys, and it allows customization of the key style via the StringConvention enum. |
Since 4.0, Micronaut framework supports embedding evaluated expressions in annotation values using #{…} syntax which
allows to achieve even more flexibility while configuring your application.
@Value("#{ T(Math).random() }")
double injectedValue;Expressions can be defined whenever an annotation member accepts a string or an array of strings.
|
Note
|
Expressions are currently not supported for "type use" annotations (that declare ElementType.TYPE_USE).
|
@Singleton
@Requires(env = {"dev", "#{ 'test' }"})
public class EvaluatedExpressionInArray {}You can also embed one or more expressions in a string template in a similar manner to embedding properties with the ${…} syntax.
@Value("http://#{'hostname'}/#{'path'}")
String url;Evaluated Expressions are validated and compiled at build time which guarantees type safety at runtime.
Once an application is running expressions are evaluated on demand as part of annotation metadata resolution. The usage of expressions does not impact performance as evaluation process is completely reflection free.
Note that, for security reasons expressions cannot be dynamically compiled at runtime from potentially untrusted input. All expressions are compiled and checked statically during the compilation process of the application with errors reported as compilation failures.
In general, expressions can be treated as statement written using a programming language with reduced set of available features. Even though the complexity of expression is only limited by the list of supported syntax constructs, it is in general not recommended to place complex logic inside an expression as there are usually better ways to achieve the same result.
Using Expressions in Micronaut framework
Expressions can be used anywhere throughout the Micronaut framework and associated modules, but as an example, you can use them to implement simple scheduled job control, for example:
|
Tip
|
You can also use expressions to perform conditional routing using the @RouteCondition annotation. |
Evaluated Expression Language Reference
The Evaluated Expressions syntax supports the following functionality:
-
Literal Values
-
Math Operators
-
Comparison Operators
-
Logical Operators
-
Ternary Operator
-
Type References
-
Method Invocation
-
Property Access
-
Retrieving Beans from Bean Context
-
Retrieving Environment Properties
Literal Values
The following types of literal values are supported:
-
null -
boolean values (
true,false) -
strings, which need to be surrounded with single quotation mark (
') -
numeric values (
int,long,float,double)
Integer and Long values can also be specified in hexadecimal or octal notation. Float and Double values can also be specified in exponential notation. All numeric values can be negative as well.
#{ null }
#{ true }
#{ 'string value' }
#{ 10 }
#{ 0xFFL }
#{ 10L }
#{ .123f }
#{ 1E+1d }
#{ 123D }Math Operators
The supported mathematical operators are `, `-`, `*`, `/`, `%`, `^`. Math operators can only be applied to numeric
values (except ` which can be used for string concatenation as well). Mathematical operations are performed in order
enforced by standard operator precedence. You can also change evaluation order by using brackets ().
/ and % operators can be aliased by div and mod keywords respectively.
#{ 1 + 2 } // 3
#{ 'a' + 'b' + 'c' } // 'abc'
#{ 7 - 3 } // 4
#{ 7 * 3 } // 21
#{ 7 * ( 3 + 1) } // 28
#{ 15 / 3 } // 5
#{ 15 div 3 } // 5
#{ 15 % 3 } // 0
#{ 15 mod 3 } // 0
// Unlike in Java, ^ operator means exponentiation
#{ 3 ^ 2 } // 9Comparison Operators
The following comparison operators are supported: ==, !=, >, <, >=, <=, matches
Comparison operations are performed in order enforced by standard operator precedence.
You can also change evaluation order by using brackets ().
Equality check is supported for both primitive types and objects. It is performed using Object.equals() method.
>, <, >=, <= operations can be applied to numeric types or types that implement java.lang.Comparable
interface.
matches keyword can be used to determine whether a string matches provided regular expression which has to
be specified as string literal. The regular expression itself will be checked for validity at compilation time.
#{ 1 + 2 == 3 } // true
#{ 'abc' != 'abc' } // false
#{ 7 > 3 } // true
#{ 7 < 3 } // false
#{ 7 >= 7 } // true
#{ 7 <= 8 } // false
#{ 'AbC' matches '[A-Za-z*' } // Compilation failure
#{ 'AbC' matches '[A-Za-z]*' } // true
#{ 'AbC' matches '[a-z]*' } // falseLogical Operators
The following logical operators are supported:
-
&&(can be aliased withand) -
||(can be aliased withor), -
!(can be aliaded withnot) -
empty/not empty(works with strings, collections, arrays, and maps)
Logical operations are performed in order enforced by standard operator precedence.
You can also change evaluation order by using brackets ().
#{ true && false } // false
#{ true and true } // true
#{ true || false } // true
#{ false or false } // false
#{ !false } // true
#{ !!true } // true
#{ empty '' } // true
#{ not empty '' } // falseTernary Operator
A standard ternary operator is supported to allow specifying if-then-else conditional logic in expression
condition ? thenBranch : elseBranchwhere condition evaluation should provide boolean value, and the complexity of then and else branches is not
limited.
#{ 15 > 10 ? 'a' : 'b' } // 'a'
#{ 15 >= 16 ? 'a' : 'b' } // 'b'Dot and Safe Navigation Operator
The dot operator can be used to access methods and properties of a value within an expression. For example:
#{ collection.size() > 0 }
#{ foo.bar.name == "Fred" }You can also use the safe dereference operator ?. to navigate paths in a null safe way:
#{ foo?.bar?.name == "Fred" }|
Tip
|
When used, the safe dereference operator will also automatically unwrap Java’s Optional type.
|
Type References
A predefined syntax construct T(…) can be used to reference a class. The value inside brackets should be fully
qualified class name (including the package name). The only exception is java.lang.* classes which can be referenced
directly by only specifying the simple class name. Primitive types can not be referenced.
Type References are evaluated in different ways depending on the context.
Simple type reference
A simple type reference is resolved as a Class<?> object.
#{ T(java.lang.String) } // String.classSame rule applies if type reference is specified as a method argument.
Type check with instanceof
A Type Reference can be used as the right-hand side part of the instanceof operator
#{ 'abc' instanceof T(String) } // truewhich is equivalent to the following Java code and will be evaluated as a boolean value:
"abc" instanceof StringStatic method invocation
Type Reference can be used to invoke a static method of a class
#{ T(Math).random() }Expression Evaluation Context
By default, the only methods you can invoke inside Evaluated Expressions are static methods using type references.
The available methods can be extended by extended the evaluation context. There are two ways to extend the evaluation context. The first involves registering new context class via a custom TypeElementVisitor.
|
Note
|
The TypeElementVisitor has to be on the annotation processor classpath, therefore needs to be defined in a separate module that can be included on this classpath. |
Once a class is registered within evaluation context the methods and properties of the class are available for referencing in evaluated expressions.
Consider the following example:
imports
import jakarta.inject.Singleton;
import java.util.Random;@Singleton
public class CustomEvaluationContext {
private Random random = random = new Random();
public int generateRandom(int min, int max) {
return random.nextInt(max - min) + min;
}
}|
Note
|
The class should be resolvable as a bean can use jakarta.inject annotations to inject other types if necessary. In addition, for performance reasons all evaluation context classes are effectively singleton regardless of the defined scope.
|
Registering this class can be achieved with a custom implementation of ExpressionEvaluationContextRegistrar that is registered via service loader as a TypeElementVisitor (create a new META-INF/services/io.micronaut.inject.visitor.TypeElementVisitor file referencing the new class) and placed on the annotation processor classpath:
imports
import io.micronaut.expressions.context.ExpressionEvaluationContextRegistrar;public class ContextRegistrar implements ExpressionEvaluationContextRegistrar {
@Override
public String getContextClassName() {
return "io.micronaut.docs.expressions.CustomEvaluationContext";
}
}Method generateRandom(int, int) can now be used within Evaluated Expression in the following way:
imports
package io.micronaut.docs.expressions;
import io.micronaut.context.annotation.Value;
import jakarta.inject.Singleton;@Singleton
public class ContextConsumer {
@Value("#{ generateRandom(1, 10) }")
public int randomField;
}At runtime, the bean will be retrieved from application context and respective method will be invoked.
If a matching method is not found within evaluation context at compilation time, the compilation will fail. A compilation error will also occur if multiple suitable methods are found in the evaluation context, keep that in mind if you provide multiple ExpressionEvaluationContextRegistrar that a conflict can occur as these types are effectively global.
The methods will be considered ambiguous (leading to compilation failure) when their names are the same and list of provided arguments matches multiple methods parameters.
Using a ExpressionEvaluationContextRegistrar makes its methods and properties available for evaluated expressions within any annotation in a global manner.
However, you can also specify evaluation context scoped to concrete annotation or annotation member using @AnnotationExpressionContext.
Again context classes need to be explicitly defined as beans to make them available for retrieval from application context at runtime.
Method Invocation
You can invoke both static methods using type references, methods from evaluation context and methods on objects, which means method chaining is supported.
imports
import io.micronaut.context.annotation.Value;
import jakarta.inject.Singleton;@Singleton
class CustomEvaluationContext {
public String stringValue() {
return "stringValue";
}
}
@Singleton
class ContextConsumer {
@Value("#{ #stringValue().length() }")
public int stringLength;
}Varargs methods invocation is supported as well. Note that if last parameter of a method is an array, you can still invoke it providing list of arguments separated by comma without explicitly wrapping it into array. So in this case it will be treated in same way as if last method argument was explicitly specified as varargs parameter.
imports
import io.micronaut.context.annotation.Value;
import jakarta.inject.Singleton;@Singleton
class CustomEvaluationContext {
public int countIntegers(int... values) {
return values.length;
}
public int countStrings(String[] values) {
return values.length;
}
}
@Singleton
class ContextConsumer {
@Value("#{ #countIntegers(1, 2, 3) }")
public int totalIntegers;
@Value("#{ #countStrings('a', 'b', 'c') }")
public int totalStrings;
}Property Access
JavaBean properties can be accessed simply be referencing their names from evaluation context prefixed with #. Bean
properties can also be chained with dot in the same way as methods.
imports
import io.micronaut.context.annotation.Value;
import jakarta.inject.Singleton;@Singleton
class CustomEvaluationContext {
public String getName() {
return "Bob";
}
public int getAge() {
return 25;
}
}
@Singleton
class ContextConsumer {
@Value("#{ 'Name is ' + #name + ', age is ' + #age }")
public String value;
}Retrieving Beans from Bean Context
A predefined syntax construct ctx[…] can be used to retrieve beans from bean
context. The argument inside square brackets has to be a fully qualified class name (note that T(…) wrapper is
optional and can be omitted for simplicity).
#{ ctx[T(io.micronaut.example.ContextBean)] }
#{ ctx[io.micronaut.example.ContextBean] }Retrieving Environment Properties
A syntax construct env[…] can be used to retrieve environment properties by name.
The expression inside square brackets has to resolve to string value, otherwise compilation will fail. If property
value will be absent at runtime, the expression will return null
#{ env['test.property'] }You can create type-safe configuration by creating classes that are annotated with @ConfigurationProperties.
The Micronaut framework will produce a reflection-free @ConfigurationProperties bean and will also at compile time calculate the property paths to evaluate, greatly improving the speed and efficiency of loading @ConfigurationProperties.
For example:
Once you have prepared a type-safe configuration it can be injected into your beans like any other bean:
Configuration values can then be supplied from one of the PropertySource instances. For example:
Map<String, Object> map = new LinkedHashMap<>(1);
map.put("my.engine.cylinders", "8");
ApplicationContext applicationContext = ApplicationContext.run(map, "test");
Vehicle vehicle = applicationContext.getBean(Vehicle.class);
System.out.println(vehicle.start());The above example prints: "Ford Engine Starting V8 [rodLength=6.0]"
You can directly reference configuration properties in @Requires annotation to conditionally load beans using the following syntax: @Requires(bean=Config.class, beanProperty="property", value="true")
Note for more complex configurations you can structure @ConfigurationProperties beans through inheritance.
For example creating a subclass of EngineConfig with @ConfigurationProperties('bar') will resolve all properties under the path my.engine.bar.
Includes / Excludes
For the cases where the configuration properties class inherits properties from a parent class, it may be desirable to exclude properties from the parent class. The includes and excludes members of the @ConfigurationProperties annotation allow for that functionality. The list applies to both local properties and inherited properties.
The names supplied to the includes/excludes list must be the "property" name. For example if a setter method is injected, the property name is the de-capitalized setter name (setConnectionTimeout → connectionTimeout).
Change accessors style
Since 3.3, the Micronaut framework supports defining different accessors prefixes for getters and setter other than the default get and set defined for Java Beans. Annotate your POJO or @ConfigurationProperties class with the @AccessorsStyle annotation.
This is useful when you write the getters and setters in a fluent way. For example:
@AccessorsStyleNow you can inject EngineConfig and use it with engineConfig.manufacturer() and engineConfig.cylinders() to retrieve the values from configuration.
Property Type Conversion
The Micronaut framework uses the ConversionService bean to convert values when resolving properties. You can register additional converters for types not supported by Micronaut by defining beans that implement the TypeConverter interface.
The Micronaut framework features some built-in conversions that are useful, which are detailed below.
Duration Conversion
Durations can be specified by appending the unit with a number. Supported units are s, ms, m etc. The following table summarizes examples:
| Configuration Value | Resulting Value |
|---|---|
|
|
|
|
|
|
|
|
|
|
|
|
|
|
For example to configure the default HTTP client read timeout:
micronaut.http.client.read-timeout=15sList / Array Conversion
Lists and arrays can be specified in Java properties files as comma-separated values, or in YAML using native YAML lists. The generic types are used to convert the values. For example in YAML:
my.app.integers[0]=1
my.app.integers[1]=2
my.app.urls[0]=http://foo.com
my.app.urls[1]=http://bar.comFor the above example configurations you can define properties to bind to with the target type supplied via generics:
List<Integer> integers;
List<URL> urls;Readable Bytes
You can annotate any setter parameter with @ReadableBytes to allow the value to be set using a shorthand syntax for specifying bytes, kilobytes etc. For example the following is taken from HttpClientConfiguration:
@ReadableBytespublic void setMaxContentLength(@ReadableBytes int maxContentLength) {
this.maxContentLength = maxContentLength;
}With the above in place you can set micronaut.http.client.max-content-length using the following values:
| Configuration Value | Resulting Value |
|---|---|
|
10 megabytes |
|
10 kilobytes |
|
10 gigabytes |
|
A raw byte length |
Formatting Dates
The @Format annotation can be used on setters to specify the date format to use when binding java.time date objects.
@Format for Datespublic void setMyDate(@Format("yyyy-MM-dd") LocalDate date) {
this.myDate = date;
}Configuration Builder
Many frameworks and tools already use builder-style classes to construct configuration.
You can use the @ConfigurationBuilder annotation to populate a builder-style class with configuration values. ConfigurationBuilder can be applied to fields or methods in a class annotated with @ConfigurationProperties.
Since there is no consistent way to define builders in the Java world, one or more method prefixes can be specified in the annotation to support builder methods like withXxx or setXxx. If the builder methods have no prefix, assign an empty string to the parameter.
A configuration prefix can also be specified to tell the Micronaut framework where to look for configuration values. By default, builder methods use the configuration prefix specified in a class-level @ConfigurationProperties annotation.
For example:
|
Note
|
By default, only single-argument builder methods are supported. For methods with no arguments, set the allowZeroArgs parameter of the annotation to true.
|
Like in the previous example, we can construct an EngineImpl. Since we are using a builder, we can use a factory class to build the engine from the builder.
imports
import io.micronaut.context.annotation.Factory;
import jakarta.inject.Singleton;@Factory
class EngineFactory {
@Singleton
EngineImpl buildEngine(EngineConfig engineConfig) {
return engineConfig.builder.build(engineConfig.crankShaft, engineConfig.getSparkPlug());
}
}The engine that was returned can then be injected anywhere an engine is required.
Configuration values can be supplied from one of the PropertySource instances. For example:
Map<String, Object> properties = new HashMap<>();
properties.put("my.engine.cylinders" ,"4");
properties.put("my.engine.manufacturer" , "Subaru");
properties.put("my.engine.crank-shaft.rod-length", 4);
properties.put("my.engine.spark-plug.name" , "6619 LFR6AIX");
properties.put("my.engine.spark-plug.type" , "Iridium");
properties.put("my.engine.spark-plug.companyName", "NGK");
ApplicationContext applicationContext = ApplicationContext.run(properties, "test");
Vehicle vehicle = applicationContext.getBean(Vehicle.class);
System.out.println(vehicle.start());The above example prints: "Subaru Engine Starting V4 [rodLength=4.0, sparkPlug=Iridium(NGK 6619 LFR6AIX)]"
MapFormat
For some use cases it may be desirable to accept a map of arbitrary configuration properties that can be supplied to a bean, especially if the bean represents a third-party API where not all the possible configuration properties are known. For example, a datasource may accept a map of configuration properties specific to a particular database driver, allowing the user to specify any desired options in the map without coding each property explicitly.
For this purpose, the MapFormat annotation lets you bind a map to a single configuration property, and specify whether to accept a flat map of keys to values, or a nested map (where the values may be additional maps).
@Singleton
public class EngineImpl implements Engine {
@Inject
EngineConfig config;
@Override
public Map getSensors() {
return config.getSensors();
}
@Override
public String start() {
return "Engine Starting V" + getConfig().getCylinders() +
" [sensors=" + getSensors().size() + "]";
}
public EngineConfig getConfig() {
return config;
}
public void setConfig(EngineConfig config) {
this.config = config;
}
}Now a map of properties can be supplied to the my.engine.sensors configuration property.
Map<String, Object> map = new LinkedHashMap<>(2);
map.put("my.engine.cylinders", "8");
Map<Integer, String> map1 = new LinkedHashMap<>(2);
map1.put(0, "thermostat");
map1.put(1, "fuel pressure");
map.put("my.engine.sensors", map1);
ApplicationContext applicationContext = ApplicationContext.run(map, "test");
Vehicle vehicle = applicationContext.getBean(Vehicle.class);
System.out.println(vehicle.start());The above example prints: "Engine Starting V8 [sensors=2]"
|
Tip
|
See the guide for @Configuration and @ConfigurationBuilder to learn more. |
The Micronaut framework includes an extensible type conversion mechanism. To add additional type converters you register beans of type TypeConverter.
The following example shows how to use one of the built-in converters (Map to an Object) or create your own.
Consider the following ConfigurationProperties:
@ConfigurationProperties(MyConfigurationProperties.PREFIX)
public class MyConfigurationProperties {
public static final String PREFIX = "myapp";
protected LocalDate updatedAt;
public LocalDate getUpdatedAt() {
return updatedAt;
}
}The type MyConfigurationProperties has a property named updatedAt of type LocalDate.
To bind this property from a map via configuration:
This won’t work by default, since there is no built-in conversion from Map to LocalDate. To resolve this, define a custom TypeConverter:
|
Note
|
It’s possible to add a custom type converter into ConversionService.SHARED by registering it in a TypeConverterRegistrar via the service loader.
|
The @ConfigurationProperties annotation is great for a single configuration class, but sometimes you want multiple instances, each with its own distinct configuration. That is where EachProperty comes in.
The @EachProperty annotation creates a ConfigurationProperties bean for each sub-property within the given name. As an example consider the following class:
|
Note
|
Micronaut configuration uses kebap case, not lower camel case. For example, using @EachProperty("my-bean") works, but @EachProperty("myBean") fails.
|
The above DataSourceConfiguration defines a url property to configure one or more data sources. The URLs themselves can be configured using any of the PropertySource instances evaluated to Micronaut:
ApplicationContext applicationContext = ApplicationContext.run(PropertySource.of(
"test",
CollectionUtils.mapOf(
"test.datasource.one.url", "jdbc:mysql://localhost/one",
"test.datasource.two.url", "jdbc:mysql://localhost/two")
));In the above example two data sources (called one and two) are defined under the test.datasource prefix defined earlier in the @EachProperty annotation. Each of these configuration entries triggers the creation of a new DataSourceConfiguration bean such that the following test succeeds:
List-Based Binding
The default behavior of @EachProperty is to bind from a map style of configuration, where the key is the named qualifier of the bean and the value is the data to bind from. For cases where map style configuration doesn’t make sense, it is possible to inform the Micronaut framework that the class is bound from a list. Simply set the list member on the annotation to true.
The @EachProperty annotation is a great way to drive dynamic configuration, but typically you want to inject that configuration into another bean that depends on it. Injecting a single instance with a hard-coded qualifier is not a great solution, hence @EachProperty is typically used in combination with @EachBean:
|
Note
|
@EachBean requires that the parent bean has a @Named qualifier, since the qualifier is inherited by each bean created by @EachBean.
|
In other words, to retrieve the DataSource created by test.datasource.one you can do:
Since 1.3, Micronaut framework supports the definition of immutable configuration. Immutable configuration with an interface requires the Micronaut Context dependency.
implementation("io.micronaut:micronaut-context")micronaut-context is a transitive dependency of micronaut-http. If you use a Micronaut HTTP runtime, your project already includes the Micronaut-context dependency.
There are two ways to define immutable configuration. The preferred way is to define an interface annotated with @ConfigurationProperties. For example:
In this case the Micronaut framework provides a compile-time implementation that delegates all getters to call the getProperty(..) method of the Environment interface.
This has the advantage that if the application configuration is refreshed (for example by invoking the /refresh endpoint), the injected interface automatically sees the new values.
|
Note
|
If you try to specify any other abstract method other than a getter, a compilation error occurs (default methods are supported). |
Another way to implement immutable configuration is to define a class and use the @ConfigurationInject annotation on a constructor of a @ConfigurationProperties or @EachProperty bean.
For example:
The @ConfigurationInject annotation provides a hint to the Micronaut framework to prioritize binding values from configuration instead of injecting beans.
|
Note
|
Using this approach, to make the configuration refreshable, add the @Refreshable annotation to the class as well. This allows the bean to be re-created in the case of a runtime configuration refresh event. |
There are a few exceptions to this rule. Micronaut framework will not perform configuration binding for a parameter if any of these conditions is met:
-
The parameter is annotated with
@Value(explicit binding) -
The parameter is annotated with
@Property(explicit binding) -
The parameter is annotated with
@Parameter(parameterized bean handling) -
The parameter is annotated with
@Inject(generic bean injection) -
The type of the parameter is annotated with a bean scope (such as
@Singleton)
Once you have prepared a type-safe configuration it can be injected into your beans like any other bean:
Configuration values can then be supplied when running the application. For example:
ApplicationContext applicationContext = ApplicationContext.run(CollectionUtils.mapOf(
"my.engine.cylinders", "8",
"my.engine.crank-shaft.rod-length", "7.0"
));
Vehicle vehicle = applicationContext.getBean(Vehicle.class);
System.out.println(vehicle.start());The above example prints: "Ford Engine Starting V8 [rodLength=7B.0]"
Using Java Record Classes to define immutable configuration
For Java language applications, it’s also possible to use Java Record Classes for immutable configuration with @ConfigurationProperties. For example:
|
Note
|
From a performance perspective Java records are better than interfaces. |
Customizing accessors
As already explained in Change accessors style, it is also possible to customize the accessors when creating immutable configuration properties:
Most application configuration is stored in your configuration file (e.g application.yml), environment-specific files like application-{environment}.{extension}, environment and system properties, etc.
These configure the application context.
But during application startup, before the application context is created, a "bootstrap" context can be created to store configuration necessary to retrieve additional configuration for the main context. Typically, that additional configuration is in some remote source.
The bootstrap context is enabled depending on the following conditions. The conditions are checked in the following order:
-
If The BOOTSTRAP_CONTEXT_PROPERTY system property is set, that value determines if the bootstrap context is enabled.
-
If The application context builder option bootstrapEnvironment is set, that value determines if the bootstrap context is enabled.
-
If a BootstrapPropertySourceLocator bean is present the bootstrap context is enabled. Normally this comes from the
micronaut-discovery-clientdependency.
Configuration properties that must be present before application context configuration properties are resolved, for example when using distributed configuration, are stored in a bootstrap configuration file. Once it is determined the bootstrap context is enabled (as described above), the bootstrap configuration files are read using the same rules as regular application configuration.
See the property source documentation for the details. The only difference is the prefix (bootstrap instead of application).
The file name prefix bootstrap is configurable with a system property micronaut.bootstrap.name.
|
Note
|
The bootstrap context configuration is carried over to the main context automatically, so it is not necessary for configuration properties to be duplicated in the main context. In addition, the bootstrap context configuration has a higher precedence than the main context, meaning if a configuration property appears in both contexts, then the value will be taken from the bootstrap context first. |
That means if a configuration property is needed in both places, it should go into the bootstrap context configuration.
See the distributed configuration section of the documentation for the list of integrations with common distributed configuration solutions.
Bootstrap Context Beans
In order for a bean to be resolvable in the bootstrap context it must be annotated with @BootstrapContextCompatible. If any given bean is not annotated then it will not be able to be resolved in the bootstrap context. Typically, any bean that is participating in the process of retrieving distributed configuration needs to be annotated.
Micronaut framework provides basic support for JMX.
For more information, see the documentation for the micronaut-jmx project.
Aspect-Oriented Programming (AOP) has historically had many incarnations and some very complicated implementations. Generally AOP can be thought of as a way to define cross-cutting concerns (logging, transactions, tracing, etc.) separate from application code in the form of aspects that define advice.
There are typically two forms of advice:
-
Around Advice - decorates a method or class
-
Introduction Advice - introduces new behaviour to a class.
In modern Java applications, declaring advice typically takes the form of an annotation. The most well-known annotation advice in the Java world is probably @Transactional, which demarcates transaction boundaries in Spring and Grails applications.
The disadvantage of traditional approaches to AOP is the heavy reliance on runtime proxy creation and reflection, which slows application performance, makes debugging harder and increases memory consumption.
Micronaut framework tries to address these concerns by providing a simple compile-time AOP API that does not use reflection.
The most common type of advice you may want to apply is "Around" advice, which lets you decorate a method’s behaviour.
Writing Around Advice
The first step is to define an annotation that will trigger a MethodInterceptor:
The next step to defining Around advice is to implement a MethodInterceptor. For example the following interceptor disallows parameters with null values:
|
Note
|
Micronaut AOP interceptors use no reflection which improves performance and reducing stack trace sizes, thus improving debugging. |
Apply the annotation to target classes to put the new MethodInterceptor to work:
imports
import jakarta.inject.Singleton;@Singleton
public class NotNullExample {
@NotNull
void doWork(String taskName) {
System.out.println("Doing job: " + taskName);
}
}Whenever the type NotNullExample is injected into a class, a compile-time-generated proxy is injected that decorates method calls with the @NotNull advice defined earlier. You can verify that the advice works by writing a test. The following test verifies that the expected exception is thrown when the argument is null:
NOTE: Missing tag `test` in `test-suite/src/test/java/io/micronaut/docs/aop/around/AroundSpec.java`.|
Note
|
Since Micronaut injection happens at compile time, generally the advice should be packaged in a dependent JAR file that is on the classpath when the above test is compiled. It should not be in the same codebase since you don’t want the test to be compiled before the advice itself is compiled. |
Customizing Proxy Generation
The default behaviour of the Around annotation is to generate a proxy at compile time that is a subclass of the proxied class. In other words, in the previous example a compile-time subclass of the NotNullExample class will be produced where proxied methods are decorated with interceptor handling, and the original behaviour is invoked via a call to super.
This behaviour is more efficient as only one instance of the bean is required, however depending on the use case you may wish to alter this behaviour. The @Around annotation supports various attributes that allow you to alter this behaviour, including:
-
proxyTarget(defaults tofalse) - If set totrue, instead of a subclass that callssuper, the proxy delegates to the original bean instance -
hotswap(defaults tofalse) - Same asproxyTarget=true, but in addition the proxy implements HotSwappableInterceptedProxy which wraps each method call in aReentrantReadWriteLockand allows swapping the target instance at runtime. -
lazy(defaults tofalse) - By default the Micronaut framework eagerly initializes the proxy target when the proxy is created. If set totruethe proxy target is instead resolved lazily for each method call.
AOP Advice on @Factory Beans
The semantics of AOP advice when applied to Bean Factories differs from regular beans, with the following rules applying:
Consider the following two examples:
@Factory@Timed
@Factory
public class MyFactory {
@Prototype
public MyBean myBean() {
return new MyBean();
}
}The above example logs the time it takes to create the MyBean bean.
Now consider this example:
@Factory@Factory
public class MyFactory {
@Prototype
@Timed
public MyBean myBean() {
return new MyBean();
}
}The above example logs the time it takes to execute the public methods of the MyBean bean, but not the bean creation.
The rationale for this behaviour is that you may at times wish to apply advice to a factory and at other times apply advice to the bean produced by the factory.
Note that there is currently no way to apply advice at the method level to a @Factory bean, and all advice for factories must be applied at the type level. You can control which methods have advice applied by defining methods as non-public which do not have advice applied.
Introduction advice is distinct from Around advice in that it involves providing an implementation instead of decorating.
Examples of introduction advice includes Spring Data which implements persistence logic for you.
Micronaut Client annotation is another example of introduction advice where the Micronaut framework implements HTTP client interfaces for you at compile time.
The way you implement Introduction advice is very similar to how you implement Around advice.
You start by defining an annotation that powers the introduction advice. As an example, say you want to implement advice to return a stubbed value for every method in an interface (a common requirement in testing frameworks). Consider the following @Stub annotation:
The StubIntroduction class referred to in the previous example must then implement the MethodInterceptor interface, just like around advice.
The following is an example implementation:
To now use this introduction advice in an application, annotate your abstract classes or interfaces with @Stub:
@Stub
public interface StubExample {
@Stub("10")
int getNumber();
LocalDateTime getDate();
}All abstract methods delegate to the StubIntroduction class to be implemented.
The following test demonstrates the behaviour or StubIntroduction:
StubExample stubExample = applicationContext.getBean(StubExample.class);
assertEquals(10, stubExample.getNumber());
assertNull(stubExample.getDate());Note that if the introduction advice cannot implement the method, call the proceed method of the MethodInvocationContext. This lets other introduction advice interceptors implement the method, and an UnsupportedOperationException will be thrown if no advice can implement the method.
In addition, if multiple introduction advice are present you may wish to override the getOrder() method of MethodInterceptor to control the priority of advice.
The following sections cover core advice types provided by Micronaut.
There are cases where you want to introduce a new bean based on the presence of an annotation on a method. An example of this is the @EventListener annotation which produces an implementation of ApplicationEventListener for each annotated method that invokes the annotated method.
For example the following snippet runs the logic contained within the method when the ApplicationContext starts up:
imports
import io.micronaut.context.event.StartupEvent;
import io.micronaut.runtime.event.annotation.EventListener;...
@EventListener
void onStartup(StartupEvent event) {
// startup logic here
}The presence of the @EventListener annotation causes the Micronaut framework to create a new class that implements ApplicationEventListener and invokes the onStartup method defined in the bean above.
The actual implementation of the @EventListener is trivial; it simply uses the @Adapter annotation to specify which SAM (single abstract method) type it adapts:
|
Note
|
The Micronaut framework also automatically aligns the generic types for the SAM interface if they are specified. |
Using this mechanism you can define custom annotations that use the @Adapter annotation and a SAM interface to automatically implement beans for you at compile time.
Sometimes you may need to apply advice to a bean’s lifecycle. There are 3 types of advice that are applicable in this case:
-
Interception of the construction of the bean
-
Interception of the bean’s
@PostConstructinvocation -
Interception of a bean’s
@PreDestroyinvocation
The Micronaut framework supports these 3 use cases by allowing the definition of additional @InterceptorBinding meta-annotations.
Consider the following annotation definition:
Note that if you do not need @PostConstruct and @PreDestroy interception you can simply remove those bindings.
The @ProductBean annotation can then be used on the target class:
Now you can define ConstructorInterceptor beans for constructor interception and MethodInterceptor beans for @PostConstruct or @PreDestroy interception.
The following factory defines a ConstructorInterceptor that intercepts construction of Product instances and registers them with a hypothetical ProductService validating the product name first:
Defining MethodInterceptor instances that interceptor the @PostConstruct and @PreDestroy methods is no different from defining interceptors for regular methods. Note however that you can use the passed MethodInvocationContext to identify what kind of interception is occurring and adapt the code accordingly like in the following example:
Validation advice is one of the most common advice types you are likely to want to use in your application.
Validation advice is built on Bean Validation JSR 380, a specification of the Java API for bean validation which ensures that the properties of a bean meet specific criteria, using jakarta.validation annotations such as @NotNull, @Min, and @Max.
The Micronaut framework provides native support for the jakarta.validation annotations with the micronaut-validation dependency:
annotationProcessor("io.micronaut.validation:micronaut-validation-processor")implementation("io.micronaut.validation:micronaut-validation")Or full JSR 380 compliance with the micronaut-hibernate-validator dependency:
implementation("io.micronaut.beanvalidation:micronaut-hibernate-validator")See the section on Bean Validation for more information on how to apply validation rules to your bean classes.
Like Spring and Grails, the Micronaut framework provides caching annotations in the io.micronaut.cache package.
The CacheManager interface allows different cache implementations to be plugged in as necessary.
The SyncCache interface provides a synchronous API for caching, whilst the AsyncCache API allows non-blocking operation.
Cache Annotations
The following cache annotations are supported:
-
@Cacheable - Indicates a method is cacheable in the specified cache
-
@CachePut - Indicates that the return value of a method invocation should be cached. Unlike
@Cacheablethe original operation is never skipped. -
@CacheInvalidate - Indicates the invocation of a method should cause the invalidation of one or more caches.
Using one of these annotations activates the CacheInterceptor, which in the case of @Cacheable caches the return value of the method.
The emitted result is cached if the method return type is a non-blocking type (either CompletableFuture or an instance of Publisher) .
In addition, if the underlying Cache implementation supports non-blocking cache operations, cache values are read without blocking, resulting in non-blocking cache operations.
Configuring Caches
By default, Caffeine is used to create caches from application configuration. For example:
micronaut.caches.my-cache.maximum-size=20The above example configures a cache called "my-cache" with a maximum size of 20.
|
Note
|
Naming Caches
Define names of caches under |
To configure a weigher to be used with the maximumWeight configuration, create a bean that implements io.micronaut.caffeine.cache.Weigher. To associate a given weigher with only a specific cache, annotate the bean with @Named(<cache name>). Weighers without a named qualifier apply to all caches that don’t have a named weigher. If no beans are found, a default implementation is used.
See the configuration reference for all available configuration options.
Dynamic Cache Creation
A DynamicCacheManager bean can be registered for use cases where caches cannot be configured ahead of time. When a cache is attempted to be retrieved that was not predefined, the dynamic cache manager is invoked to create and return a cache.
By default, if there is no other dynamic cache manager defined in the application, the Micronaut framework registers an instance of DefaultDynamicCacheManager that creates Caffeine caches with default values.
Other Cache Implementations
Check the Micronaut Cache project for more information.
In distributed systems and microservice environments, failure is something you have to plan for, and it is common to want to attempt to retry an operation if it fails. If first you don’t succeed try again!
With this in mind, the Micronaut framework includes a Retryable annotation.
Retry Dependency
|
Note
|
Since Micronaut Framework 4.0 to use the Retry functionality you need to add the following dependency: |
implementation("io.micronaut:micronaut-retry")Simple Retry
The simplest form of retry is just to add the @Retryable annotation to a type or method. The default behaviour of @Retryable is to retry three times with a linear delay of one second between each retry. (first attempt with 1s delay, second attempt with 2s delay, third attempt with 3s delay).
For example:
@Retryable
public List<Book> listBooks() {
// ...With the above example if the listBooks() method throws a RuntimeException, it is retried until the maximum number of attempts is reached.
The multiplier value of the @Retryable annotation can be used to configure a multiplier used to calculate the delay between retries, allowing exponential retry support.
To customize retry behaviour, set the attempts and delay members, For example to configure five attempts with a two seconds delay:
@Retryable(attempts = "5",
delay = "2s")
public Book findBook(String title) {
// ...Notice how both attempts and delay are defined as strings. This is to support configurability through annotation metadata. For example, you can allow the retry policy to be configured using property placeholder resolution:
@Retryable(attempts = "${book.retry.attempts:3}",
delay = "${book.retry.delay:1s}")
public Book getBook(String title) {
// ...With the above in place, if book.retry.attempts is specified in configuration it is bound to the value of the attempts member of the @Retryable annotation via annotation metadata.
Reactive Retry
@Retryable advice can also be applied to methods that return reactive types, such as Publisher (Project Reactor's Flux or RxJava's Flowable). For example:
@Retryable
public Publisher<Book> streamBooks() {
// ...In this case @Retryable advice applies the retry policy to the reactive type.
Circuit Breaker
Retry is useful in a microservice environment, but in some cases excessive retries can overwhelm the system as clients repeatedly re-attempt failing operations.
The Circuit Breaker pattern is designed to resolve this issue by allowing a certain number of failing requests and then opening a circuit that remains open for a period before allowing additional retry attempts.
The CircuitBreaker annotation is a variation of the @Retryable annotation that supports a reset member which indicates how long the circuit should remain open before it is reset (the default is 20 seconds).
@CircuitBreaker(reset = "30s")
public List<Book> findBooks() {
// ...The above example retries the findBooks method three times and then opens the circuit for 30 seconds, rethrowing the original exception and preventing potential downstream traffic such as HTTP requests and I/O operations flooding the system.
Factory Bean Retry
When @Retryable is applied to bean factory methods, it behaves as if the annotation was placed on the type being returned. The retry behavior applies when the methods on the returned object are invoked. Note that the bean factory method itself is not retried. If you want the functionality of creating the bean to be retried, it should be delegated to another singleton that has the @Retryable annotation applied.
For example:
Retry Events
You can register RetryEventListener instances as beans to listen for RetryEvent events that are published every time an operation is retried.
In addition, you can register event listeners for CircuitOpenEvent to be notified when a circuit breaker circuit is opened, or CircuitClosedEvent for when a circuit is closed.
Like Spring and Grails, the Micronaut framework features a Scheduled annotation for scheduling background tasks.
|
Tip
|
See the guide for Schedule Periodic Tasks inside your Micronaut Applications to learn more. |
Using the @Scheduled Annotation
The Scheduled annotation can be added to any method of a bean, and you should set one of the fixedRate, fixedDelay, or cron members. Scheduling requires the Micronaut Context dependency:
implementation("io.micronaut:micronaut-context")micronaut-context is a transitive dependency of micronaut-http. If you use a Micronaut HTTP runtime, your project already includes the Micronaut-context dependency.
|
Note
|
Remember that the scope of a bean impacts behaviour. A @Singleton bean shares state (the fields of the instance) each time the scheduled method is executed, while for a @Prototype bean a new instance is created for each execution.
|
Scheduling at a Fixed Rate
To schedule a task at a fixed rate, use the fixedRate member. For example:
@Scheduled(fixedRate = "5m")
void everyFiveMinutes() {
System.out.println("Executing everyFiveMinutes()");
}The task above executes every five minutes.
Scheduling with a Fixed Delay
To schedule a task, so it runs five minutes after the termination of the previous task use the fixedDelay member. For example:
@Scheduled(fixedDelay = "5m")
void fiveMinutesAfterLastExecution() {
System.out.println("Executing fiveMinutesAfterLastExecution()");
}Scheduling a Cron Task
To schedule a Cron task use the cron member:
@Scheduled(cron = "0 15 10 ? * MON")
void everyMondayAtTenFifteenAm() {
System.out.println("Executing everyMondayAtTenFifteenAm()");
}The above example runs the task every Monday morning at 10:15AM in the time zone of the server.
Scheduling with only an Initial Delay
To schedule a task, so it runs once after the server starts, use the initialDelay member:
@Scheduled(initialDelay = "1m")
void onceOneMinuteAfterStartup() {
System.out.println("Executing onceOneMinuteAfterStartup()");
}The above example only runs once, one minute after the server starts.
Programmatically Scheduling Tasks
To programmatically schedule tasks, use the TaskScheduler bean which can be injected as follows:
@Inject
@Named(TaskExecutors.SCHEDULED)
TaskScheduler taskScheduler;Configuring Scheduled Tasks with Annotation Metadata
To make your application’s tasks configurable, you can use annotation metadata and property placeholder configuration. For example:
@Scheduled(fixedRate = "${my.task.rate:5m}",
initialDelay = "${my.task.delay:1m}")
void configuredTask() {
System.out.println("Executing configuredTask()");
}The above example allows the task execution frequency to be configured with the property my.task.rate, and the initial delay to be configured with the property my.task.delay.
Configuring the Scheduled Task Thread Pool
Tasks executed by @Scheduled are run by default on a ScheduledExecutorService configured to have twice the number of threads as available processors.
You can configure this thread pool in your configuration file (e.g application.yml):
micronaut.executors.scheduled.type=scheduled
micronaut.executors.scheduled.core-pool-size=30Handling Exceptions
By default, the Micronaut framework includes a DefaultTaskExceptionHandler bean that implements the TaskExceptionHandler interface and simply logs the exception if an error occurs invoking a scheduled task.
If you have custom requirements you can replace this bean with your own implementation (for example to send an email or shutdown the context to fail fast). To do so, write your own TaskExceptionHandler and annotate it with @Replaces(DefaultTaskExceptionHandler.class).
Although the Micronaut framework’s design is based on a compile-time approach and does not rely on Spring dependency injection, there is still a lot of value in the Spring ecosystem that does not depend directly on the Spring container.
You may wish to use existing Spring projects within the Micronaut framework and configure beans to be used within the Micronaut framework.
You may also wish to leverage existing AOP advice from Spring. One example of this is Spring’s support for declarative transactions with @Transactional.
The Micronaut framework provides support for Spring-based transaction management without requiring Spring itself. Simply add the spring module to your application dependencies:
implementation("io.micronaut.spring:micronaut-spring")This also requires adding the spring-annotation module dependency as an annotation processor:
annotationProcessor("io.micronaut.spring:micronaut-spring-annotation")|
Note
|
If you use Micronaut’s Hibernate support you already get this dependency and a HibernateTransactionManager is configured for you.
|
This is done by intercepting method calls annotated with Spring’s @Transactional with TransactionInterceptor.
The benefit here is you can use Micronaut’s compile-time, reflection-free AOP to declare programmatic Spring transactions. For example:
imports
import org.springframework.transaction.annotation.Transactional;...
@Transactional
public Book saveBook(String title) {
...
}The new Propagation Context API aims to simplify reactor instrumentation, avoid thread-local usage, and integrate idiomatically with Kotlin Coroutines.
The PropagatedContext object represents the context propagation. We designed the context propagation API for immutability. It consists of multiple elements of type PropagatedContextElement.
Each element represents a particular state that needs to be propagated. There is a special element that can be used to update and restore the thread-local value ThreadPropagatedContextElement:
ThreadPropagatedContextElementIn this example, the propagated context element implements the setting of the MDC context, and it restores it after.
|
Note
|
The ThreadPropagatedContextElement is inspired by Kotlin Coroutines propagation API element kotlinx.coroutines.ThreadContextElement
|
public String createUser(String name) {
try {
UUID newUserId = UUID.randomUUID();
MDC.put("userId", newUserId.toString());
try (PropagatedContext.Scope ignore = PropagatedContext.getOrEmpty().plus(new MdcPropagationContext()).propagate()) {
return createUserInternal(newUserId, name);
}
} finally {
MDC.remove("userId");
}
}|
Important
|
In the previous versions of Micronaut Framework, we would capture the context to propagate, this is not the case since Micronaut Framework 4. We always require for the context to be modified manually and repropagated. |
Since Micronaut Framework version 4, Project Reactor integration no longer captures the state automatically. Micronaut Framework users need to extend the propagation context manually.
Before version 4, Micronaut Framework required the instrumentation of every reactive operator to capture the current state to propagate it. It added an unwanted overhead and forced us to maintain complicated Reactor operators' instrumentation.
Since 3.5.0, Reactor-Core embeds support for the io.micrometer:context-propagation SPI. This allows to achieve the same thread-local propagation by including the Micrometer Context Propagation dependency.
The framework automatically adds the PropagatedContext to Project Reactor’s context for interceptors and the HTTP filters. You can access it via the utility class ReactorPropagation.
|
Note
|
ReactorPropagation is an experimental class and might change in the future. |
It is possible to use Micrometer Context Propagation, which Reactor supports for propagation and restoring the thread-local context.
To enable it, include the dependency:
implementation("io.micrometer:context-propagation")After that, all the thread-local propagated elements can restore their thread-local value.
|
Note
|
The thread-local values are read-only. To modify them, the PropagatedContext instance needs to be changed and put into the Reactor’s context.
|
To add the context in the middle of the reactive chain, do something like the following:
If you have Micrometer Context Propagation on the classpath but don’t want to use it, apply the following configuration:
reactor.enable-automatic-context-propagation=falseModifying the propagated context is a common scenario. Usually, you want to extend the context to include the request-related values.
To use a non-reactive HTTP filter API, you need to add a method parameter MutablePropagatedContext and modify the propagated context elements by adding or removing the existing ones:
@ServerFilter(MATCH_ALL_PATTERN)
public class MdcFilter {
@RequestFilter
public void myRequestFilter(HttpRequest<?> request, MutablePropagatedContext mutablePropagatedContext) {
try {
String trackingId = request.getHeaders().get("X-TrackingId");
MDC.put("trackingId", trackingId);
mutablePropagatedContext.add(new MdcPropagationContext());
} finally {
MDC.remove("trackingId");
}
}
}The next filter in the chain will have the new propagated context available. Any of the thread-local context elements will be set for the next filter or the controller method invocation.
To use the legacy reactive HTTP filters, simply modify and propagate the context bound to the following chain invocation:
@Filter(MATCH_ALL_PATTERN)
public class MdcLegacyFilter implements HttpServerFilter {
@Override
public Publisher<MutableHttpResponse<?>> doFilter(HttpRequest<?> request,
ServerFilterChain chain) {
try {
String trackingId = request.getHeaders().get("X-TrackingId");
MDC.put("trackingId", trackingId);
try (PropagatedContext.Scope ignore = PropagatedContext.get().plus(new MdcPropagationContext()).propagate()) {
return chain.proceed(request);
}
} finally {
MDC.remove("trackingId");
}
}
}The majority of JVM frameworks in use today were designed before the rise of cloud deployments and microservice architectures. Applications built with these frameworks were intended to be deployed to traditional Java containers. As a result, cloud support in these frameworks typically comes as an add-on rather than as core design features.
Micronaut framework was designed from the ground up for building microservices for the cloud. As a result, many key features that typically require external libraries or services are available within your application itself. To override one of the industry’s current favorite buzzwords, Micronaut applications are "natively cloud-native".
The following are some cloud-specific features that are integrated directly into the Micronaut runtime:
-
Distributed Configuration
-
Service Discovery
-
Client-Side Load-Balancing
-
Distributed Tracing
-
Serverless Functions
Many features in the Micronaut framework are heavily inspired by features from Spring and Grails. This is by design and helps developers who are already familiar with systems such as Spring Cloud.
The following sections cover these features and how to use them.
Applications built for the Cloud often need to adapt to running in a Cloud environment, read and share configuration in a distributed manner, and externalize configuration to the environment where necessary.
Micronaut’s Environment concept can be configured to be Cloud platform-aware and makes the best effort to detect the underlying active Cloud environment.
To enable this feature you can:
-
call
deduceCloudEnvironment(true)on the ApplicationContextBuilder interface when starting Micronaut. For example:Enabling Cloud Environment Detectionpublic static void main(String...args) { Micronaut.build(args) .deduceCloudEnvironment(true) .start(); } -
Set the
micronaut.env.cloud-deductionproperty totruein your configuration. -
Provide an environment variable
MICRONAUT_ENV_CLOUD_DEDUCTIONset totrue.
You can then use the Requires annotation to conditionally load bean definitions.
The following table summarizes the constants in the Environment interface and provides an example:
| Constant | Description | Requires Example | Environment name |
|---|---|---|---|
The application is running as an Android application |
|
|
|
The application is running within a JUnit or Spock test |
|
|
|
The application is running in a Cloud environment (present for all other cloud platform types) |
|
|
|
Running on Amazon EC2 |
|
|
|
Running on Google Compute |
|
|
|
Running on Kubernetes |
|
|
|
Running on Heroku |
|
|
|
Running on Cloud Foundry |
|
|
|
Running on Microsoft Azure |
|
|
|
Running on IBM Cloud |
|
|
|
Running on Digital Ocean |
|
|
|
Running on Oracle Cloud |
|
|
Note that you can have multiple environments active, for example when running in Kubernetes on AWS.
In addition, using the value of the constants defined in the table above you can create environment-specific configuration files. For example if you create a src/main/resources/application-gcp.yml file, it is only loaded when running on Google Compute.
|
Tip
|
Any configuration property in the Environment can also be set via an environment variable. For example, setting the CONSUL_CLIENT_HOST environment variable overrides the host property in ConsulConfiguration.
|
Using Cloud Instance Metadata
When the Micronaut framework detects it is running on a supported cloud platform, on startup it populates the interface ComputeInstanceMetadata.
|
Tip
|
As of Micronaut framework 2.1.x this logic depends on the presence of the appropriate core Cloud module for Oracle Cloud, AWS, or GCP. |
All this data is merged together into the metadata property for the running ServiceInstance.
To access the metadata for your application instance you can use the interface EmbeddedServerInstance, and call getMetadata() which returns a Map of the metadata.
If you connect remotely via a client, the instance metadata can be referenced once you have retrieved a ServiceInstance from either the LoadBalancer or DiscoveryClient APIs.
|
Note
|
The Netflix Ribbon client-side load balancer can be configured to use the metadata to do zone-aware client-side load balancing. See Client-Side Load Balancing |
To obtain metadata for a service via Service Discovery use the LoadBalancerResolver interface to resolve a LoadBalancer and obtain a reference to a service by identifier:
LoadBalancer loadBalancer = loadBalancerResolver.resolve("some-service");
Flux.from(
loadBalancer.select()
).subscribe((instance) ->
ConvertibleValues<String> metaData = instance.getMetadata();
...
);The EmbeddedServerInstance is available through event listeners that listen for the ServiceReadyEvent. The @EventListener annotation makes it easy to listen for the event in your beans.
To obtain metadata for the locally running server, use an EventListener for the ServiceReadyEvent:
@EventListener
void onServiceStarted(ServiceReadyEvent event) {
ServiceInstance serviceInstance = event.getSource();
ConvertibleValues<String> metadata = serviceInstance.getMetadata();
}As you can see, the Micronaut framework features a robust system for externalizing and adapting configuration to the environment inspired by similar approaches in Grails and Spring Boot.
However, what if you want multiple microservices to share configuration? the Micronaut framework includes APIs for distributed configuration.
The ConfigurationClient interface has a getPropertySources method that can be implemented to read and resolve configuration from distributed sources.
The getPropertySources returns a Publisher that emits zero or many PropertySource instances.
The default implementation is DefaultCompositeConfigurationClient which merges all registered ConfigurationClient beans into a single bean.
You can either implement your own ConfigurationClient or use the implementations provided by Micronaut. The following sections cover those.
Consul is a popular Service Discovery and Distributed Configuration server provided by HashiCorp. The Micronaut framework features a native ConsulClient that uses Micronaut’s support for Declarative HTTP Clients.
Starting Consul
The quickest way to start using Consul is via Docker:
-
Starting Consul with Docker
docker run -p 8500:8500 consulAlternatively you can install and run a local Consul instance.
Enabling Distributed Configuration with Consul
|
Tip
|
Using the CLI
If you create your project using the Micronaut CLI, supply the |
To enable distributed configuration make sure [bootstrap] is enabled and create a src/main/resources/bootstrap.[yml/toml/properties] file with the following configuration:
micronaut.application.name=hello-world
micronaut.config-client.enabled=true
consul.client.defaultZone=${CONSUL_HOST:localhost}:${CONSUL_PORT:8500}After enabling distributed configuration, store the configuration to share in Consul’s key/value store. There are a number of ways to do that.
Storing Configuration as Key/Value Pairs
One way is to store the keys and values directly in Consul. In this case by default the Micronaut framework looks for configuration in the Consul /config directory.
|
Tip
|
You can alter the path searched for by setting consul.client.config.path
|
Within the /config directory Micronaut searches values within the following directories in order of precedence:
| Directory | Description |
|---|---|
|
Configuration shared by all applications |
|
Configuration shared by all applications for the |
|
Application-specific configuration, example |
|
Application-specific configuration for an active Environment |
The value of APPLICATION_NAME is whatever your have configured micronaut.application.name to be in your bootstrap configuration file.
To see this in action, use the following cURL command to store a property called foo.bar with a value of myvalue in the directory /config/application.
curl -X PUT -d @- localhost:8500/v1/kv/config/application/foo.bar <<< myvalueIf you now define a @Value("${foo.bar}") or call environment.getProperty(..) the value myvalue will be resolved from Consul.
Storing Configuration in YAML, JSON etc.
Some Consul users prefer storing configuration in blobs of a certain format, such as YAML. The Micronaut framework supports this mode and supports storing configuration in either YAML, JSON, or Java properties format.
|
Tip
|
The ConfigDiscoveryConfiguration has a number of configuration options for configuring how distributed configuration is discovered. |
You can set the consul.client.config.format option to configure the format with which properties are read.
For example, to configure JSON:
consul.client.config.format=JSONNow write your configuration in JSON format to Consul:
curl -X PUT localhost:8500/v1/kv/config/application \
-d @- << EOF
{ "foo": { "bar": "myvalue" } }
EOFStoring Configuration as File References
Another popular option is git2consul which mirrors the contents of a Git repository to Consul’s key/value store.
You can set up a Git repository that contains files like application.yml, hello-world-test.json, etc., and the contents of these files will be cloned to Consul.
In this case, each key in Consul represents a file with an extension, for example /config/application.yml, and you must configure the FILE format:
consul.client.config.format=FILEThe Micronaut framework integrates with HashiCorp Vault as a distributed configuration source.
To enable distributed configuration make sure [bootstrap] is enabled and create a src/main/resources/bootstrap.[yml/toml/properties] file with the following configuration:
micronaut.application.name=hello-world
micronaut.config-client.enabled=true
vault.client.uri=http://localhost:8200
vault.client.config.enabled=trueSee the configuration reference for all configuration options.
The Micronaut framework uses the configured micronaut.application.name to lookup property sources for the application from Vault.
| Secret Path | Description |
|---|---|
|
Configuration shared by all applications |
|
Application-specific configuration |
|
Configuration shared by all applications for an active environment name |
|
Application-specific configuration for an active environment name |
See the Documentation for HashiCorp Vault for more information on how to set up the server.
Since 1.1, the Micronaut framework features a native Spring Cloud Configuration for those who have not switched to a dedicated more complete solution like Consul.
To enable distributed configuration make sure [bootstrap] is enabled and create a src/main/resources/bootstrap.[yml/toml/properties] file with the following configuration:
micronaut.application.name=hello-world
micronaut.config-client.enabled=true
spring.cloud.config.enabled=true
spring.cloud.config.uri=http://localhost:8888/
spring.cloud.config.retry-attempts=4
spring.cloud.config.retry-delay=2s-
retry-attemptsis optional, and specifies the number of times to retry -
retry-delayis optional, and specifies the delay between retries
The Micronaut framework uses the configured micronaut.application.name to look up property sources for the application from Spring Cloud config server configured via spring.cloud.config.uri.
See the Documentation for Spring Cloud Config Server for more information on how to set up the server.
The Micronaut framework supports configuration sharing via AWS System Manager Parameter Store. You need the following dependencies configured:
implementation("io.micronaut.aws:micronaut-aws-parameter-store")To enable distributed configuration, make sure [bootstrap] is enabled and create a src/main/resources/bootstrap.yml file with the following configuration:
micronaut.application.name=hello-world
micronaut.config-client.enabled=true
aws.client.system-manager.parameterstore.enabled=trueSee the configuration reference for all configuration options.
You can configure shared properties from the AWS Console → System Manager → Parameter Store.
The Micronaut framework uses a hierarchy to read configuration values, and supports String, StringList, and SecureString types.
You can create environment-specific configurations as well by including the environment name after an underscore _. For example if micronaut.application.name is set to helloworld, specifying configuration values under helloworld_test will be applied only to the test environment.
| Directory | Description |
|---|---|
|
Configuration shared by all applications |
|
Application-specific configuration, example |
|
Configuration shared by all applications for the |
|
Application-specific configuration for an active Environment |
For example, if the configuration name /config/application_test/server.url is configured in AWS Parameter Store, any application connecting to that parameter store can retrieve the value using server.url. If the application has micronaut.application.name configured to be myapp, a value with the name /config/myapp_test/server.url overrides the value just for that application.
Each level of the tree can be composed of key=value pairs. For multiple key/value pairs, set the type to StringList.
For special secure information, such as keys or passwords, use the type SecureString. KMS will be automatically invoked when you add and retrieve values, and will decrypt them with the default key store for your account. If you set the configuration to not use secure strings, they will be returned to you encrypted, and you must manually decrypt them.
See the Secure Distributed Configuration with Oracle Cloud Vault documentation.
See the Micronaut GCP Distributed Configuration documentation.
See the Kubernetes Configuration Client documentation.
Service Discovery enables Microservices to find each other without knowing the physical location or IP address of associated services.
The Micronaut framework integrates with multiple tools and libraries. See Micronaut Service Discovery documentation for more details.
See the Micronaut Consul documentation.
See the Micronaut Eureka documentation.
Kubernetes is a container runtime with many features including integrated Service Discovery and Distributed Configuration.
The Micronaut framework includes first-class integration with Kubernetes. See the Micronaut Kubernetes documentation for more details.
To use Route 53 Service Discovery, you must meet the following criteria:
-
Run EC2 instances of some type
-
Have a domain name hosted in Route 53
-
Have a newer version of AWS-CLI (such as 14+)
Assuming you have those things, you are ready. It is not as fancy as Consul or Eureka, but other than some initial setup with the AWS-CLI, there is no other software running to go wrong. You can even support health checks if you add a custom health check to your service. To test if your account can create and use Service Discovery, see the Integration Test section. More information is available at https://docs.aws.amazon.com/Route53/latest/APIReference/overview-service-discovery.html.
Here are the steps:
-
Use AWS-CLI to create a namespace. You can make either a public or private one depending on the IPs or subnets you use
-
Create a service with DNS Records with AWS-CLI command
-
Add health checks or custom health checks (optional)
-
Add Service ID to your application configuration file like so:
aws.route53.registration.enabled=true
aws.route53.registration.aws-service-id=srv-978fs98fsdf
aws.route53.registration.namespace=micronaut.io
micronaut.application.name=something-
Make sure you have the following dependencies in your build file:
implementation("io.micronaut.aws:micronaut-aws-route53")-
On the client side, you need the same dependencies and fewer configuration options:
aws.route53.discovery.client.enabled=true
aws.route53.discovery.client.aws-service-id=srv-978fs98fsdf
aws.route53.discovery.client.namespace-id=micronaut.ioYou can then use the DiscoveryClient API to find other services registered via Route 53. For example:
DiscoveryClient discoveryClient = embeddedServer.getApplicationContext().getBean(DiscoveryClient.class);
List<String> serviceIds = Flux.from(discoveryClient.getServiceIds()).blockFirst();
List<ServiceInstance> instances = Flux.from(discoveryClient.getInstances(serviceIds.get(0))).blockFirst();Creating the Namespace
Namespaces are similar to a regular Route53 hosted zone, and they appear in the Route53 console, but the console doesn’t support modifying them. You must use the AWS-CLI at this time for any Service Discovery functionality.
First decide if you are creating a public-facing namespace or a private one, as the commands are different:
$ aws servicediscovery create-public-dns-namespace --name micronaut.io --create-request-id create-1522767790 --description adescriptionhere
or
$ aws servicediscovery create-private-dns-namespace --name micronaut.internal.io --create-request-id create-1522767790 --description adescriptionhere --vpc yourvpcIDWhen you run this you will get an operation ID. You can check the status with the get-operation CLI command:
$ aws servicediscovery get-operation --operation-id asdffasdfsdaYou can use this command to get the status of any call you make that returns an operation ID.
The result of the command will tell you the ID of the namespace. Write that down, you’ll need it for the next steps. If you get an error it will say what the error was.
Creating the Service and DNS Records
The next step is creating the Service and DNS records.
$ aws create-service --name yourservicename --create-request-id somenumber --description someservicedescription --dns-config NamespaceId=yournamespaceid,RoutingPolicy=WEIGHTED,DnsRecords=[{Type=A,TTL=1000},{Type=A,TTL=1000}]The DnsRecord type can be A(ipv4),AAAA(ipv6),SRV, or CNAME. RoutingPolicy can be WEIGHTED or MULTIVALUE. Keep in mind CNAME must use weighted routing type, SRV must have a valid port configured.
To add a health check, use the following syntax on the CLI:
Type=string,ResourcePath=string,FailureThreshold=integerType can be 'HTTP','HTTPS', or 'TCP'. You can only use a standard health check on a public namespace. See Custom Health Checks for private namespaces. Resource path should be a URL that returns 200 OK if it is healthy.
For a custom health check, you only need to specify --health-check-custom-config FailureThreshold=integer which works on private namespaces as well.
This is also good because the Micronaut framework sends out pulsation commands to let AWS know the instance is still healthy.
For more help run 'aws discoveryservice create-service help'.
You will get a service ID and an ARN back from this command if successful. Write that down, it is going to go into the Micronaut configuration.
Setting up the configuration in Micronaut
Auto Naming Registration
Add the configuration to make your applications register with Route 53 Auto-discovery:
aws.route53.registration.enabled=true
aws.route53.registration.aws-service-id=<enter the service id you got after creation on aws cli>
aws.route53.discovery.namespace-id=<enter the namespace id you got after creating the namespace>Discovery Client Configuration
aws.route53.discovery.client.enabled=true
aws.route53.discovery.client.aws-service-id=<enter the service id you got after creation on aws cli>You can also call the following methods by getting the bean "Route53AutoNamingClient":
// if serviceId is null it will use property "aws.route53.discovery.client.awsServiceId"
Publisher<List<ServiceInstance>> getInstances(String serviceId)
// reads property "aws.route53.discovery.namespaceId"
Publisher<List<String>> getServiceIds()Integration Tests
If you set the environment variable AWS_SUBNET_ID and have credentials configured in your home directory that are valid (in ~/.aws/credentials) you can run the integration tests. You need a domain hosted on Route53 as well. This test will create a t2.nano instance, a namespace, service, and register that instance to service discovery. When the test completes it will remove/terminate all resources it spun up.
If you do not wish to involve a service discovery server like Consul or you interact with a third-party service that cannot register with Consul you can instead manually configure services that are available via Service discovery.
To do this, use the micronaut.http.services setting. For example:
micronaut.http.services.foo.urls[0]=http://foo1
micronaut.http.services.foo.urls[1]=http://foo2You can then inject a client with @Client("foo"), and it will use the above configuration to load balance between the two configured servers.
|
Important
|
When using @Client with service discovery, the service id must be specified in the annotation in kebab-case. The configuration in the example above however can be in camel case.
|
|
Tip
|
You can override this configuration in production by specifying an environment variable such as MICRONAUT_HTTP_SERVICES_FOO_URLS=http://prod1,http://prod2
|
Note that by default no health checking will happen to assert that the referenced services are operational. You can alter that by enabling health checking and optionally specifying a health check path (the default is /health):
micronaut.http.services.foo.health-check=true
micronaut.http.services.foo.health-check-interval=15s
micronaut.http.services.foo.health-check-uri=/health-
health-checkindicates whether to health check the service -
health-check-intervalis the interval between checks -
health-check-urispecifies the endpoint URI of the health check request
The Micronaut framework starts a background thread to check the health status of the service and if any of the configured services respond with an error code, they are removed from the list of available services.
When discovering services from Consul, Eureka, or other Service Discovery servers, the DiscoveryClient emits a list of available ServiceInstance.
The Micronaut framework by default automatically performs Round Robin client-side load balancing using the servers in this list. This combined with Retry Advice adds extra resiliency to your Microservice infrastructure.
The load balancing is handled by the LoadBalancer interface, which has a LoadBalancer.select() method that returns a Publisher which emits a ServiceInstance.
The Publisher is returned because the process for selecting a ServiceInstance may result in a network operation depending on the Service Discovery strategy employed.
The default implementation of the LoadBalancer interface is DiscoveryClientRoundRobinLoadBalancer. You can replace this strategy with another implementation to customize how client side load balancing is handled in Micronaut, since there are many different ways to optimize load balancing.
For example, you may wish to load balance between services in a particular zone, or to load balance between servers that have the best overall response time.
To replace the LoadBalancer, define a bean that replaces the DiscoveryClientLoadBalancerFactory.
In fact that is exactly what the Netflix Ribbon support does, described in the next section.
|
Tip
|
Using the CLI
If you create your project using the Micronaut CLI, supply the |
Netflix Ribbon is an inter-process communication library used at Netflix with support for customizable load balancing strategies.
If you need more flexibility in how your application performs client-side load balancing, you can use Micronaut’s Netflix Ribbon support.
To add Ribbon support to your application, add the netflix-ribbon configuration to your build:
implementation("io.micronaut.netflix:micronaut-netflix-ribbon")The LoadBalancer implementations will now be RibbonLoadBalancer instances.
Ribbon’s Configuration options can be set using the ribbon namespace in configuration. For example in your configuration file (e.g application.yml):
ribbon.VipAddress=test
ribbon.ServerListRefreshInterval=2000Each discovered client can also be configured under ribbon.clients. For example given a @Client(id = "hello-world") you can configure Ribbon settings with:
ribbon.clients.hello-world.VipAddress=test
ribbon.clients.hello-world.ServerListRefreshInterval=2000By default, the Micronaut framework registers a DiscoveryClientServerList for each client that integrates Ribbon with the Micronaut framework’s DiscoveryClient.
See the documentation for Micronaut Tracing for more information adding distributed tracing to your applications.
Serverless architectures, where you deploy functions that are fully managed by a Cloud environment and are executed in ephemeral processes, require a unique approach.
Traditional frameworks like Grails and Spring are not really suitable since low memory consumption and fast startup time are critical, since the Function as a Service (FaaS) server typically spins up your function for a period using a cold start and then keeps it warm.
Micronaut’s compile-time approach, fast startup time, and low memory footprint make it a great candidate for developing functions, and the Micronaut framework includes dedicated support for developing and deploying functions to AWS Lambda, Google Cloud Function, Azure Function, and any FaaS system that supports running functions as containers (such as OpenFaaS, Rift or Fn).
There are generally two approaches to writing functions with Micronaut:
-
Low-level functions written using the native API of the function platform
-
Higher-level functions where you simply define controllers as you normally do in a typical Micronaut application and deploy to the function platform.
The first has marginally less startup time overhead and is typically used for non-HTTP functions such as functions that listen to an event or background functions.
The second is only for HTTP functions and is useful for users who want to take a slice of an existing application and deploy it as a serverless function. If cold start performance is a concern it is recommended that you consider building a native image with GraalVM for this option.
Support for AWS Lambda is implemented in the Micronaut AWS subproject.
Simple Functions with AWS Lambda
You can implement AWS Request Handlers with the Micronaut framework that directly implement the AWS Lambda SDK API. See the documentation on Micronaut Request Handlers for more information.
|
Tip
|
Using the CLI
To create an AWS Lambda Function: Or with Micronaut Launch |
HTTP Functions with AWS Lambda
You can deploy regular Micronaut applications that use @Controller, etc. using Micronaut’s support for AWS API Gateway. See the documentation on AWS Application Types, Lambda Runtimes, Dependencies for more information.
|
Tip
|
Using the CLI
To create an AWS API Gateway Proxy application: Or with Micronaut Launch |
Support for Google Cloud Function is implemented in the Micronaut GCP subproject.
Simple Functions with Cloud Function
You can implement Cloud Functions with the Micronaut framework that directly implement the Cloud Function Framework API. See the documentation on Simple Functions for more information.
|
Tip
|
Using the CLI
To create a Google Cloud Function: Or with Micronaut Launch |
HTTP Functions with Cloud Function
You can deploy regular Micronaut applications that use @Controller etc. using Micronaut’s support for HTTP Functions. See the documentation on Google Cloud HTTP Functions for more information.
|
Tip
|
Using the CLI
To create a Google Cloud HTTP Function: Or with Micronaut Launch |
To deploy to Google Cloud Run we recommend using JIB to containerize your application.
|
Tip
|
Using the CLI
Creating an application with JIB: Or with Micronaut Launch |
With JIB setup to deploy your application to Google Container Registry, run:
$ ./gradlew jibYou are now ready to deploy your application:
$ gcloud run deploy --image gcr.io/[PROJECT ID]/example --platform=managed --allow-unauthenticatedWhere [PROJECT ID] is your project ID. You will be asked to specify a region and will see output like the following:
Service name: (example):
Deploying container to Cloud Run service [example] in project [PROJECT_ID] region [us-central1]
✓ Deploying... Done.
✓ Creating Revision...
✓ Routing traffic...
✓ Setting IAM Policy...
Done.
Service [example] revision [example-00004] has been deployed and is serving 100 percent of traffic at https://example-9487r97234-uc.a.run.appThe URL is the URL of your Cloud Run application.
Support for Azure Function is implemented in the Micronaut Azure subproject.
Simple Functions with Azure Function
You can implement Azure Functions with the Micronaut framework that directly implement the Azure Function Java SDK. See the documentation on Azure Functions for more information.
|
Tip
|
Using the CLI
To create an Azure Function: Or with Micronaut Launch |
HTTP Functions with Azure Function
You can deploy regular Micronaut applications that use @Controller etc. using Micronaut’s support for Azure HTTP Functions. See the documentation on Azure HTTP Functions for more information.
|
Tip
|
Using the CLI
To create an Azure HTTP Function: Or with Micronaut Launch |
In the past, with monolithic applications, message listeners that listened to messages from messaging systems would frequently be embedded in the same application unit.
In Microservice architectures it is common to have individual Microservice applications that are driven by a message system such as RabbitMQ or Kafka.
In fact a Message-driven Microservice may not even feature an HTTP endpoint or HTTP server (although this can be valuable from a health check and visibility perspective).
Apache Kafka is a distributed stream processing platform that can be used for a range of messaging requirements in addition to stream processing and real-time data handling.
The Micronaut framework features dedicated support for defining both Kafka Producer and Consumer instances. Micronaut applications built with Kafka can be deployed with or without the presence of an HTTP server.
With Micronaut’s efficient compile-time AOP and cloud native features, writing efficient Kafka consumer applications that use very little resources is a breeze.
See the documentation for Micronaut Kafka for more information on how to build Kafka applications with Micronaut.
RabbitMQ is the most widely deployed open source message broker.
The Micronaut framework features dedicated support for defining both RabbitMQ publishers and consumers. Micronaut applications built with RabbitMQ can be deployed with or without an HTTP server.
With Micronaut framework’s efficient compile-time AOP, using RabbitMQ has never been easier. Support has been added for publisher confirms and RPC through reactive streams.
See the documentation for Micronaut RabbitMQ for more information on how to build RabbitMQ applications with Micronaut.
Nats.io is a simple, secure, and high-performance open source messaging system for cloud native applications, IoT messaging, and microservices architectures.
The Micronaut framework features dedicated support for defining both Nats.io publishers and consumers. Micronaut applications built with Nats.io can be deployed with or without an HTTP server.
With Micronaut’s efficient compile-time AOP, using Nats.io has never been easier. Support has been added for publisher confirms and RPC through reactive streams.
See the documentation for Micronaut Nats for more information on how to build Nats.io applications with Micronaut.
In certain cases you may wish to create standalone command-line (CLI) applications that interact with your Microservice infrastructure.
Examples of applications like this include scheduled tasks, batch applications and general command line applications.
In this case having a robust way to parse command line options and positional parameters is important.
Picocli is a command line parser that supports usage help with ANSI colors, autocomplete, and nested subcommands. It has an annotations API to create command line applications with almost no code, and a programmatic API for dynamic uses like creating Domain Specific Languages.
See the documentation for the Picocli integration for more information.
Micronaut framework features several built-in configurations that enable integration with common databases and other servers.
Project Reactor is used internally by Micronaut. However, to use Reactor or other reactive libraries (e.g. RxJava) types in your controller and/or HTTP Client methods you need to include dependencies.
To add support for Reactor, add the following module:
implementation("io.micronaut.reactor:micronaut-reactor")To use the Reactor HTTP client, add the following dependency:
implementation("io.micronaut.reactor:micronaut-reactor-http-client")For more information see the documentation for Micronaut Reactor.
To add support for RxJava 3, add the following module:
implementation("io.micronaut.rxjava3:micronaut-rxjava3")To use the RxJava 3 HTTP client, add the following dependency:
implementation("io.micronaut.rxjava3:micronaut-rxjava3-http-client")For more information see the documentation for Micronaut RxJava 3.
To add support for RxJava 2, add the following module:
implementation("io.micronaut.rxjava2:micronaut-rxjava2")To use the RxJava 2 HTTP client, add the following dependency:
implementation("io.micronaut.rxjava2:micronaut-rxjava2-http-client")For more information see the documentation for Micronaut RxJava 2.
Legacy support for RxJava 1 can be added with the following module:
implementation("io.micronaut.rxjava1:micronaut-rxjava1")For more information see the Micronaut RxJava1 documentation.
This table summarizes the configuration modules and dependencies to add to your build to enable them:
| Dependency | Description |
|---|---|
|
Configures SQL DataSources using Commons DBCP |
|
Configures SQL DataSources using Hikari Connection Pool |
|
Configures SQL DataSources using Tomcat Connection Pool |
|
Configures Hibernate/JPA |
|
Configures the MongoDB Reactive Driver |
|
Configures the Bolt Java Driver for Neo4j |
|
Configures the Reactive MySQL Client |
|
Configures the Reactive Postgres Client |
|
|
|
Configures the Datastax Java Driver for Cassandra |
For example, to add support for MongoDB, add the following dependency:
compile "io.micronaut.mongodb:micronaut-mongo-reactive"The following sections go into more detail about configuration options and the exposed beans for each implementation.
JDBC DataSources can be configured for one of three currently provided implementations - Apache DBCP2, Hikari, and Tomcat are supported by default.
Configuring a JDBC DataSource
|
Tip
|
Using the CLI
If you create your project using the Micronaut CLI, supply one of the |
To get started, add a dependency for one of the JDBC configurations that corresponds to the implementation you will use. Choose one of the following:
runtimeOnly("io.micronaut.sql:micronaut-jdbc-tomcat")runtimeOnly("io.micronaut.sql:micronaut-jdbc-hikari")runtimeOnly("io.micronaut.sql:micronaut-jdbc-dbcp")runtimeOnly("io.micronaut.sql:micronaut-jdbc-ucp")Also, add a JDBC driver dependency to your build. For example to add the H2 In-Memory Database:
runtimeOnly("com.h2database:h2")For more information see the Configuring JDBC section of the Micronaut SQL libraries project.
Setting up a Hibernate/JPA EntityManager
|
Tip
|
Using the CLI
If you create your project using the Micronaut CLI, supply the |
The Micronaut framework includes support for configuring a Hibernate / JPA EntityManager that builds on the SQL DataSource support.
Once you have configured one or more DataSources to use Hibernate, add the hibernate-jpa dependency to your build:
implementation("io.micronaut.sql:micronaut-hibernate-jpa")For more information see the Configuring Hibernate section of the Micronaut SQL libraries project.
Setting up the Native MongoDB Driver
|
Tip
|
Using the CLI
If you create your project using the Micronaut CLI, supply the |
The Micronaut framework can automatically configure the native MongoDB Java driver. To use this, add the following dependency to your build:
implementation("io.micronaut.mongodb:micronaut-mongo-reactive")Then configure the URI of the MongoDB server in your configuration file (e.g application.yml):
mongodb.uri=mongodb://username:password@localhost:27017/databaseName|
Tip
|
The mongodb.uri follows the MongoDB Connection String format.
|
A non-blocking Reactive Streams MongoClient is then available for dependency injection.
To use the blocking driver, add a dependency to your build on the mongo-java-driver:
runtimeOnly "org.mongodb:mongo-java-driver"Then the blocking MongoClient will be available for injection.
See the Micronaut MongoDB documentation for further information on configuring and using MongoDB within Micronaut.
The Micronaut Framework features dedicated support for automatically configuring the Neo4j Bolt Driver for the popular Neo4j Graph Database.
|
Tip
|
Using the CLI
If you create your project using the Micronaut CLI, supply the |
To configure the Neo4j Bolt driver, first add the neo4j-bolt module to your build:
implementation("io.micronaut.neo4j:micronaut-neo4j-bolt")Then configure the URI of the Neo4j server in your configuration file (e.g application.yml):
neo4j.urineo4j.uri=bolt://localhost|
Tip
|
The neo4j.uri setting must be in the format as described in the Connection URIs section of the Neo4j documentation
|
Once you have the above configuration in place you can inject an instance of the org.neo4j.driver.v1.Driver bean, which features both a synchronous blocking API and a non-blocking API based on CompletableFuture.
See the Micronaut Neo4j documentation for further information on configuring and using Neo4j within Micronaut.
The Micronaut framework supports a reactive and non-blocking client to connect to Postgres using vertx-pg-client, which can handle many database connections with a single thread.
Configuring the Reactive Postgres Client
|
Tip
|
Using the CLI
If you create your project using the Micronaut CLI, supply the |
To configure the Reactive Postgres client, first add the vertx-pg-client module to your build:
compile "io.micronaut.sql:micronaut-vertx-pg-client"For more information see the Configuring Reactive Postgres section of the Micronaut SQL libraries project.
The Micronaut framework features automatic configuration of the Lettuce driver for Redis via the redis-lettuce module.
Configuring Lettuce
|
Tip
|
Using the CLI
If you create your project using the Micronaut CLI, supply the |
To configure the Lettuce driver, first add the redis-lettuce module to your build:
compile "io.micronaut.redis:micronaut-redis-lettuce"Then configure the URI of the Redis server in your configuration file (e.g application.yml):
redis.uriredis.uri=redis://localhost|
Tip
|
The redis.uri setting must be in the format as described in the Connection URIs section of the Lettuce wiki
|
You can also specify multiple Redis URIs using redis.uris, in which case a RedisClusterClient is created instead.
For more information and further documentation see the Micronaut Redis documentation.
|
Tip
|
Using the CLI
If you create your project using the Micronaut CLI, supply the |
For more information see the Micronaut Cassandra Module documentation.
To configure the Micronaut integration with Liquibase, please follow these instructions.
To configure the Micronaut integration with Flyway, please follow these instructions
The Micronaut framework uses Slf4j to log messages. The default implementation for applications created via Micronaut Launch is Logback. Any other Slf4j implementation is supported, however.
To log messages, use the Slf4j LoggerFactory to get a logger for your class.
imports
import org.slf4j.Logger;
import org.slf4j.LoggerFactory;public class LoggerExample {
private static Logger logger = LoggerFactory.getLogger(LoggerExample.class);
public static void main(String[] args) {
logger.debug("Debug message");
logger.info("Info message");
logger.error("Error message");
}
}Log levels can be configured via properties defined in your configuration file (e.g. application.yml) (and environment variables) with the logger.levels prefix:
logger.levels.foo.bar=ERRORThe same configuration can be achieved by setting the environment variable LOGGER_LEVELS_FOO_BAR. Note that there is currently no way to set log levels for unconventional prefixes such as foo.barBaz.
Custom Logback XML Configuration
logger.config=/foo/custom-logback.xmlYou can also set a custom Logback XML configuration file to be used via logger.config.
The file is first checked on the classpath and then on the file system.
Disabling a Logger with Properties
To disable a logger, you need to set the logger level to OFF:
logger.levels.io.verbose.logger.who.CriedWolf=OFF-
This will disable ALL logging for the class
io.verbose.logger.who.CriedWolf
Note that the ability to control log levels via config is controlled via the LoggingSystem interface. Currently, the Micronaut framework includes a single implementation that allows setting log levels for the Logback library. If you use another library, you should provide a bean that implements this interface.
To use the logback library, add the following dependency to your build.
implementation("ch.qos.logback:logback-classic")|
Note
|
Logback 1.3.x+ included a breaking binary change that may prevent it working with 3.8.x of the Micronaut framework. If you are using Logback 1.3.x+ and are experiencing issues, please downgrade to Logback 1.2.x. |
If it does not exist yet, place a logback.xml file in the resources folder and modify the content for your needs. For example:
<configuration>
<appender name="STDOUT" class="ch.qos.logback.core.ConsoleAppender">
<encoder>
<pattern>%cyan(%d{HH:mm:ss.SSS}) %gray([%thread]) %highlight(%-5level) %magenta(%logger{36}) - %msg%n
</pattern>
</encoder>
</appender>
<root level="info">
<appender-ref ref="STDOUT"/>
</root>
</configuration>To change the log level for specific classes or package names, you can add such a logger entry to the configuration section:
<configuration>
...
<logger name="io.micronaut.context" level="TRACE"/>
...
</configuration>The Micronaut framework has a notion of a logging system. In short, it is a simple API to be able to set log levels in the logging implementation at runtime. Default implementations are provided for Logback and Log4j2. The behavior of the logging system can be overridden by creating your own implementation of LoggingSystem and replace the implementation being used with the @Replaces annotation.
Micronaut framework supports any JVM language that implements the Java Annotation Processor API.
Although Groovy does not support this API, special support has been built using AST transformations. The current list of supported languages is: Java, Groovy, and Kotlin (via the kapt tool).
|
Note
|
Theoretically any language that supports a way to analyze the AST at compile time could be supported. The io.micronaut.inject.writer package includes language-neutral classes that build BeanDefinition classes at compile time using the ASM tool. |
The following sections cover language-specific features and considerations for using Micronaut.
For Java, Micronaut framework uses a Java BeanDefinitionInjectProcessor annotation processor to process classes at compile time and produce BeanDefinition classes.
The major advantage here is that you pay a slight cost at compile time, but at runtime Micronaut framework is largely reflection-free, fast, and consumes very little memory.
The Micronaut framework is built with Java 8 but works fine with Java 9 and above. The classes that Micronaut generates sit alongside existing classes in the same package, hence do not violate anything regarding the Java module system.
There are some considerations when using Java 9+ with Micronaut.
The javax.annotation package
|
Tip
|
Using the CLI
If you create your project using the Micronaut CLI, the |
The javax.annotation, which includes @PostConstruct, @PreDestroy, etc. has been moved from the core JDK to a module. In general annotations in this package should be avoided and instead the jakarta.annotation equivalents used.
The Micronaut framework supports Gradle incremental annotation processing which speeds up builds by compiling only classes that have changed, avoiding a full recompilation.
However, the support is disabled by default since the Micronaut framework allows the definition of custom meta-annotations (to for example define custom AOP advice) that need to be configured for processing.
The following example demonstrates how to enable and configure incremental annotation processing for annotations you have defined under the com.example package:
tasks.withType(JavaCompile) {
options.compilerArgs = [
'-Amicronaut.processing.incremental=true',
'-Amicronaut.processing.annotations=com.example.*',
]
}|
Warning
|
If you do not enable processing for your custom annotations, they will be ignored by Micronaut, which may break your application. |
Project Lombok is a popular java library that adds a number of useful AST transformations to the Java language via annotation processors.
Since both the Micronaut framework and Lombok use annotation processors, special care must be taken when configuring Lombok to ensure that the Lombok processor runs before Micronaut’s processor.
If you use Gradle, add the following dependencies:
compileOnly 'org.projectlombok:lombok:1.18.24'
annotationProcessor "org.projectlombok:lombok:1.18.24"
...
// Micronaut processor defined after Lombok
annotationProcessor "io.micronaut:micronaut-inject-java"Or if using Maven:
<dependencies>
<dependency>
<groupId>org.projectlombok</groupId>
<artifactId>lombok</artifactId>
<version>1.18.24</version>
<scope>provided</scope>
</dependency>
</dependencies>
...
<annotationProcessorPaths combine.self="override">
<path>
<!-- must precede micronaut-inject-java -->
<groupId>org.projectlombok</groupId>
<artifactId>lombok</artifactId>
<version>1.18.24</version>
</path>
<path>
<groupId>io.micronaut</groupId>
<artifactId>micronaut-inject-java</artifactId>
<version>${micronaut.version}</version>
</path>
<path>
<groupId>io.micronaut.validation</groupId>
<artifactId>micronaut-validation-processor</artifactId>
<version>${micronaut.version}</version>
</path>
</annotationProcessorPaths>|
Note
|
In both cases (Gradle and Maven) the Micronaut processor must be configured after the Lombok processor. Reversing the order of the declared dependencies will not work. |
You can use any IDE to develop Micronaut applications, if you depend on your configured build tool (Gradle or Maven) to build the application.
However, running tests within the IDE is currently possible with IntelliJ IDEA or Eclipse 4.9 or higher.
See the section on IDE Setup in the Quick start for more information on how to configure IntelliJ and Eclipse.
By default, with Java, the parameter name data for method parameters is not retained at compile time. This can be a problem for the Micronaut framework if you do not define parameter names explicitly and depend on an external JAR that is already compiled.
Consider this interface:
interface HelloOperations {
@Get("/hello/{name}")
String hello(String name);
}At compile time the parameter name name is lost and becomes arg0 when compiled against or read via reflection later. To avoid this problem you have two options. You can either declare the parameter name explicitly:
interface HelloOperations {
@Get("/hello/{name}")
String hello(@QueryValue("name") String name);
}Or alternatively it is recommended that you compile all bytecode with -parameters flag to javac. See Obtaining Names of Method Parameters. For example in build.gradle:
compileJava.options.compilerArgs += '-parameters'Groovy has first-class support in Micronaut.
Groovy-Specific Modules
Additional modules exist specific to Groovy that improve the overall experience. These are detailed in the table below:
| Dependency | Description |
|---|---|
|
Includes AST transformations to generate bean definitions. Should be |
|
Adds the ability to specify configuration under |
|
Includes AST transforms that make it easier to write Functions for AWS Lambda |
The most common module you need is micronaut-inject-groovy, which enables DI and AOP for Groovy classes.
Groovy Support in the CLI
The Micronaut Command Line Interface includes special support for Groovy. To create a Groovy application, use the groovy lang option. For example:
$ mn create-app hello-world --lang groovyThe above generates a Groovy project, built with Gradle. Use the -build maven flag to generate a project built with Maven instead.
Once you have created an application with the groovy feature, commands like create-controller, create-client etc. generate Groovy files instead of Java. The following example demonstrates this when using interactive mode of the CLI:
$ mn
| Starting interactive mode...
| Enter a command name to run. Use TAB for completion:
mn>
create-bean create-client create-controller
create-job help
mn> create-bean helloBean
| Rendered template Bean.groovy to destination src/main/groovy/hello/world/HelloBean.groovyThe above example demonstrates creating a Groovy bean that looks like the following:
imports
package hello.world
import jakarta.inject.Singleton@Singleton
class HelloBean {
}|
Warning
|
Groovy automatically imports groovy.lang.Singleton which can be confusing as it conflicts with jakarta.inject.Singleton. Make sure you use jakarta.inject.Singleton when declaring a Micronaut singleton bean to avoid surprising behavior.
|
We can also create a client - don’t forget Micronaut framework can act as a client or a server!
mn> create-client hello
| Rendered template Client.groovy to destination src/main/groovy/hello/world/HelloClient.groovyimports
package hello.world
import io.micronaut.http.client.annotation.Client
import io.micronaut.http.annotation.Get
import io.micronaut.http.HttpStatus@Client("hello")
interface HelloClient {
@Get
HttpStatus index()
}Now let’s create a controller:
mn> create-controller hello
| Rendered template Controller.groovy to destination src/main/groovy/hello/world/HelloController.groovy
| Rendered template ControllerSpec.groovy to destination src/test/groovy/hello/world/HelloControllerSpec.groovy
mn>imports
package hello.world
import io.micronaut.http.annotation.Controller
import io.micronaut.http.annotation.Get
import io.micronaut.http.HttpStatus@Controller("/hello")
class HelloController {
@Get
HttpStatus index() {
return HttpStatus.OK
}
}As you can see from the output from the CLI, a Spock test was also generated for you which demonstrates how to test the controller:
...
void "test index"() {
given:
HttpResponse response = client.toBlocking().exchange("/hello")
expect:
response.status == HttpStatus.OK
}
...Notice how you use the Micronaut framework both as client and as a server to test itself.
Programmatic Routes with GroovyRouterBuilder
If you prefer to build your routes programmatically (similar to Grails UrlMappings), a special io.micronaut.web.router.GroovyRouteBuilder exists that has some enhancements to make the DSL better.
The following example shows GroovyRouteBuilder in action:
The above example results in the following routes:
-
/book- Maps toBookController.index() -
/book/hello/{message}- Maps toBookController.hello(String) -
/book/{id}- Maps toBookController.show(String id) -
/book/{id}/author- Maps toAuthorController.index
Serverless Functions with Groovy
A microservice application is just one way to use Micronaut. You can also use it for serverless functions like on AWS Lambda.
With the function-groovy module, the Micronaut framework features enhanced support for functions written in Groovy.
See the section on Serverless Functions for more information.
|
Tip
|
The Command Line Interface for Micronaut framework includes special support for Kotlin. To create a Kotlin application use the kotlin lang option. For example:
|
$ mn create-app hello-world --lang kotlinSince the 4.0 release, Micronaut framework offers support for Kotlin via Kapt or Kotlin Symbol Processing API.
Micronaut framework has offered support for Kotlin via Kapt.
With version 4.0, Micronaut framework supports Kotlin also via Kotlin Symbol Processing (KSP) API.
Please note that KAPT is in maintenance mode. Micronaut framework 4 includes experimental support for KSP which Kotlin users should consider migrating in the future.
kapt is in maintenance mode. We are keeping it up-to-date with recent Kotlin and Java releases but have no plans to implement new features.
KAPT supports existing Java annotation processors by generating Java stubs and feeding them into the Java annotation processors.
By skipping the generation of stubs, KSP offers several advantages:
-
Faster compilation.
-
Better support Kotlin native syntax.
|
Warning
|
If you use other annotation processors besides the Micronaut annotation processors, they will not work with KSP. |
The Kapt compiler plugin includes support for Java annotation processors. To use Kotlin in your Micronaut application, add the proper dependencies to configure and run kapt on your kt source files. Kapt creates Java "stub" classes for your Kotlin classes, which can then be processed by Micronaut’s Java annotation processor. The stubs are not included in the final compiled application.
|
Tip
|
Learn more about kapt and its features from the official documentation. |
The Micronaut annotation processors are declared in the kapt scope when using Gradle. For example:
With a build.gradle file similar to the above, you can now run your Micronaut application using the run task (provided by the Application plugin):
$ ./gradlew runYou can build Micronaut applications with Kotlin and KSP:
Kotlin Symbol Processing (KSP) is an API that you can use to develop lightweight compiler plugins. KSP provides a simplified compiler plugin API that leverages the power of Kotlin while keeping the learning curve at a minimum. Compared to kapt, annotation processors that use KSP can run up to 2 times faster.
If you use the Micronaut Gradle Plugin, you can build Micronaut applications with Kotlin and KSP. You need to apply the com.google.devtools.ksp Gradle plugin.
plugins {
id("org.jetbrains.kotlin.jvm") version "1.9.20"
id("com.google.devtools.ksp") version "1.9.20-1.0.13"
id("org.jetbrains.kotlin.plugin.allopen") version "1.9.20"
id("io.micronaut.application") version "4.4.4" // get latest version from https://plugins.gradle.org/plugin/io.micronaut.application
}
version = "0.1"
group = "example.micronaut"
repositories {
mavenCentral()
}
dependencies {
runtimeOnly("ch.qos.logback:logback-classic")
runtimeOnly("org.yaml:snakeyaml")
implementation("io.micronaut:micronaut-jackson-databind")
testImplementation("io.micronaut:micronaut-http-client")
}
application {
mainClass.set("example.micronaut.Application")
}
graalvmNative.toolchainDetection.set(false)
micronaut {
runtime("netty")
testRuntime("junit5")
processing {
incremental(true)
annotations("example.micronaut.*")
}
}If you don’t use the Micronaut Gradle Plugin, in addition to applying the com.google.devtools.ksp Gradle plugin, you have to add micronaut-inject-kotlin with the ksp configuration.
ksp(platform("io.micronaut.platform:micronaut-platform:$micronautVersion"))
ksp("io.micronaut:micronaut-inject-kotlin")
kspTest(platform("io.micronaut.platform:micronaut-platform:$micronautVersion"))
kspTest("io.micronaut:micronaut-inject-kotlin")Unfortunately, KSP doesn’t see the changes in the classes made by other compiler plugins, which breaks integration with the allopen plugin.
To make the integration work, we have introduced an experimental KSP property kotlin.allopen.annotations for the annotation processor. The property expects a list of annotations that are open, separated by |. It’s also supported to use the system property of the same name, but that might be unreliable considering build daemons can be cached.
allOpen {
annotations("io.micronaut.docs.aop.around.OpenSingleton", "io.micronaut.docs.aop.around.AnotherOpenSingleton")
}ksp {
arg("kotlin.allopen.annotations", "io.micronaut.docs.aop.around.OpenSingleton|io.micronaut.docs.aop.around.AnotherOpenSingleton")
}|
Note
|
Kotlin All-Open plugin supports only class level annotations - it’s not possible to open a class just by a method annotation |
An example controller written in Kotlin can be seen below:
imports
package example
import io.micronaut.http.annotation.*@Controller("/")
class HelloController {
@Get("/hello/{name}")
fun hello(name: String): String {
return "Hello $name"
}
}As of this writing, IntelliJ’s built-in compiler does not directly support Kapt and annotation processing. You must instead configure Intellij to run Gradle (or Maven) compilation as a build step before running your tests or application class.
First, edit the run configuration for tests or for the application and select "Run Gradle task" as a build step:
Then add the classes task as task to execute for the application or for tests the testClasses task:
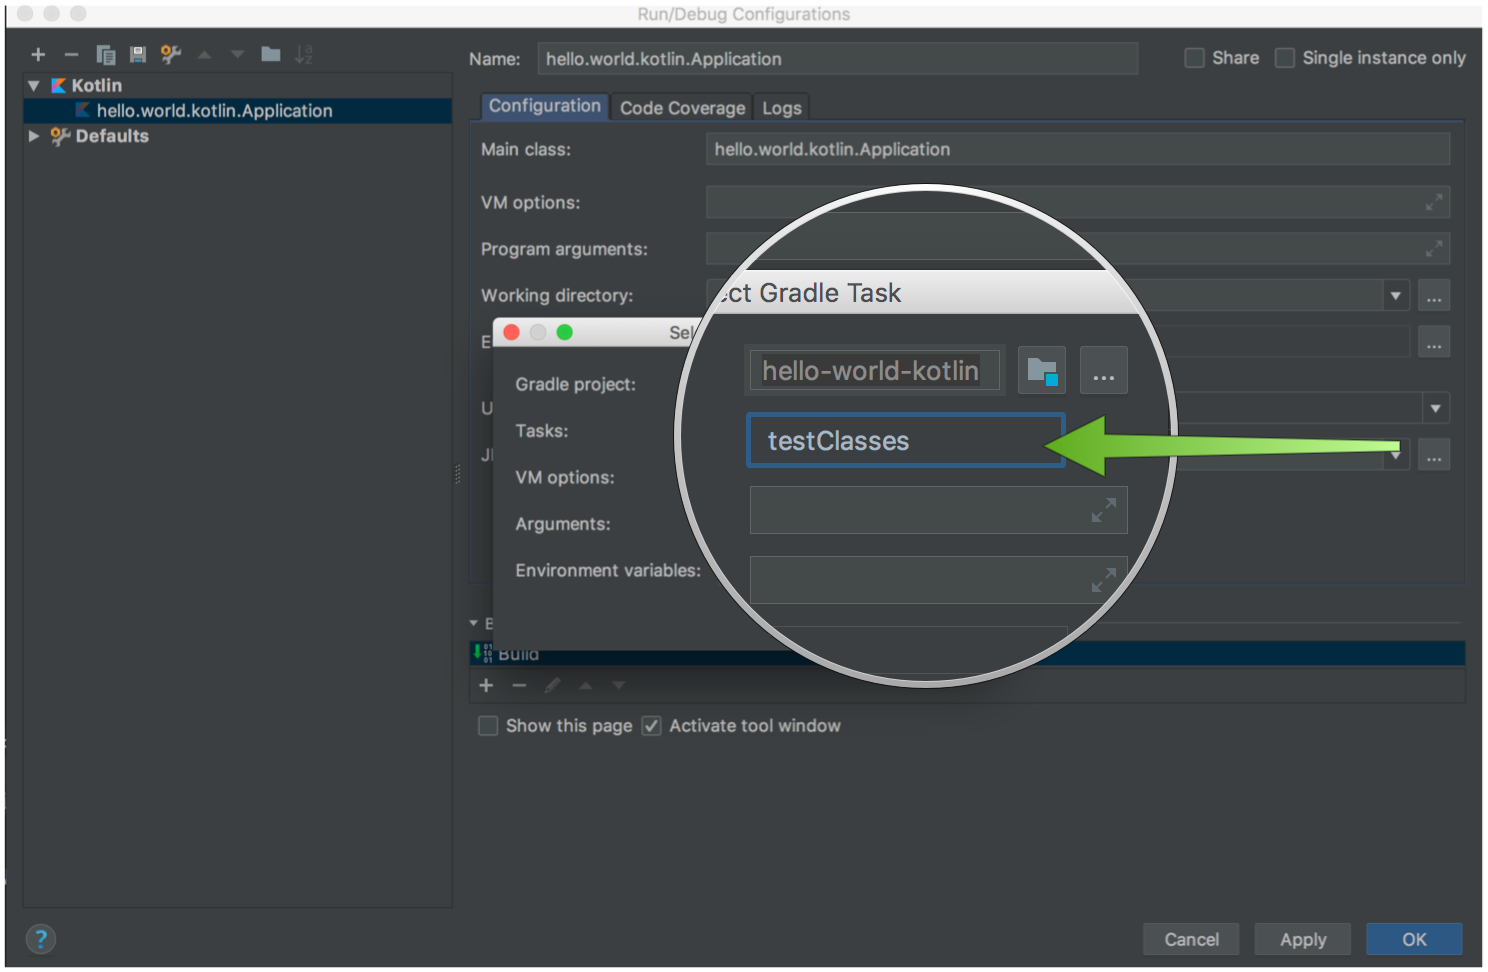
Now when you run tests or start the application, the Micronaut framework will generate classes at compile time.
Alternatively, you can delegate IntelliJ build/run actions to Gradle completely:
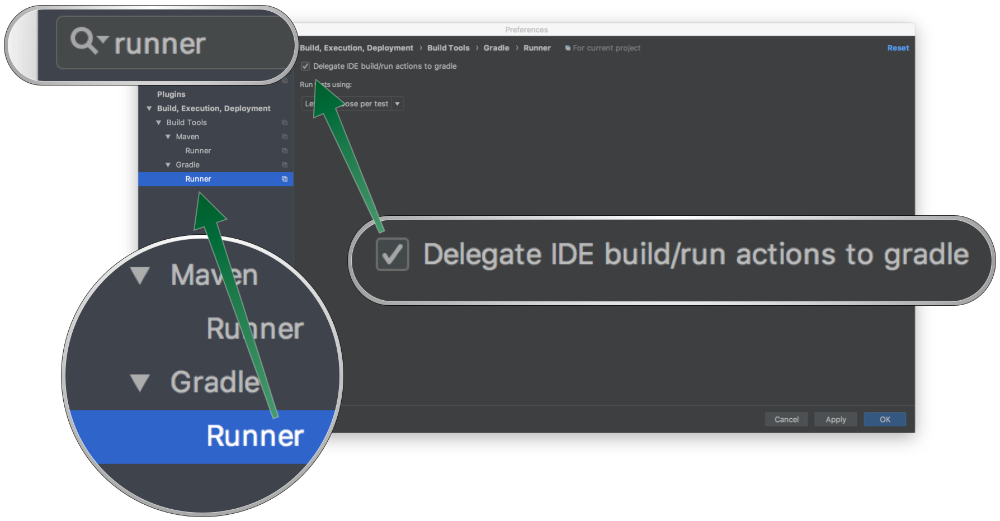
To enable Gradle incremental annotation processing with Kapt, the arguments as specified in Incremental Annotation Processing with Gradle must be sent to Kapt.
The following example demonstrates how to enable and configure incremental annotation processing for annotations you have defined under the com.example and io.example packages:
kapt {
arguments {
arg("micronaut.processing.incremental", true)
arg("micronaut.processing.annotations", "com.example.*,io.example.*")
}
}|
Warning
|
If you do not enable processing for your custom annotations, they will be ignored by Micronaut, which may break your application. |
The Micronaut framework provides a compile-time AOP API that does not use reflection. When you use any Micronaut AOP Advice, it creates a subclass at compile-time to provide the AOP behaviour. This can be a problem because Kotlin classes are final by default. If the application was created with the Micronaut CLI, the Kotlin all-open plugin is configured for you to automatically change your classes to open when an AOP annotation is used. To configure it yourself, add the Around class to the list of supported annotations.
If you prefer not to or cannot use the all-open plugin, you must declare the classes that are annotated with an AOP annotation to be open:
|
Note
|
The all-open plugin does not handle methods. If you declare an AOP annotation on a method, you must manually declare it as open.
|
Like with Java, the parameter name data for method parameters is not retained at compile time when using Kotlin. This can be a problem for the Micronaut framework if you do not define parameter names explicitly and depend on an external JAR that is already compiled.
To enable retention of parameter name data with Kotlin, set the javaParameters option to true in your build.gradle:
compileTestKotlin {
kotlinOptions {
javaParameters = true
}
}|
Note
|
If you use interfaces with default methods add freeCompilerArgs = ["-Xjvm-default=all"] for the Micronaut framework to recognize them.
|
Or if using Maven configure the Micronaut Maven Plugin accordingly:
<project xmlns="http://maven.apache.org/POM/4.0.0" xmlns:xsi="http://www.w3.org/2001/XMLSchema-instance"
xsi:schemaLocation="http://maven.apache.org/POM/4.0.0 http://maven.apache.org/xsd/maven-4.0.0.xsd">
<!-- ... -->
<build>
<plugins>
<!-- ... -->
<plugin>
<artifactId>kotlin-maven-plugin</artifactId>
<groupId>org.jetbrains.kotlin</groupId>
<configuration>
<javaParameters>true</javaParameters>
<!-- ... -->
</configuration>
<!-- ... -->
</plugin>
<!-- ... -->
</plugins>
</build>
</project>Kotlin coroutines allow you to create asynchronous applications with imperative style code. A Micronaut controller action can be a suspend function:
@Status(HttpStatus.CREATED)
@Get("/statusDelayed")
suspend fun statusDelayed() {
delay(1)
}You can also use Flow type for streaming server and client. A streaming controller can return Flow, for example:
A streaming client can simply return a Flow, for example:
The Micronaut framework supports tracing context propagation. If you use suspend functions all the way from your controller actions down to all your services,
you don’t have to do anything special. However, when you create coroutines within a regular function, tracing propagation won’t happen automatically.
You have to use a HttpCoroutineContextFactory<CoroutineTracingDispatcher> to create a new CoroutineTracingDispatcher and use it as a CoroutineContext.
Following example shows how this might look like:
@Controller
class SimpleController(
private val coroutineTracingDispatcherFactory: HttpCoroutineContextFactory<CoroutineTracingDispatcher>
) {
@Get("/runParallelly")
fun runParallelly(): String = runBlocking {
val a = async(Dispatchers.Default + coroutineTracingDispatcherFactory.create()) {
val traceId = MDC.get("traceId")
println("$traceId: Calculating sth...")
calculateSth()
}
val b = async(Dispatchers.Default + coroutineTracingDispatcherFactory.create()) {
val traceId = MDC.get("traceId")
println("$traceId: Calculating sth else...")
calculateSthElse()
}
a.await() + b.await()
}
}The Micronaut framework supports context propagation from Reactor’s context to coroutine context. To enable this propagation you need to include following dependency:
implementation("org.jetbrains.kotlinx:kotlinx-coroutines-reactor")For more detailed information on how to use the library you can find at the official documentation.
|
Note
|
Since Micronaut framework 4, we recommend using the latest Context Propagation API. The ThreadPropagatedContextElement is inspired by Kotlin Coroutines propagation API element kotlinx.coroutines.ThreadContextElement and acts similarly by restoring thread locals.
|
Following example shows how to propagate Reactor context from the HTTP filter to the controller’s coroutine:
@Filter(Filter.MATCH_ALL_PATTERN)
class ReactorHttpServerFilter : HttpServerFilter {
override fun doFilter(request: HttpRequest<*>, chain: ServerFilterChain): Publisher<MutableHttpResponse<*>> {
val trackingId = request.headers["X-TrackingId"] as String
return Mono.from(chain.proceed(request)).contextWrite {
it.put("reactorTrackingId", trackingId)
}
}
override fun getOrder(): Int = 1
}Access Reactor context by retrieving ReactorContext from the coroutine context:
@Get("/data")
suspend fun getTracingId(request: HttpRequest<*>): String {
val reactorContextView = currentCoroutineContext()[ReactorContext.Key]!!.context
return reactorContextView.get("reactorTrackingId") as String
}It’s possible to use coroutines Reactor integration to create a filter using a suspended function:
@Filter(Filter.MATCH_ALL_PATTERN)
class SuspendHttpServerFilter : CoroutineHttpServerFilter {
override suspend fun filter(request: HttpRequest<*>, chain: ServerFilterChain): MutableHttpResponse<*> {
val trackingId = request.headers["X-TrackingId"] as String
//withContext does not merge the current context so data may be lost
return withContext(Context.of("suspendTrackingId", trackingId).asCoroutineContext()) {
chain.next(request)
}
}
override fun getOrder(): Int = 0
}
interface CoroutineHttpServerFilter : HttpServerFilter {
suspend fun filter(request: HttpRequest<*>, chain: ServerFilterChain): MutableHttpResponse<*>
override fun doFilter(request: HttpRequest<*>, chain: ServerFilterChain): Publisher<MutableHttpResponse<*>> {
return mono {
filter(request, chain)
}
}
}
suspend fun ServerFilterChain.next(request: HttpRequest<*>): MutableHttpResponse<*> {
return this.proceed(request).asFlow().single()
}GraalVM is an advanced JDK with ahead-of-time Native Image compilation, to generate native executables of Micronaut applications.
Any Micronaut application can be run on the GraalVM JDK, however special support has been added to Micronaut to support running Micronaut applications using GraalVM’s native-image tool.
Micronaut framework currently supports GraalVM version 23.1.8 and the team is improving the support in every new release. Don’t hesitate to report issues however if you find any problem.
Many of Micronaut’s modules and third-party libraries have been verified to work with GraalVM: HTTP server, HTTP client, Function support, Micronaut Data JDBC and JPA, Service Discovery, RabbitMQ, Views, Security, Zipkin, etc. Support for other modules is evolving and will improve over time.
Getting Started
|
Note
|
Only Java and Kotlin projects support using GraalVM’s native-image tool. Groovy relies heavily on reflection, which is only partially supported by GraalVM.
|
To start using GraalVM, install this JDK. The easiest way to install GraalVM on Linux or Mac is to use SDKMAN!. For other installation options, visit the Downloads page.
Getting Started with Micronaut Framework and GraalVM
Starting with Micronaut framework 2.2, any Micronaut application can be built into a native image using the Micronaut Gradle or Maven plugins. To get started, create a new application.
$ mn create-app hello-worldYou can use --build maven for a Maven build.
Building a Native Image Using Docker
To build your native image using Docker and Gradle, run:
$ ./gradlew dockerBuildNativeTo build your native image using Docker and Maven, run:
$ ./mvnw package -Dpackaging=docker-nativeBuilding a Native Image Without Using Docker
To build your native image without using Docker, install a GraalVM JDK. The easiest way to install GraalVM on Linux or Mac is to use SDKMAN!. For other installation options, visit the Downloads page.
$ sdk install java 23.1.8-graal
$ sdk use java 23.1.8-graalOnce you install GraalVM, the native-image tool becomes available.
Gradle
You can build a native image with Gradle by running the nativeCompile task:
$ ./gradlew nativeCompileThe native executable file is created in the build/native/nativeCompile directory.
You can then run it from that directory: ./build/native/nativeCompile/hello-world.
It is possible to pass additional build arguments to native-image using the Gradle plugin for Native Image building.
Add the following configuration to build.gradle:
Maven
To create a native image with Maven, use the native-image packaging format:
$ ./mvnw package -Dpackaging=native-imageThe native executable file is created in the target/ directory.
You can then run it from that directory: ./target/hello-world.
It is possible to pass additional build arguments to native-image using the Maven plugin for Native Image building.
Declare the plugin as following:
Understanding Micronaut Framework and GraalVM
The Micronaut framework itself does not rely on reflection or dynamic class loading, so it works automatically with GraalVM Native Image. However certain third-party libraries used by Micronaut may require additional input about uses of reflection.
The Micronaut framework includes an annotation processor that helps to generate reflection configuration that is automatically picked up by the native-image tool:
annotationProcessor("io.micronaut:micronaut-graal")This processor generates additional classes that implement the GraalReflectionConfigurer interface and programmatically register reflection configuration.
For example, see the following class:
imports
package example;
import io.micronaut.core.annotation.ReflectiveAccess;@ReflectiveAccess
class Test {
...
}The above example results in the public methods, declared fields, and declared constructors of example.Test being registered for reflective access.
If you have more advanced requirements and wish to include only certain fields or methods, use the annotation on any constructor, field, or method to include only the specific field, constructor, or method.
Adding Additional Classes for Reflective Access
The Micronaut framework provides several annotations to specify additional classes that should be included in the generated reflection configuration, such as:
-
@ReflectiveAccess - An annotation that can be declared on a specific type, constructor, method, or field to enable reflective access just for the annotated element.
-
@TypeHint - An annotation that allows to bulk configuration of reflective access to one or many types.
-
@ReflectionConfig - A repeatable annotation that directly models the reflection configuration in JSON format.
The @ReflectiveAccess annotation is typically used on a particular type, constructor, method, or field whilst the latter two are typically used on a module or Application class to include classes that are needed reflectively.
See the following example from Micronaut’s Jackson module with @TypeHint:
@TypeHint annotationAlternatively, use the @ReflectionConfig annotation which is repeatable and allows distinct configuration per type:
@ReflectionConfig annotation@ReflectionConfig(
type = PropertyNamingStrategy.UpperCamelCaseStrategy.class,
accessType = TypeHint.AccessType.ALL_DECLARED_CONSTRUCTORS
)
@ReflectionConfig(
type = ArrayList.class,
accessType = TypeHint.AccessType.ALL_DECLARED_CONSTRUCTORS
)
@ReflectionConfig(
type = LinkedHashMap.class,
accessType = TypeHint.AccessType.ALL_DECLARED_CONSTRUCTORS
)
@ReflectionConfig(
type = HashSet.class,
accessType = TypeHint.AccessType.ALL_DECLARED_CONSTRUCTORS
)Generating Native Images
GraalVM’s native-image command generates native images. You can use this command manually to generate your native image. For example:
native-image commandOnce the image is built, run the application using its name:
$ ./hello-world
15:15:15.153 [main] INFO io.micronaut.runtime.Micronaut - Startup completed in 14ms. Server Running: http://localhost:8080As you can see, the native image startup completes in milliseconds, and memory consumption does not include the overhead of the JVM (a native Micronaut application runs with just 20MB of memory).
Resource File Generation
How does Micronaut Framework manage to run on GraalVM?
The Micronaut framework features a Dependency Injection and Aspect-Oriented Programming runtime that uses no reflection. This makes it easier for Micronaut applications to run on GraalVM since there are compatibility concerns particularly around reflection in Native Image.
How can I make a Micronaut application that uses Picocli run on GraalVM?
Picocli provides a picocli-codegen module with a tool for generating a GraalVM reflection configuration file. The tool can be run manually or automatically as part of the build. The module’s README has usage instructions with code snippets for configuring Gradle and Maven to generate a cli-reflect.json file automatically as part of the build. Add the generated file to the -H:ReflectionConfigurationFiles option when running the native-image tool.
What about other third-party libraries?
The Micronaut framework cannot guarantee that third-party libraries work with GraalVM Native Image. It is up to each individual library to implement support.
I Get a "Class XXX is instantiated reflectively…" exception. What do I do?
If you get an error such as:
Class myclass.Foo[] is instantiated reflectively but was never registered. Register the class by using org.graalvm.nativeimage.RuntimeReflectionYou may need to manually tweak the generated reflect.json file. For regular classes you need to add an entry into the array:
[
{
"name" : "myclass.Foo",
"allDeclaredConstructors" : true
},
...
]Learn more about providing reflection configuration in the Native Image Reachability documentation. For arrays, this must use the Java JVM internal array representation. For example:
[
{
"name" : "[Lmyclass.Foo;",
"allDeclaredConstructors" : true
},
...
]What if I want to set the maximum heap size with -Xmx, but I get an OutOfMemoryError?
If you set the maximum heap size in the Dockerfile that you use to build your native image, you will probably get a runtime error like this:
java.lang.OutOfMemoryError: Direct buffer memoryThe problem is that Netty tries to allocate 16MB of memory per chunk with its default settings for io.netty.allocator.pageSize and io.netty.allocator.maxOrder:
int defaultChunkSize = DEFAULT_PAGE_SIZE << DEFAULT_MAX_ORDER; // 8192 << 11 = 16MBThe simplest solution is to specify io.netty.allocator.maxOrder explicitly in your Dockerfile’s entrypoint. See below a working example with -Xmx64m:
ENTRYPOINT ["/app/application", "-Xmx64m", "-Dio.netty.allocator.maxOrder=8"]To go further, you can also experiment with io.netty.allocator.numHeapArenas or io.netty.allocator.numDirectArenas. You can find more information about Netty’s PooledByteBufAllocator in the official documentation.
|
Tip
|
Using the CLI
If you create your project using the Micronaut CLI, supply the |
Inspired by Spring Boot and Grails, the Micronaut management dependency adds support for monitoring of your application via endpoints: special URIs that return details about the health and state of your application. The management endpoints are also integrated with Micronaut’s security dependency, allowing for sensitive data to be restricted to authenticated users in your security system (see Built-in Endpoints Access in the Security section).
To use the management features described in this section, add this dependency to your build:
implementation("io.micronaut:micronaut-management")In addition to the Built-In Endpoints, the management dependency also provides support for creating custom endpoints. These can be enabled and configured like the built-in endpoints, and can be used to retrieve and return any metrics or other application data.
An Endpoint can be created by annotating a class with the Endpoint annotation, and supplying it with (at minimum) an endpoint id.
@Endpoint("foo")
class FooEndpoint {
...
}If a single String argument is supplied to the annotation, it is used as the endpoint id.
It is possible to supply additional (named) arguments to the annotation. Other possible arguments to @Endpoint are described in the table below:
| Argument | Description | Endpoint Example |
|---|---|---|
|
The endpoint id (or name) |
|
|
Prefix used for configuring the endpoint (see Endpoint Configuration) |
|
|
Sets whether the endpoint is enabled when no configuration is set (see Endpoint Configuration) |
|
|
Sets whether the endpoint is sensitive if no configuration is set (see Endpoint Configuration) |
|
Example of custom Endpoint
The following example Endpoint class creates an endpoint accessible at /date:
imports
import io.micronaut.management.endpoint.annotation.Endpoint;@Endpoint(id = "date",
prefix = "custom",
defaultEnabled = true,
defaultSensitive = false)
public class CurrentDateEndpoint {
//.. endpoint methods
}Endpoints respond to GET ("read"), POST ("write") and DELETE ("delete") requests. To return a response from an endpoint, annotate its public method(s) with one of the following annotations:
| Annotation | Description |
|---|---|
Responds to |
|
Responds to |
|
Responds to |
Read Methods
Annotating a method with the Read annotation causes it to respond to GET requests.
imports
import io.micronaut.management.endpoint.annotation.Endpoint;
import io.micronaut.management.endpoint.annotation.Read;@Endpoint(id = "date",
prefix = "custom",
defaultEnabled = true,
defaultSensitive = false)
public class CurrentDateEndpoint {
private Date currentDate;
@Read
public Date currentDate() {
return currentDate;
}
}The above method responds to the following request:
$ curl -X GET localhost:55838/date
1526085903689The Read annotation accepts an optional produces argument, which sets the media type returned from the method (default is application/json):
The above method responds to the following request:
$ curl -X GET localhost:8080/date/the_date_is
the_date_is: Fri May 11 19:24:21 CDTWrite Methods
Annotating a method with the Write annotation causes it to respond to POST requests.
imports
import io.micronaut.management.endpoint.annotation.Endpoint;
import io.micronaut.management.endpoint.annotation.Write;
import io.micronaut.http.MediaType;
import io.micronaut.management.endpoint.annotation.Selector;@Endpoint(id = "date",
prefix = "custom",
defaultEnabled = true,
defaultSensitive = false)
public class CurrentDateEndpoint {
private Date currentDate;
@Write
public String reset() {
currentDate = new Date();
return "Current date reset";
}
}The above method responds to the following request:
$ curl -X POST http://localhost:39357/date
Current date resetThe Write annotation accepts an optional consumes argument, which sets the media type accepted by the method (default is application/json):
imports
import io.micronaut.context.annotation.Requires;
import io.micronaut.management.endpoint.annotation.Endpoint;
import io.micronaut.management.endpoint.annotation.Write;
import io.micronaut.http.MediaType;@Endpoint(id = "message", defaultSensitive = false)
public class MessageEndpoint {
String message;
@Write(consumes = MediaType.APPLICATION_FORM_URLENCODED, produces = MediaType.TEXT_PLAIN)
public String updateMessage(String newMessage) {
this.message = newMessage;
return "Message updated";
}
}The above method responds to the following request:
$ curl -X POST http://localhost:65013/message -H 'Content-Type: application/x-www-form-urlencoded' -d $'newMessage=A new message'
Message updatedDelete Methods
Annotating a method with the Delete annotation causes it to respond to DELETE requests.
imports
import io.micronaut.context.annotation.Requires;
import io.micronaut.management.endpoint.annotation.Endpoint;
import io.micronaut.management.endpoint.annotation.Delete;@Endpoint(id = "message", defaultSensitive = false)
public class MessageEndpoint {
String message;
@Delete
public String deleteMessage() {
this.message = null;
return "Message deleted";
}
}The above method responds to the following request:
$ curl -X DELETE http://localhost:65013/message
Message deletedEndpoint sensitivity can be controlled for the entire endpoint through the endpoint annotation and configuration. Individual methods can be configured independently of the endpoint as a whole, however. The @Sensitive annotation can be applied to methods to control their sensitivity.
If the configuration key endpoints.alerts.add.sensitive is set, that value determines the sensitivity of the addAlert method.
-
endpointis the first token because that is the default value forprefixin the endpoint annotation and is not set explicitly in this example. -
alertsis the next token because that is the endpoint id -
add.sensitiveis the next token because that is the value set to thepropertymember of the @Sensitive annotation.
If the configuration key is not set, the defaultValue is used (defaults to true).
Endpoints with the endpoints prefix can be configured through their default endpoint id. If an endpoint exists with the id of foo, it can be configured through endpoints.foo. In addition, default values can be provided through the all prefix.
For example, consider the following endpoint.
@Endpoint("foo")
class FooEndpoint {
...
}By default, the endpoint is enabled. To disable it, set endpoints.foo.enabled to false. If endpoints.foo.enabled is not set and endpoints.all.enabled is false, the endpoint will be disabled.
The configuration values for the endpoint override those for all. If endpoints.foo.enabled is true and endpoints.all.enabled is false, the endpoint will be enabled.
For all endpoints, the following configuration values can be set.
endpoints.<any endpoint id>.enabled=Boolean
endpoints.<any endpoint id>.sensitive=Boolean|
Note
|
The base path for all endpoints is / by default. If you prefer the endpoints to be available under a different base path, configure endpoints.all.path. For example, if the value is set to /endpoints/, the foo endpoint will be accessible at /endpoints/foo, relative to the context path. Note that the leading and trailing / are required for endpoints.all.path unless micronaut.server.context-path is set, in which case the leading / isn’t necessary.
|
When the management dependency is added to your project, the following built-in endpoints are enabled by default:
| Endpoint | URI | Description |
|---|---|---|
|
Returns information about the loaded bean definitions in the application (see BeansEndpoint) |
|
|
Returns information about the "health" of the application (see HealthEndpoint) |
|
|
Returns static information from the state of the application (see InfoEndpoint) |
|
|
Returns information about available loggers and permits changing the configured log level (see LoggersEndpoint) |
|
|
Return the application metrics. Requires the |
|
|
Refreshes the application state (see RefreshEndpoint) |
|
|
Returns information about URIs available to be called for your application (see RoutesEndpoint) |
|
|
Returns information about the current threads in the application. |
In addition, the following built-in endpoint(s) are provided by the management dependency but are not enabled by default:
| Endpoint | URI | Description |
|---|---|---|
|
Returns information about the environment and its property sources (see EnvironmentEndpoint) |
|
|
Returns information about the caches and permits invalidating them (see CachesEndpoint) |
|
|
Shuts down the application server (see ServerStopEndpoint) |
|
Warning
|
It is possible to open all endpoints for unauthenticated access defining endpoints.all.sensitive: false but
this should be used with care because private and sensitive information will be exposed.
|
Management Port
By default, all management endpoints are exposed over the same port as the application. You can alter this behaviour by specifying the endpoints.all.port setting:
endpoints.all.port=8085In the above example the management endpoints are exposed only over port 8085.
JMX
The Micronaut framework provides functionality to register endpoints with JMX. See the section on JMX to get started.
The beans endpoint returns information about the loaded bean definitions in the application. The bean data returned by default is an object where the key is the bean definition class name and the value is an object of properties about the bean.
To execute the beans endpoint, send a GET request to /beans.
Configuration
To configure the beans endpoint, supply configuration through endpoints.beans.
endpoints.beans.enabled=Boolean
endpoints.beans.sensitive=BooleanCustomization
The beans endpoint is composed of a bean definition data collector and a bean data implementation. The bean definition data collector (BeanDefinitionDataCollector) is responsible for returning a publisher that returns the data used in the response. The bean definition data (BeanDefinitionData) is responsible for returning data about an individual bean definition.
To override the default behavior for either of the helper classes, either extend the default implementations (DefaultBeanDefinitionDataCollector, DefaultBeanDefinitionData), or implement the relevant interface directly. To ensure your implementation is used instead of the default, add the @Replaces annotation to your class with the value being the default implementation.
The info endpoint returns static information from the state of the application. The info exposed can be provided by any number of "info sources".
To execute the info endpoint, send a GET request to /info.
Configuration
To configure the info endpoint, supply configuration through endpoints.info.
endpoints.info.enabled=Boolean
endpoints.info.sensitive=BooleanCustomization
The info endpoint consists of an info aggregator and any number of info sources. To add an info source, create a bean class that implements InfoSource. If your info source needs to retrieve data from Java properties files, extend the PropertiesInfoSource interface which provides a helper method for this purpose.
All info source beans are collected together with the info aggregator. To provide your own implementation of the info aggregator, create a class that implements InfoAggregator and register it as a bean. To ensure your implementation is used instead of the default, add the @Replaces annotation to your class with the value being the default implementation.
The default info aggregator returns a map containing the combined properties returned by all the info sources. This map is returned as JSON from the /info endpoint.
Provided Info Sources
Configuration Info Source
The ConfigurationInfoSource returns configuration properties under the info key. In addition to string, integer and boolean values, more complex properties can be exposed as maps in the JSON output (if the configuration format supports it).
application.groovy)info.demo.string = "demo string"
info.demo.number = 123
info.demo.map = [key: 'value', other_key: 123]The above config results in the following JSON response from the info endpoint:
{
"demo": {
"string": "demo string",
"number": 123,
"map": {
"key": "value",
"other_key": 123
}
}
}Configuration
The configuration info source can be disabled using the endpoints.info.config.enabled property.
Git Info Source
If a git.properties file is available on the classpath, the GitInfoSource exposes the values in that file under the git key. Generating of a git.properties file must be configured as part of your build. One easy option for Gradle users is the Gradle Git Properties Plugin. Maven users can use the Maven Git Commit ID Plugin.
Configuration
To specify an alternate path or name of the properties file, supply a custom value in the endpoints.info.git.location property.
The git info source can be disabled using the endpoints.info.git.enabled property.
Build Info Source
If a META-INF/build-info.properties file is available on the classpath, the BuildInfoSource exposes the values in that file under the build key. Generating a build-info.properties file must be configured as part of your build. One easy option for Gradle users is the Gradle Build Info Plugin. An option for Maven users is the Spring Boot Maven Plugin
Configuration
To specify an alternate path/name of the properties file, supply a custom value in the endpoints.info.build.location property.
The build info source can be disabled using the endpoints.info.build.enabled property.
The health endpoint returns information about the "health" of the application, which is determined by any number of "health indicators".
Send a GET request to /health to execute the health endpoint. Additionally, the health endpoint exposes /health/liveness and /health/readiness health indicators.
A positive liveness check (/health/liveness) means the application is running and not stuck. If it fails, the application might need to be restarted.
A positive readiness check (/health/readiness) means the application is fully initialized and ready to handle requests.
|
Tip
|
See the guide for Exposing a Health Endpoint for your Micronaut Application to learn more. |
To configure the health endpoint, supply configuration through endpoints.health.
endpoints.health.enabled=Boolean
endpoints.health.sensitive=Boolean
endpoints.health.details-visible=String
endpoints.health.status.http-mapping=Map<String, HttpStatus>-
details-visibleis one of DetailsVisibility
The details-visible setting controls whether health detail will be exposed to users who are not authenticated. If the details-visible parameter is configured as ANONYMOUS, while the sensitive flag is set to true, the resulting outcome will be 401 Unauthorized.
For example, setting:
details-visibleendpoints.health.details-visible=ANONYMOUSexposes detailed information from the various health indicators about the health status of the application to anonymous unauthenticated users.
The endpoints.health.status.http-mapping setting controls which status codes to return for each health status. The defaults are described in the table below:
| Status | HTTP Code |
|---|---|
OK (200) |
|
OK (200) |
|
SERVICE_UNAVAILABLE (503) |
You can provide custom mappings in your configuration file (e.g application.yml):
endpoints.health.status.http-mapping.DOWN=200The above returns OK (200) even when the HealthStatus is DOWN.
The DefaultHealthAggregator also emits log statements for health indicator status and details. To log this information use Level.DEBUG for just health indicator status or use Level.TRACE for both status and details. For example:
The health endpoint consists of a health aggregator and any number of health indicators. To add a health indicator, create a bean class that implements HealthIndicator. It is recommended to also use either @Liveness or @Readiness qualifier. If no qualifier is used, the health indicator will be part of /health and /health/readiness endpoints. A base class AbstractHealthIndicator is available to subclass to make the process easier.
All health indicator beans are collected together with the health aggregator. To provide your own implementation of the health aggregator, create a class that implements HealthAggregator and register it as a bean. To ensure your implementation is used instead of the default, add the @Replaces annotation to your class with the value being the default implementation DefaultHealthAggregator.
The default health aggregator returns an overall status calculated based on the health statuses of the indicators. A health status consists of several pieces of information.
Name |
The name of the status |
Description |
The description of the status |
Operational |
Whether the functionality the indicator represents is functional |
Severity |
How severe the status is. A higher number is more severe |
The "worst" status is returned as the overall status. A non-operational status is selected over an operational status. A higher severity is selected over a lower severity.
A continuous health monitor that updates the CurrentHealthStatus in a background thread can be enabled when using EmbeddedServer with the following application configuration:
micronaut.application.name=foo
micronaut.health.monitor.enabled=true-
Both configuration properties are required to enable the monitor background task.
Similarly to DefaultHealthAggregator it also emits log statements for health indicator status and details. To log this use the following logger configuration:
<logger name="io.micronaut.management.health.monitor.HealthMonitorTask" level="trace" />All the Micronaut framework provided health indicators are exposed on /health and /health/readiness endpoints.
| Indicator | Configuration Toggle | Default Value |
|---|---|---|
|
|
|
|
|
|
|
|
|
|
|
|
|
|
|
|
|
|
A health indicator is provided that determines the health of the application based on the amount of free disk space. Configuration for the disk space health indicator can be provided under the endpoints.health.disk-space key.
endpoints.health.disk-space.enabled=Boolean
endpoints.health.disk-space.path=String
endpoints.health.disk-space.threshold=String | Long-
pathspecifies the path used to determine the disk space -
thresholdspecifies the minimum amount of free space
The threshold can be provided as a string like "10MB" or "200KB", or the number of bytes.
The JDBC health indicator determines the health of your application based on the ability to successfully create connections to datasources in the application context. The only configuration option supported is to enable or disable the indicator by the endpoints.health.jdbc.enabled key.
The deadlocked threads health indicator uses the ThreadMXBean to check for deadlocked threads and is part of the /health and /health/liveness endpoints.
Its only configuration option is to enable or disable the indicator by the endpoints.health.deadlocked-thread.enabled key. It is enabled by default.
The health status is set to DOWN if any deadlocked threads are found and their ThreadInfo including a formatted stacktrace are given in the details. See below for an example.
{
"name": "example-app",
"status": "DOWN",
"details": {
"deadlockedThreads": {
"name": "example-app",
"status": "DOWN",
"details": [
{
"threadId": "60",
"threadName": "Thread-0",
"threadState": "BLOCKED",
"daemon": "false",
"priority": "5",
"suspended": "false",
"inNative": "false",
"lockName": "java.lang.Object@7d10b1ca",
"lockOwnerName": "Thread-1",
"lockOwnerId": "61",
"lockedSynchronizers": [],
"stackTrace": "app//com.example.Deadlock.lambda$new$0(Deadlock.java:27)\n- blocked on java.lang.Object@7d10b1ca\n- locked java.lang.Object@4505ea74\napp//com.example.Deadlock$$Lambda/0x000001906948b360.run(Unknown Source)\njava.base@21/java.lang.Thread.runWith(Thread.java:1596)\njava.base@21/java.lang.Thread.run(Thread.java:1583)\n"
},
{
"threadId": "61",
"threadName": "Thread-1",
"threadState": "BLOCKED",
"daemon": "false",
"priority": "5",
"suspended": "false",
"inNative": "false",
"lockName": "java.lang.Object@4505ea74",
"lockOwnerName": "Thread-0",
"lockOwnerId": "60",
"lockedSynchronizers": [],
"stackTrace": "app//com.example.Deadlock.lambda$new$1(Deadlock.java:43)\n- blocked on java.lang.Object@4505ea74\n- locked java.lang.Object@7d10b1ca\napp//com.example.Deadlock$$Lambda/0x000001906948b580.run(Unknown Source)\njava.base@21/java.lang.Thread.runWith(Thread.java:1596)\njava.base@21/java.lang.Thread.run(Thread.java:1583)\n"
}
]
}
}
}The Micronaut framework can expose application metrics via integration with Micrometer.
|
Tip
|
Using the CLI
If you create your project using the Micronaut CLI, supply one of the micrometer features to enable metrics and preconfigure the selected registry in your project. For example: |
The metrics endpoint returns information about the "metrics" of the application. To execute the metrics endpoint, send a GET request to /metrics. This returns a list of available metric names.
You can get specific metrics by using /metrics/[name] such as /metrics/jvm.memory.used.
See the documentation for Micronaut Micrometer for a list of registries and information on how to configure, expose and customize metrics output.
The refresh endpoint refreshes the application state, causing all Refreshable beans in the context to be destroyed and reinstantiated upon further requests. This is accomplished by publishing a RefreshEvent in the Application Context.
To execute the refresh endpoint, send a POST request to /refresh.
$ curl -X POST http://localhost:8080/refreshWhen executed without a body, the endpoint first refreshes the Environment and performs a diff to detect any changes, and then only performs the refresh if changes are detected. To skip this check and refresh all @Refreshable beans regardless of environment changes (e.g., to force refresh of cached responses from third-party services), add a force parameter in the POST request body.
$ curl -X POST http://localhost:8080/refresh -H 'Content-Type: application/json' -d '{"force": true}'Configuration
To configure the refresh endpoint, supply configuration through endpoints.refresh.
endpoints.refresh.enabled=Boolean
endpoints.refresh.sensitive=BooleanThe routes endpoint returns information about URIs available to be called for your application. By default, the data returned includes the URI, allowed method, content types produced, and information about the method that would be executed.
To execute the routes endpoint, send a GET request to /routes.
Configuration
To configure the routes endpoint, supply configuration through endpoints.routes.
endpoints.routes.enabled=Boolean
endpoints.routes.sensitive=BooleanCustomization
The routes endpoint is composed of a route data collector and a route data implementation. The route data collector (RouteDataCollector) is responsible for returning a publisher that returns the data used in the response. The route data (RouteData) is responsible for returning data about an individual route.
To override the default behavior for either of the helper classes, either extend the default implementations (DefaultRouteDataCollector, DefaultRouteData), or implement the relevant interface directly. To ensure your implementation is used instead of the default, add the @Replaces annotation to your class with the value being the default implementation.
The loggers endpoint returns information about the available loggers in the application and permits configuring their log level.
|
Note
|
The loggers endpoint is disabled by default and must be explicitly enabled with the setting endpoints.loggers.enabled=true.
|
To get a collection of all loggers by name with their configured and effective log levels, send a GET request to /loggers. This also provides a list of the available log levels.
$ curl http://localhost:8080/loggers
{
"levels": [
"ALL", "TRACE", "DEBUG", "INFO", "WARN", "ERROR", "OFF", "NOT_SPECIFIED"
],
"loggers": {
"ROOT": {
"configuredLevel": "INFO",
"effectiveLevel": "INFO"
},
"io": {
"configuredLevel": "NOT_SPECIFIED",
"effectiveLevel": "INFO"
},
"io.micronaut": {
"configuredLevel": "NOT_SPECIFIED",
"effectiveLevel": "INFO"
},
// etc...
}
}To get the log levels of a particular logger, include the logger name in your GET request. For example, to access the log levels of the logger 'io.micronaut.http':
$ curl http://localhost:8080/loggers/io.micronaut.http
{
"configuredLevel": "NOT_SPECIFIED",
"effectiveLevel": "INFO"
}If the named logger does not exist, it is created with an unspecified (i.e. NOT_SPECIFIED) configured log level (its effective log level is usually that of the root logger).
To update the log level of a single logger, send a POST request to the named logger URL and include a body providing the log level to configure.
$ curl -i -X POST \
-H "Content-Type: application/json" \
-d '{ "configuredLevel": "ERROR" }' \
http://localhost:8080/loggers/ROOT
HTTP/1.1 200 OK
$ curl http://localhost:8080/loggers/ROOT
{
"configuredLevel": "ERROR",
"effectiveLevel": "ERROR"
}Configuration
To configure the loggers endpoint, supply configuration through endpoints.loggers.
endpoints.loggers.enabled=Boolean
endpoints.loggers.sensitive=Boolean|
Note
|
By default, the endpoint doesn’t allow changing the log level by unauthorized users (even if sensitive is set to false). To allow this you must set endpoints.loggers.write-sensitive to false.
|
Customization
The loggers endpoint is composed of two customizable parts: a LoggersManager and a LoggingSystem. See the logging section of the documentation for information on customizing the logging system.
The LoggersManager is responsible for retrieving and setting log levels. If the default implementation is not sufficient for your use case, simply provide your own implementation and replace the DefaultLoggersManager with the @Replaces annotation.
The caches endpoint documentation is available at the micronaut-cache project.
The stop endpoint shuts down the application server.
To execute the stop endpoint, send a POST request to /stop.
Configuration
To configure the stop endpoint, supply configuration through endpoints.stop.
endpoints.stop.enabled=Boolean
endpoints.stop.sensitive=Boolean|
Note
|
By default, the stop endpoint is disabled and must be explicitly enabled to be used. |
The environment endpoint returns information about the Environment and its PropertySources.
Configuration
To enable and configure the environment endpoint, supply configuration through endpoints.env.
endpoints.env.enabled=Boolean
endpoints.env.sensitive=Boolean
endpoints.env.active-keys=List<String>-
defaults are false for
enabledand true forsensitive -
active-keysdefaults to ["activeEnvironments", "packages", "propertySources"]
The active-keys property allows you to customize which sections of the environment information are displayed.
You can specify one or more of the following values:
-
activeEnvironments -
packages -
propertySources
For example, to only show active environments and packages:
endpoints.env.active-keys[0]=activeEnvironments
endpoints.env.active-keys[1]=packagesIf you provide an empty list, no sections will be displayed.
Masking sensitive information
By default, the endpoint will mask all values. To customize this masking you need to supply a Bean that implements EnvironmentEndpointFilter.
This first example will mask all values except for those that are prefixed by safe
@Singleton
public class OnlySafePrefixedEnvFilter implements EnvironmentEndpointFilter {
private static final Pattern SAFE_PREFIX_PATTERN = Pattern.compile("safe.*", Pattern.CASE_INSENSITIVE);
@Override
public void specifyFiltering(@NotNull EnvironmentFilterSpecification specification) {
specification
.maskAll() // All values will be masked apart from the supplied patterns
.exclude(SAFE_PREFIX_PATTERN);
}
}It is also possible to allow all values in plain text using maskNone--, and then specify name patterns that will be masked, ie:
@Singleton
public class AllPlainExceptSecretOrMatchEnvFilter implements EnvironmentEndpointFilter {
// Mask anything starting with `sekrt`
private static final Pattern SECRET_PREFIX_PATTERN = Pattern.compile("sekrt.*", Pattern.CASE_INSENSITIVE);
// Mask anything exactly matching `exact-match`
private static final String EXACT_MATCH = "exact-match";
// Mask anything that starts with `private.`
private static final Predicate<String> PREDICATE_MATCH = name -> name.startsWith("private.");
@Override
public void specifyFiltering(@NotNull EnvironmentFilterSpecification specification) {
specification
.maskNone() // All values will be in plain-text apart from the supplied patterns
.exclude(SECRET_PREFIX_PATTERN)
.exclude(EXACT_MATCH)
.exclude(PREDICATE_MATCH);
}
}Sensible defaults can be applied by calling the legacyMasking-- method.
This will show all values apart from those that contain the words password, credential, certificate, key, secret or token anywhere in their name.
Getting information about the environment
To execute the endpoint, send a GET request to /env.
Getting information about a particular PropertySource
To execute the endpoint, send a GET request to /env/{propertySourceName}.
The threaddump endpoint returns information about the threads running in your application.
To execute the threaddump endpoint, send a GET request to /threaddump.
Configuration
To configure the threaddump endpoint, supply configuration through endpoints.threaddump.
endpoints.threaddump.enabled=Boolean
endpoints.threaddump.sensitive=BooleanCustomization
The thread dump endpoint delegates to a ThreadInfoMapper) that is responsible for transforming the java.lang.management.ThreadInfo objects into any other to be sent for serialization.
The Micronaut framework has a full-featured security solution for all common security patterns.
See the documentation for Micronaut Security for more information on how to secure your applications.
See the Micronaut Multitenancy documentation to learn about Micronaut’s support for common tasks such as tenant resolution for multi-tenancy-aware Micronaut applications.
The Micronaut CLI is the recommended way to create new Micronaut projects. The CLI includes commands for generating specific categories of projects, allowing you to choose between build tools, test frameworks, and even pick the language to use in your application. The CLI also provides commands for generating artifacts such as controllers, client interfaces, and serverless functions.
|
Tip
|
We have a website that can be used to generate projects instead of the CLI. Check out Micronaut Launch to get started! |
When Micronaut framework is installed on your computer, you can call the CLI with the mn command.
$ mn create-app my-appA Micronaut framework CLI project can be identified by the micronaut-cli.yml file, which is included at the project root if it was generated via the CLI. This file will include the project’s profile, default package, and other variables. The project’s default package is evaluated based on the project name.
$ mn create-app my-demo-appresults in the default package being my.demo.app.
You can supply your own default package when creating the application by prefixing the application name with the package:
$ mn create-app example.my-demo-appresults in the default package being example.
Interactive Mode
If you run mn without any arguments, the Micronaut CLI launches in interactive mode. This is a shell-like mode which lets you run multiple CLI commands without re-initializing the CLI runtime, and is especially suitable when you use code-generation commands (such as create-controller), create multiple projects, or are just exploring CLI features. Tab-completion is enabled, enabling you to hit the TAB key to see possible options for a given command or flag.
$ mn
| Starting interactive mode...
| Enter a command name to run. Use TAB for completion:
mn>Help and Info
General usage information can be viewed using the help flag on a command.
mn> create-app -h
Usage: mn create-app [-hivVx] [--list-features] [-b=BUILD-TOOL] [--jdk=<javaVersion>] [-l=LANG]
[-t=TEST] [-f=FEATURE[,FEATURE...]]... [NAME]
Creates an application
[NAME] The name of the application to create.
-b, --build=BUILD-TOOL Which build tool to configure. Possible values: gradle, gradle_kotlin,
maven.
-f, --features=FEATURE[,FEATURE...]
-h, --help Show this help message and exit.
-i, --inplace Create a service using the current directory
--jdk, --java-version=<javaVersion>
The JDK version the project should target
-l, --lang=LANG Which language to use. Possible values: java, groovy, kotlin.
--list-features Output the available features and their descriptions
-t, --test=TEST Which test framework to use. Possible values: junit, spock, kotest.A list of available features can be viewed using the --list-features flag on any of the create commands.
mn> create-app --list-features
Available Features
(+) denotes the feature is included by default
Name Description
------------------------------- ---------------
Cache
cache-caffeine Adds support for cache using Caffeine (https://github.com/ben-manes/caffeine)
cache-ehcache Adds support for cache using EHCache (https://www.ehcache.org/)
cache-hazelcast Adds support for cache using Hazelcast (https://hazelcast.org/)
cache-infinispan Adds support for cache using Infinispan (https://infinispan.org/)Creating a project is the primary usage of the CLI. The primary command for creating a new project is create-app, which creates a standard server application that communicates over HTTP. For other types of application, see the documentation below.
| Command | Description | Options | Example |
|---|---|---|---|
|
Creates a basic Micronaut application. |
|
|
|
Creates a command-line Micronaut application. |
|
|
|
Creates a Micronaut serverless function, using AWS by default. |
|
|
|
Creates a Micronaut application that only communicates via a messaging protocol. Uses Kafka by default but can be switched to RabbitMQ with |
|
|
|
Creates a Micronaut application that uses gRPC. |
|
|
Create Command Flags
The create-* commands generate a basic Micronaut project, with optional flags to specify features, language, test framework, and build tool. All projects except functions include a default Application class for starting the application.
| Flag | Description | Example |
|---|---|---|
|
Language to use for the project (one of |
|
|
Test framework to use for the project (one of |
|
|
Build tool (one of |
|
|
Features to use for the project, comma-separated |
or |
|
If present, generates the project in the current directory (project name is optional if this flag is set) |
|
Once created, the application can be started using the Application class, or the appropriate build tool task.
$ ./gradlew run$ ./mvnw mn:runLanguage/Test Features
By default, the create commands generate a Java application, with JUnit configured as the test framework. All the options chosen and features applied are stored as properties in the micronaut-cli.yml file, as shown below:
applicationType: default
defaultPackage: com.example
testFramework: junit
sourceLanguage: java
buildTool: gradle
features: [annotation-api, app-name, application, gradle, http-client, java, junit, logback, netty-server, shade, yaml]Some commands rely on the data in this file to determine if they should be executable. For example, the create-kafka-listener command requires kafka to be one of the features in the list.
|
Note
|
The values in micronaut-cli.yml are used by the CLI for code generation. After a project is generated, you can edit these values to change the project defaults, however you must supply the required dependencies and/or configuration to use your chosen language/framework. For example, you could change the testFramework property to spock to cause the CLI to generate Spock tests when running commands (such as create-controller), but you need to add the Spock dependency to your build.
|
Groovy
To create an app with Groovy support (which uses Spock by default), supply the appropriate language via the lang flag:
$ mn create-app my-groovy-app --lang groovyThis includes the Groovy and Spock dependencies in your project, and writes the appropriates values in micronaut-cli.yml.
Kotlin
To create an app with Kotlin support (which uses Kotest by default), supply the appropriate language via the lang flag:
$ mn create-app my-kotlin-app --lang kotlinThis includes the Kotlin and Kotest dependencies in your project, and writes the appropriates values in micronaut-cli.yml.
Build Tool
By default, create-app creates a Gradle project, with a build.gradle file in the project root directory. To create an app using the Maven build tool, supply the appropriate option via the build flag:
$ mn create-app my-maven-app --build mavenCreate-Cli-App
The create-cli-app command generates a Micronaut command line application project, with optional flags to specify language, test framework, features, profile, and build tool. By default, the project includes the picocli feature to support command line option parsing. The project will include a *Command class (based on the project name, e.g. hello-world generates HelloWorldCommand), and an associated test which instantiates the command and verifies that it can parse command line options.
Once created, the application can be started using the *Command class, or the appropriate build tool task.
$ ./gradlew run$ ./mvnw mn:runCreate Function App
The create-function-app command generates a Micronaut function project, optimized for serverless environments, with optional flags to specify language, test framework, features, and build tool. The project will include a *Function class (based on the project name, e.g. hello-world generates HelloWorldFunction), and an associated test which instantiates the function and verifies that it can receive requests.
|
Tip
|
Currently, AWS Lambda, Micronaut Azure, and Google Cloud are the supported cloud providers for Micronaut functions. To use other providers, add one in the features: --features azure-function or --features google-cloud-function.
|
Contribute
The CLI source code is at https://github.com/micronaut-projects/micronaut-starter. Information about how to contribute and other resources are there.
The easiest way to see version dependency updates and other changes for a new version of Micronaut is to produce one clean application using the older version and another using the newer version of the mn CLI, and then comparing those directories.
Features consist of additional dependencies and configuration to enable specific functionality in your application. Micronaut profiles define a large number of features, including features for many of the configurations provided by Micronaut, such as the Data Access Configurations
$ mn create-app my-demo-app --features mongo-reactiveThis adds the necessary dependencies and configuration for the MongoDB Reactive Driver in your application. You can view the available features using the --list-features flag for whichever create command you use.
$ mn create-app --list-features # Output will be supported features for the create-app command
$ mn create-function-app --list-features # Output will be supported features for the create-function-app command, different from above.You can view a full list of available commands using the help flag, for example:
All the code-generation commands honor the values written in micronaut-cli.yml. For example, assume the following micronaut-cli.yml file.
defaultPackage: example
---
testFramework: spock
sourceLanguage: javaWith the above settings, the create-bean command (by default) generates a Java class with an associated Spock test, in the example package. Commands accept arguments and these defaults can be overridden on a per-command basis.
Base Commands
These commands are always available within the context of a micronaut project.
Create-Bean
| Flag | Description | Example |
|---|---|---|
|
The language used for the bean class |
|
|
Whether to overwrite existing files |
|
The create-bean command generates a simple Singleton class. It does not create an associated test.
$ mn create-bean EmailService
| Rendered template Bean.java to destination src/main/java/example/EmailService.javaCreate-Job
| Flag | Description | Example |
|---|---|---|
|
The language used for the job class |
|
|
Whether to overwrite existing files |
|
The create-job command generates a simple Scheduled class. It follows a *Job convention for generating the class name. It does not create an associated test.
$ mn create-job UpdateFeeds --lang groovy
| Rendered template Job.groovy to destination src/main/groovy/example/UpdateFeedsJob.groovyHTTP-Related Commands
Create-Controller
| Flag | Description | Example |
|---|---|---|
|
The language used for the controller |
|
|
Whether to overwrite existing files |
|
The create-controller command generates a Controller class. It follows a *Controller convention for generating the class name. It creates an associated test that runs the application and instantiates an HTTP client, which can make requests against the controller.
$ mn create-controller Book
| Rendered template Controller.java to destination src/main/java/example/BookController.java
| Rendered template ControllerTest.java to destination src/test/java/example/BookControllerTest.javaCreate-Client
| Flag | Description | Example |
|---|---|---|
|
The language used for the client |
|
|
Whether to overwrite existing files |
|
The create-client command generates a simple Client interface. It follows a *Client convention for generating the class name. It does not create an associated test.
$ mn create-client Book
| Rendered template Client.java to destination src/main/java/example/BookClient.javaCreate-Websocket-Server
| Flag | Description | Example |
|---|---|---|
|
The language used for the server |
|
|
Whether to overwrite existing files |
|
The create-websocket-server command generates a simple ServerWebSocket class. It follows a *Server convention for generating the class name. It does not create an associated test.
$ mn create-websocket-server MyChat
| Rendered template WebsocketServer.java to destination src/main/java/example/MyChatServer.javaCreate-Websocket-Client
| Flag | Description | Example |
|---|---|---|
|
The language used for the client |
|
|
Whether to overwrite existing files |
|
The create-websocket-client command generates a simple WebSocketClient abstract class. It follows a *Client convention for generating the class name. It does not create an associated test.
$ mn create-websocket-client MyChat
| Rendered template WebsocketClient.java to destination src/main/java/example/MyChatClient.javaCLI Project Commands
Create-Command
| Flag | Description | Example |
|---|---|---|
|
The language used for the command |
|
|
Whether to overwrite existing files |
|
The create-command command generates a standalone application that can be executed as a
picocli Command. It follows a *Command convention for generating the class name. It creates an associated test that runs the application and verifies that a command line option was set.
$ mn create-command print
| Rendered template Command.java to destination src/main/java/example/PrintCommand.java
| Rendered template CommandTest.java to destination src/test/java/example/PrintCommandTest.javaThis list is just a small subset of the code generation commands in the Micronaut CLI. To see all context-sensitive commands the CLI has available (and under what circumstances they apply), check out the micronaut-starter project and find the classes that extend CodeGenCommand. The applies method dictates whether a command is available or not.
Reloading (or "hot-loading") refers to the framework reinitializing classes (and parts of the application) when changes to the source files are detected.
Since Micronaut prioritizes startup time and most Micronaut apps can start up within seconds, a productive workflow can often be had by restarting the application as changes are made; for example, by running a test class within an IDE.
However, to have your changes automatically reloaded, Micronaut supports automatic restart and the use of third-party reloading agents.
There are various ways to achieve reloading of classes on the JVM, and all have their advantages and disadvantages. The following are possible ways to achieve reloading without restarting the JVM:
-
JVM Agents - A JVM agent like JRebel can be used, however these can produce unusual errors, may not support all JDK versions, and can result in cached or stale classes.
-
ClassLoader Reloading - ClassLoader-based reloading is a popular solution used by most JVM frameworks; however it once again can lead to cached or stale classes, memory leaks, and weird errors if the incorrect classloader is used.
-
Debugger HotSwap - The Java debugger supports hotswapping of changes at runtime, but only supports a few use cases.
Given the problems with existing solutions and a lack of a way built into the JVM to reload changes, the safest and best solution to reloading, and the one recommended by the Micronaut team, is to use automatic application restart via a third-party tool.
Micronaut’s startup time is fast and automatic restart leads to a clean slate without potential hard to debug problems or memory leaks cropping up.
Maven Restart
To have automatic application restarts with Maven, use the Micronaut Maven plugin (included by default when creating new Maven projects) and run the following command:
$ ./mvnw mn:runEvery time you change a class, the plugin automatically restarts the server.
Gradle Restart
Gradle automatic restart can be activated when using the Micronaut Gradle plugin by activating Gradle’s support for continuous builds via the -t flag:
./gradlew run -tEvery time you make a change to class or resources, Gradle recompiles and restarts the application.
JRebel is a proprietary reloading solution that involves an agent library, as well as sophisticated IDE support. The JRebel documentation includes detailed steps for IDE integration and usage. In this section, we show how to install and configure the agent for Maven and Gradle projects.
|
Tip
|
Using the CLI
If you create your project using the Micronaut CLI, supply the |
Install/configure JRebel Agent
The simplest way to install JRebel is to download the "standalone" installation package from the JRebel download page. Unzip the downloaded file to a convenient location, for example ~/bin/jrebel
The installation directory contains a lib directory with the agent files. For the appropriate agent based on your operating system, see the table below:
| OS | Agent |
|---|---|
Windows 64-bit JDK |
|
Windows 32-bit JDK |
|
Mac OS X 64-bit JDK |
|
Mac OS X 32-bit JDK |
|
Linux 64-bit JDK |
|
Linux 32-bit JDK |
|
Note the path to the appropriate agent, and add the value to your project build.
Gradle
Add the path to gradle.properties (create the file if necessary), as the rebelAgent property.
#Assuming installation path of ~/bin/jrebel/
rebelAgent= -agentpath:~/bin/jrebel/lib/libjrebel64.dylibAdd the appropriate JVM arg to build.gradle (not necessary if using the CLI feature)
run.dependsOn(generateRebel)
if (project.hasProperty('rebelAgent')) {
run.jvmArgs += rebelAgent
}You can start the application with ./gradlew run, and it will include the agent. See the section on Gradle Reloading or IDE Reloading to set up the recompilation.
Maven
Configure the Micronaut Maven Plugin accordingly:
<project xmlns="http://maven.apache.org/POM/4.0.0" xmlns:xsi="http://www.w3.org/2001/XMLSchema-instance"
xsi:schemaLocation="http://maven.apache.org/POM/4.0.0 http://maven.apache.org/xsd/maven-4.0.0.xsd">
<!-- ... -->
<build>
<plugins>
<!-- ... -->
<plugin>
<groupId>io.micronaut.maven</groupId>
<artifactId>micronaut-maven-plugin</artifactId>
<configuration>
<jvmArguments>-agentpath:~/bin/jrebel/lib/jrebel6/lib/libjrebel64.dylib</jvmArguments>
</configuration>
</plugin>
<plugin>
<groupId>org.zeroturnaround</groupId>
<artifactId>jrebel-maven-plugin</artifactId>
<version>1.1.10</version>
<executions>
<execution>
<id>generate-rebel-xml</id>
<phase>process-resources</phase>
<goals>
<goal>generate</goal>
</goals>
</execution>
</executions>
</plugin>
<!-- ... -->
</plugins>
</build>
</project>Gradle supports continuous builds, letting you run a task that will be rerun whenever source files change. To use this with a reloading agent (configured as described above), run the application normally (with the agent), and then run a recompilation task in a separate terminal with continuous mode enabled.
$ ./gradlew run$ ./gradlew -t classesThe classes task will be rerun every time a source file is modified, allowing the reloading agent to pick up the change.
If you use a build tool such as Maven which does not support automatic recompilation on file changes, you may use your IDE to recompile classes in combination with a reloading agent (as configured in the above sections).
IntelliJ
IntelliJ unfortunately does not have an automatic rebuild option that works for a running application. However, you can trigger a "rebuild" of the project with CMD-F9 (Mac) or CTRL-F9 (Windows/Linux).
Eclipse
Under the Project menu, check the Build Automatically option. This will trigger a recompilation of the project whenever file changes are saved to disk.
To configure the CLI to use an HTTP proxy there are two steps. Configuration options can be passed to the cli through the MN_OPTS environment variable.
For example on *nix systems:
export MN_OPTS="-Dhttps.proxyHost=127.0.0.1 -Dhttps.proxyPort=3128 -Dhttp.proxyUser=test -Dhttp.proxyPassword=test"The profile dependencies are resolved over HTTPS so the proxy port and host are configured with https., however the user and password are specified with http..
For Windows systems the environment variable can be configured under My Computer/Advanced/Environment Variables.
A resource bundle is a Java .properties file that contains locale-specific data.
Given this Resource Bundle:
hello=Hello
hello.name=Hello {0}hello=Hola
hello.name=Hola {0}You can use ResourceBundleMessageSource, an implementation of MessageSource which eases accessing Resource Bundles and provides cache functionality, to access the previous messages.
|
Warning
|
Do not instantiate a new ResourceBundleMessageSource each time you retrieve a message. Instantiate it once, for example in a factory.
|
imports
import io.micronaut.context.MessageSource;
import io.micronaut.context.annotation.Factory;
import io.micronaut.context.annotation.Requires;
import io.micronaut.context.i18n.ResourceBundleMessageSource;
import io.micronaut.core.order.Ordered;
import jakarta.inject.Singleton;@Factory
class MessageSourceFactory {
@Singleton
MessageSource createMessageSource() {
return new ResourceBundleMessageSource("io.micronaut.docs.i18n.messages", Ordered.HIGHEST_PRECEDENCE);
}
}Then you can retrieve the messages supplying the locale:
assertEquals("Hola", messageSource.getMessage("hello", MessageContext.of(new Locale("es"))).get());
assertEquals("Hello", messageSource.getMessage("hello", MessageContext.of(Locale.ENGLISH)).get());LocalizedMessageSource is a @RequestScope bean which you can inject in your Controllers and which uses Micronaut Locale Resolution to resolve the localized message for the current HTTP request.
|
Tip
|
See the guide for Localize your Application to learn more. |
Micronaut Framework provides support for loading resources from files into memory, rooted at the ResourceLoader API. Built-in implementations include
A convenience class ResourceResolver is provided that leverages both of these implementations. The following example illustrates using the API to read a text file from the classpath.
Areas of the framework that load resources using ResourceResolver include:
-
Static HTTP resources
-
SSL key and trust stores
-
Dynamic configuration
To use a fixed value for a resource instead of loading it from the file system or classpath, the string: and
base64: prefixes. While string: returns the value as is (decoded as UTF-8), base64: first decodes the value from
Base64. This allows you to serve e.g. a small binary as a static HTTP file.
The following documentation describes the Micronaut framework’s architecture and is designed for those who are looking for information on the internal workings of the Micronaut framework and how it is architected. This is not intended as end-user developer documentation, but for those interested in the inner workings of the Micronaut framework.
This documentation is divided into sections that describe the compiler, introspections, application container, dependency injection and so on.
|
Warning
|
Since this documentation covers the internal workings of Micronaut, many APIs referenced and described are regarded as internal, non-public API and are annotated as such with the @Internal. Internal APIs can change between patch releases of Micronaut and are not covered by Micronaut’s semantic versioning release policy. |
The Micronaut Compiler is a set of extensions to existing language compilers:
-
Java - the Java Annotation Processing (APT) API is used for Java code.
-
Groovy - Groovy AST Transformations are used to participate in the compilation of Groovy code.
To keep this documentation simple, the remaining sections will describe the interaction with the Java compiler.
The Micronaut Compiler visits end user code and generates additional bytecode that sits alongside the user code in the same package structure.
The AST of user source is visited using implementations of TypeElementVisitor which are loaded via the standard Java service loader mechanism.
Each TypeElementVisitor implementation can override one or more of the visit* methods which receive an instance of Element.
The Element API provides a language-neutral abstraction over the AST and computation of the AnnotationMetadata for a given element (class, method, field etc).
Micronaut framework is an implementation of an annotation-based programming model. That is to say annotations form a fundamental part of the API design of the framework.
Given this design decision, a compilation-time model was formulated to address the challenges of evaluating annotations at runtime.
The AnnotationMetadata API is a construct that is used both a compilation time and at runtime by framework components. AnnotationMetadata represents the computed fusion of annotation information for a particular type, field, constructor, method or bean property and may include both annotations declared in the source code, but also synthetic meta-annotations that can be used at runtime to implement framework logic.
When visiting source code within the Micronaut Compiler using the Element API for each ClassElement, FieldElement, MethodElement, ConstructorElement and PropertyElement an instance of AnnotationMetadata is computed.
The AnnotationMetadata API tries to address the following challenges:
-
Annotations can be inherited from types and interfaces into implementations. To avoid the need to traverse the class/interface hierarchy at runtime Micronaut will at build time compute inherited annotations and deal with member overriding rules
-
Annotations can be annotated with other annotations. These annotations are often referred to as meta-annotations or stereotypes. The
AnnotationMetadataAPI provides methods to understand whether a particular annotation is declared as meta-annotation and to find out what annotations are meta-annotated with other annotations -
It is often necessary to fuse annotation metadata together from different sources. For example, for JavaBean properties you want to combine the metadata from the private field, public getter and public setters into a single view otherwise you have to run logic to runtime to somehow combine this metadata from 3 distinct sources.
-
Repeatable annotations are combined and normalized. If inherited the annotations are combined from parent interfaces or classes providing a single API to evaluate repeatable annotations instead of requiring runtime logic to perform normalization.
When the source for a type is visited an instance of ClassElement is constructed via the ElementFactory API.
The ElementFactory uses an instance of AbstractAnnotationMetadataBuilder which contains language specific implementations to construct AnnotationMedata for the underlying native type in the AST. In the case of Java this would be a javax.model.element.TypeElement.
The basic flow is visualized below:
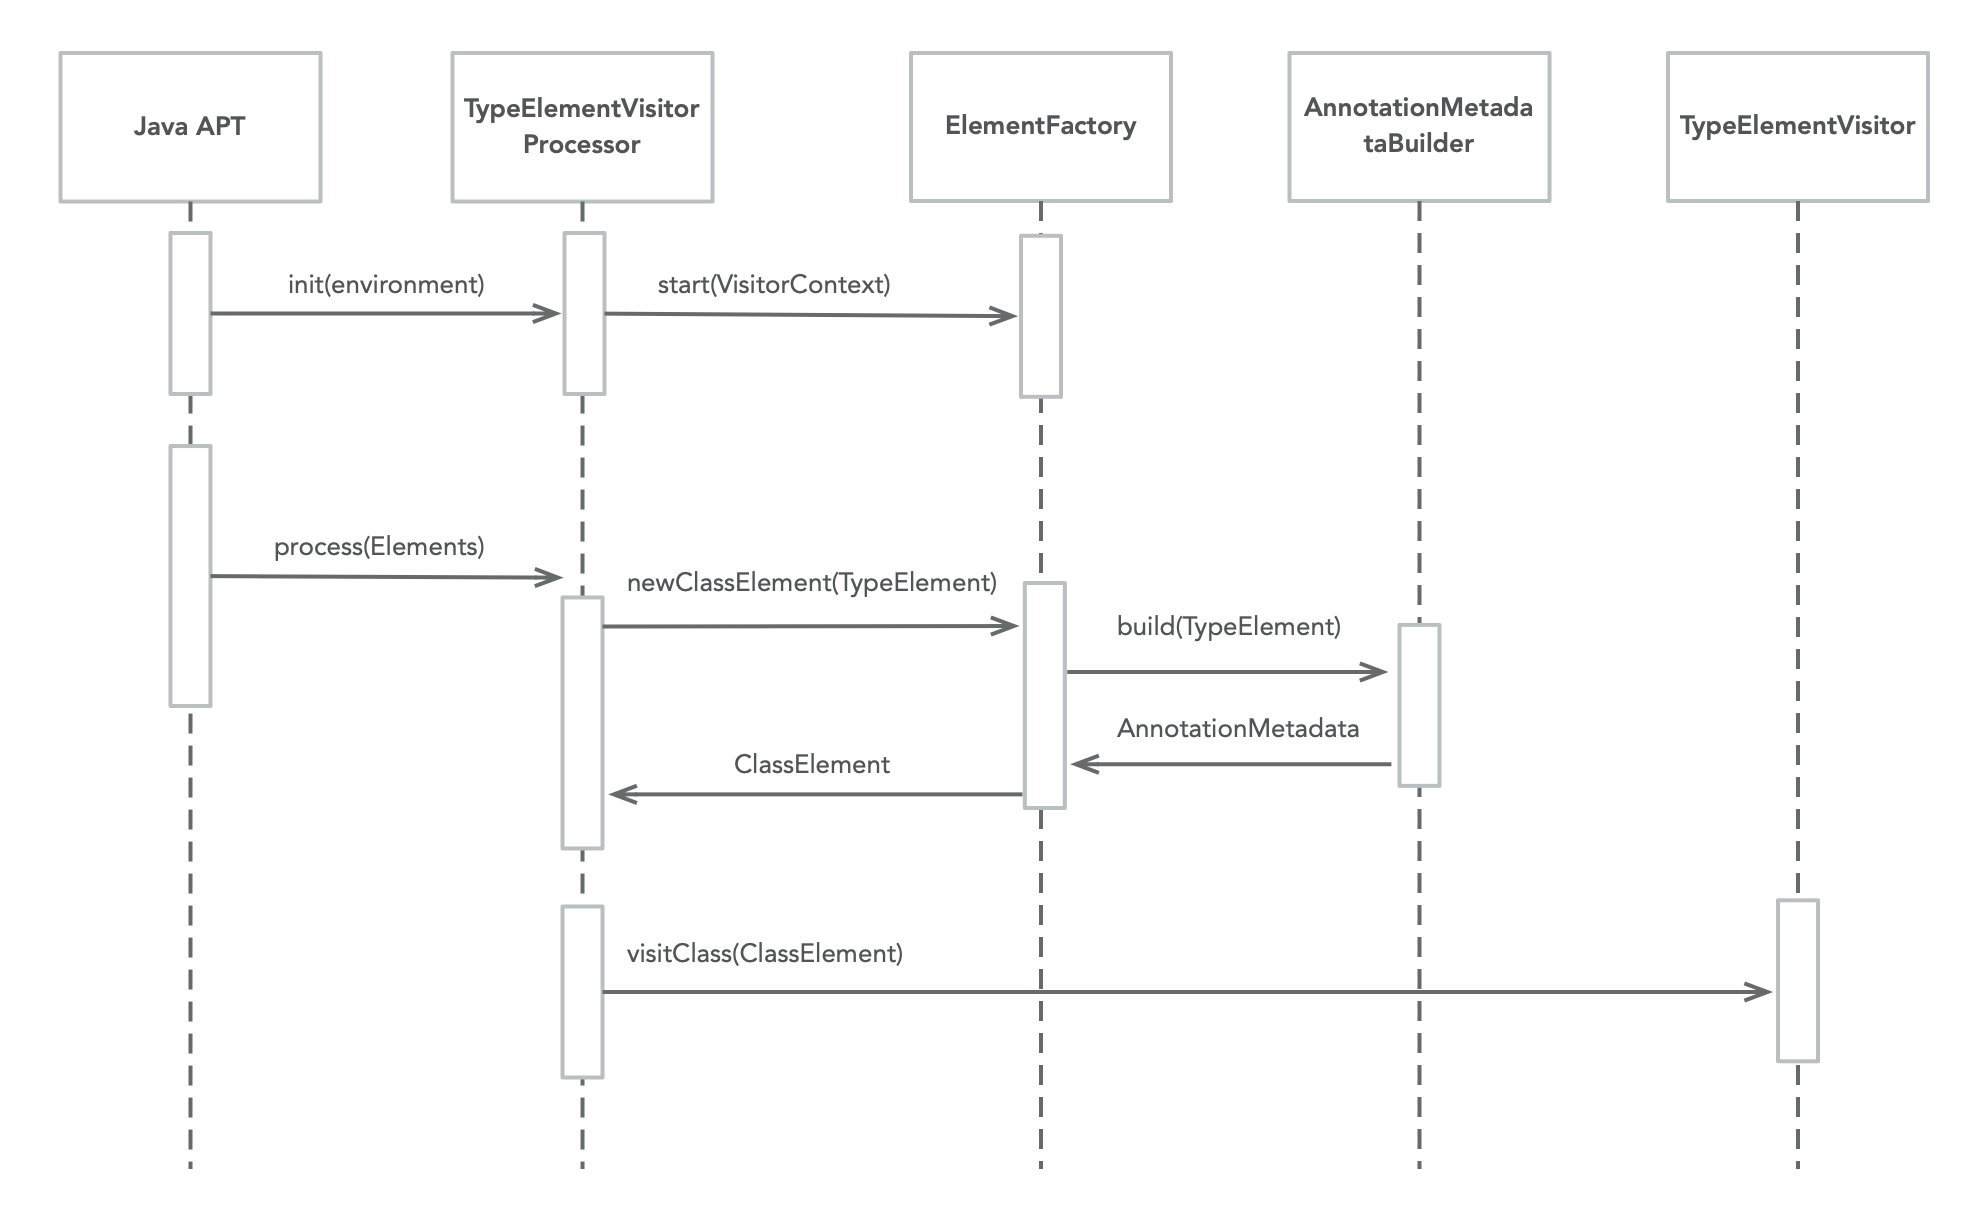
Additionally, the AbstractAnnotationMetadataBuilder will load via the standard Java service loader mechanism one or more instances of the following types that allow manipulating how an annotation is represented in the AnnotationMetadata:
-
AnnotationMapper - A type that can map the value of one annotation to another, retaining the original annotation in the
AnnotationMetadata -
AnnotationTransformer - A type that can transform the value of one annotation to another, eliminating the original annotation from the
AnnotationMetadata -
AnnotationRemapper - A type that can transform the values of all annotations in a given package, eliminating the original annotations from the
AnnotationMetadata
Note that at compilation time the AnnotationMetadata is mutable and can be further altered by implementations of TypeElementVisitor by invoking the annotate(..) method of the Element API. However, at runtime the AnnotationMetadata is immutable and fixed. The purpose of this design to allow the compiler to be extended and for Micronaut to be able to interpret different source-level annotation-based programming models.
In practice this effectively allows decoupling the source code level annotation model from what is used at runtime such that different annotations can be used to represent the same annotation.
For example jakarata.inject.Inject or Spring’s @Autowired are supported as synonyms for jakarta.inject.Inject by transforming the source level annotation to jakarta.inject.Inject which is the only annotation represented at runtime.
Finally, annotations in Java also allow the definition of default values. These defaults are not retained in individual instances of AnnotationMetadata but instead stored in a shared, static application-wide map for later retrieval for annotations known to be used by the application.
The goal of Bean Introspections is to provide an alternative to reflection and the JDK’s Introspector API that is coupled to the java.desktop module in recent versions of Java.
Many libraries in Java need to programmatically discover what methods represent properties of a class in some way and whilst the JavaBeans specification tried to establish a standard convention, the language itself has evolved to include other constructs like Records that represent properties as components.
In addition, other languages like Kotlin and Groovy have native support for class properties that need to be supported at the framework level.
The IntrospectedTypeElementVisitor visits declarations of the @Introspected annotation on types and generates at compilation time implementations of BeanIntrospection that are associated with each annotated type:
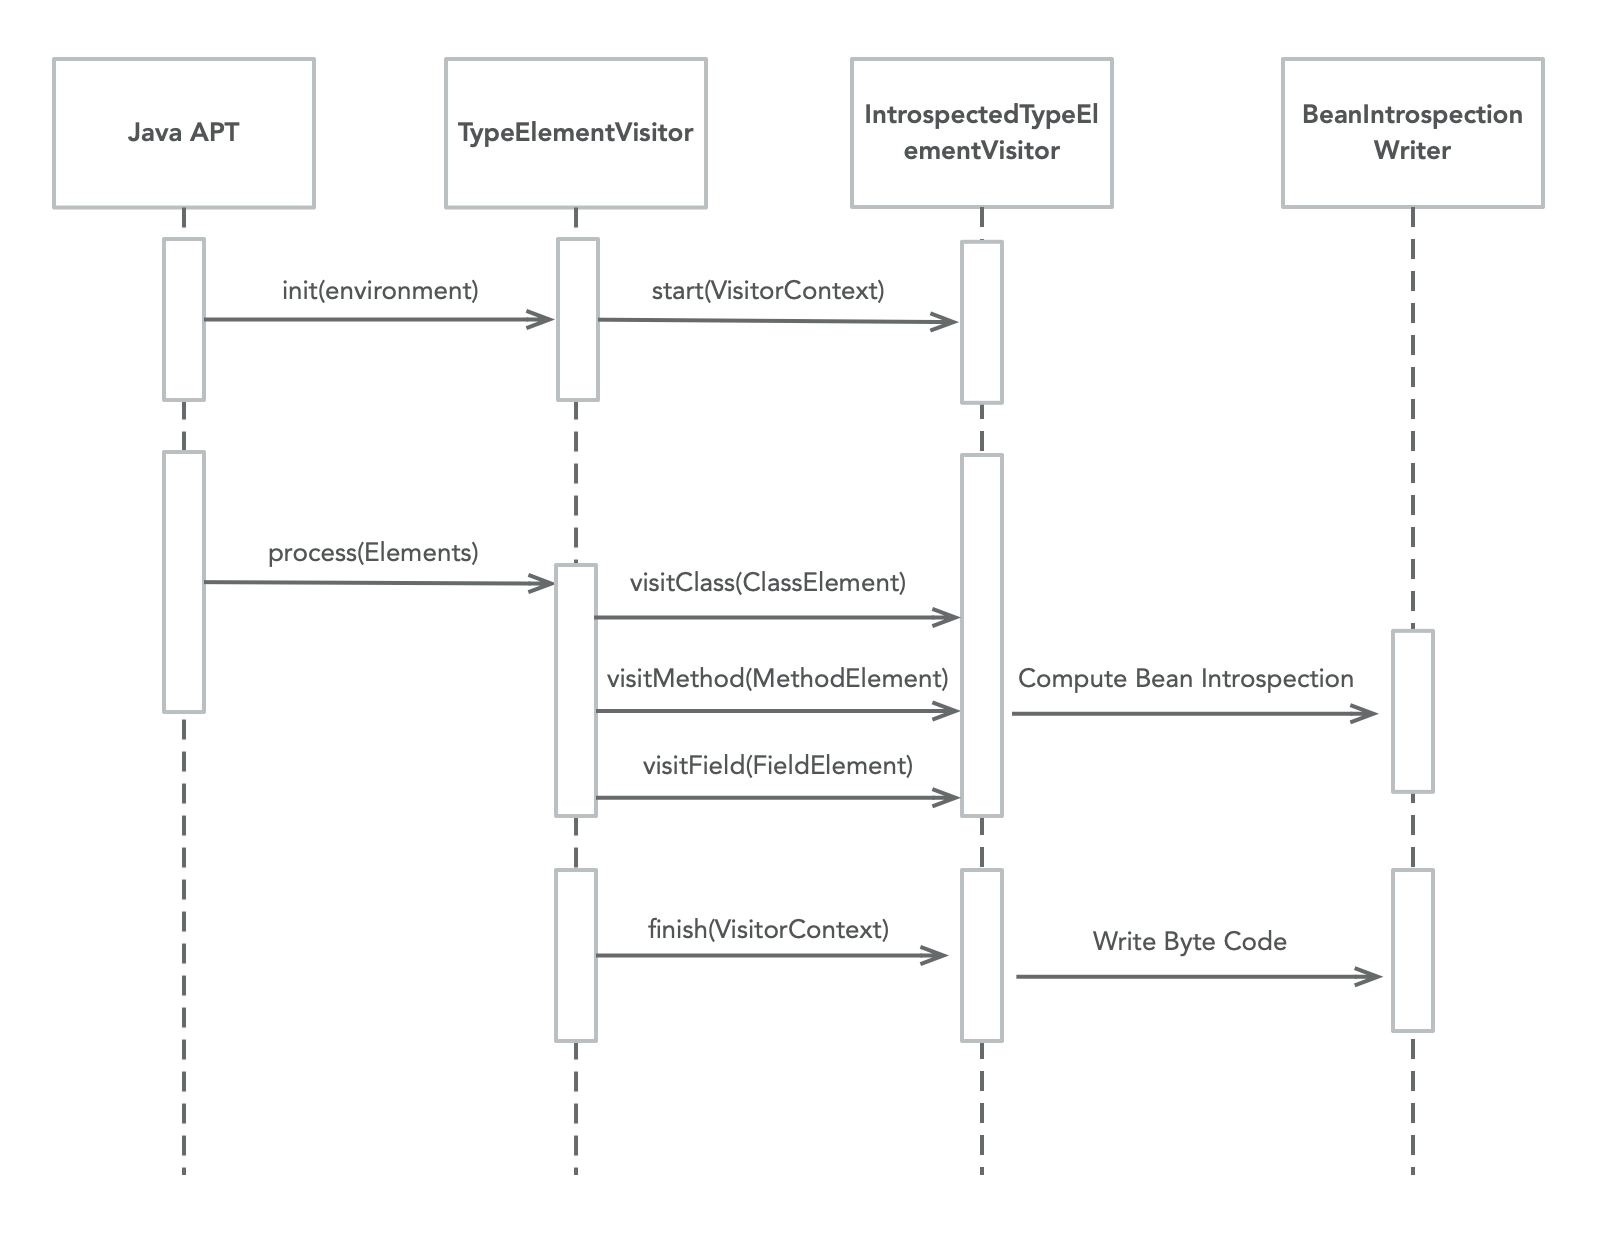
This generation happens via the io.micronaut.inject.beans.visitor.BeanIntrospectionWriter, an internal class that uses the ASM bytecode generation library to generate an additional class.
For example, given a class called example.Person Micronaut generates the following class :
-
example.$Person$Introspection- an implementation of BeanIntrospection which contains the actual runtime introspection information. Since references are loaded via ServiceLoader an entry in a generatedMETA-INF/micronaut/io.micronaut.core.beans.BeanIntrospectionReferencereferring to this type is also generated at compilation time.
The following example demonstrates usage of the BeanIntrospection API:
|
Note
|
The Person class is only initialized when the getBeanType() method is called. If the class is not present on the classpath then a NoClassDefFoundError will occur, to prevent this the developer can call the isPresent() method on the BeanIntrospectionReference prior to trying to obtain the type.
|
An implementation of BeanIntrospection performs two critical functions:
-
The introspection holds Bean metadata about the properties and constructor arguments for a particular type that is abstracted away from the actual implementation (JavaBean property, Java 17+ Record, Kotlin data classes, Groovy properties etc.) and which also provide access to AnnotationMetadata without needing to use reflection to load the annotations themselves.
-
The introspection enables the ability to instantiate and read/write bean properties without the use of Java reflection, based purely on the subset of build-time generated information.
Optimized reflection-free method dispatch is generated by overriding the dispatchOne method of AbstractInitializableBeanIntrospection, for example:
|
Note
|
The approach to use a dispatch method with an index was used to avoid the need to generate a class per method (which would consume more memory) or introduce the overhead of lambdas. |
In order to enable type instantiation the io.micronaut.inject.beans.visitor.BeanIntrospectionWriter will also generate an implementation of the instantiateInternal method which contains the reflection-free code to instantiate a given type based on known valid argument types:
public Object instantiateInternal(Object[] args) {
return new Person(
(String)args[0],
(Integer)args[1]
);
}Micronaut framework is an implementation of the JSR-330 specification for Dependency Injection.
Dependency Injection (or Inversion of Control) is a widely adopted and common pattern in Java that allows loosely decoupling components to allow applications to be easily extended and tested.
The way in which objects are wired together is decoupled from the objects themselves in this model by a separate programming model. In the case of Micronaut this model is based on annotations defined within the JSR-330 specification plus an extended set of annotations located within the io.micronaut.context.annotation package.
These annotations are visited by the Micronaut Compiler which traverses the source code language AST and builds a model used to wire objects together at runtime.
|
Note
|
It is important to note that the actual object wiring is deferred until runtime. |
For Java code BeanDefinitionInjectProcessor (which is a Java Annotation Processor) is invoked from the Java compiler for each class annotated with a bean definition annotation.
|
Note
|
What constitutes a bean defining annotation is complex as it takes into account meta-annotations, but in general it is any annotation annotated with a JSR-330 bean @Scope
|
The BeanDefinitionInjectProcessor will visit each bean in the user code source and generate additional byte code using the ASM byte code generation library that sits alongside the annotated class in the same package.
|
Note
|
For historic reasons the dependency injection processor does not use the TypeElementVisitor API but will likely do so in the future |
Byte code generation is implemented in the BeanDefinitionWriter which contains methods to "visit" different aspects of the way is bean is defined (the BeanDefinition).
The following diagram illustrates the flow:
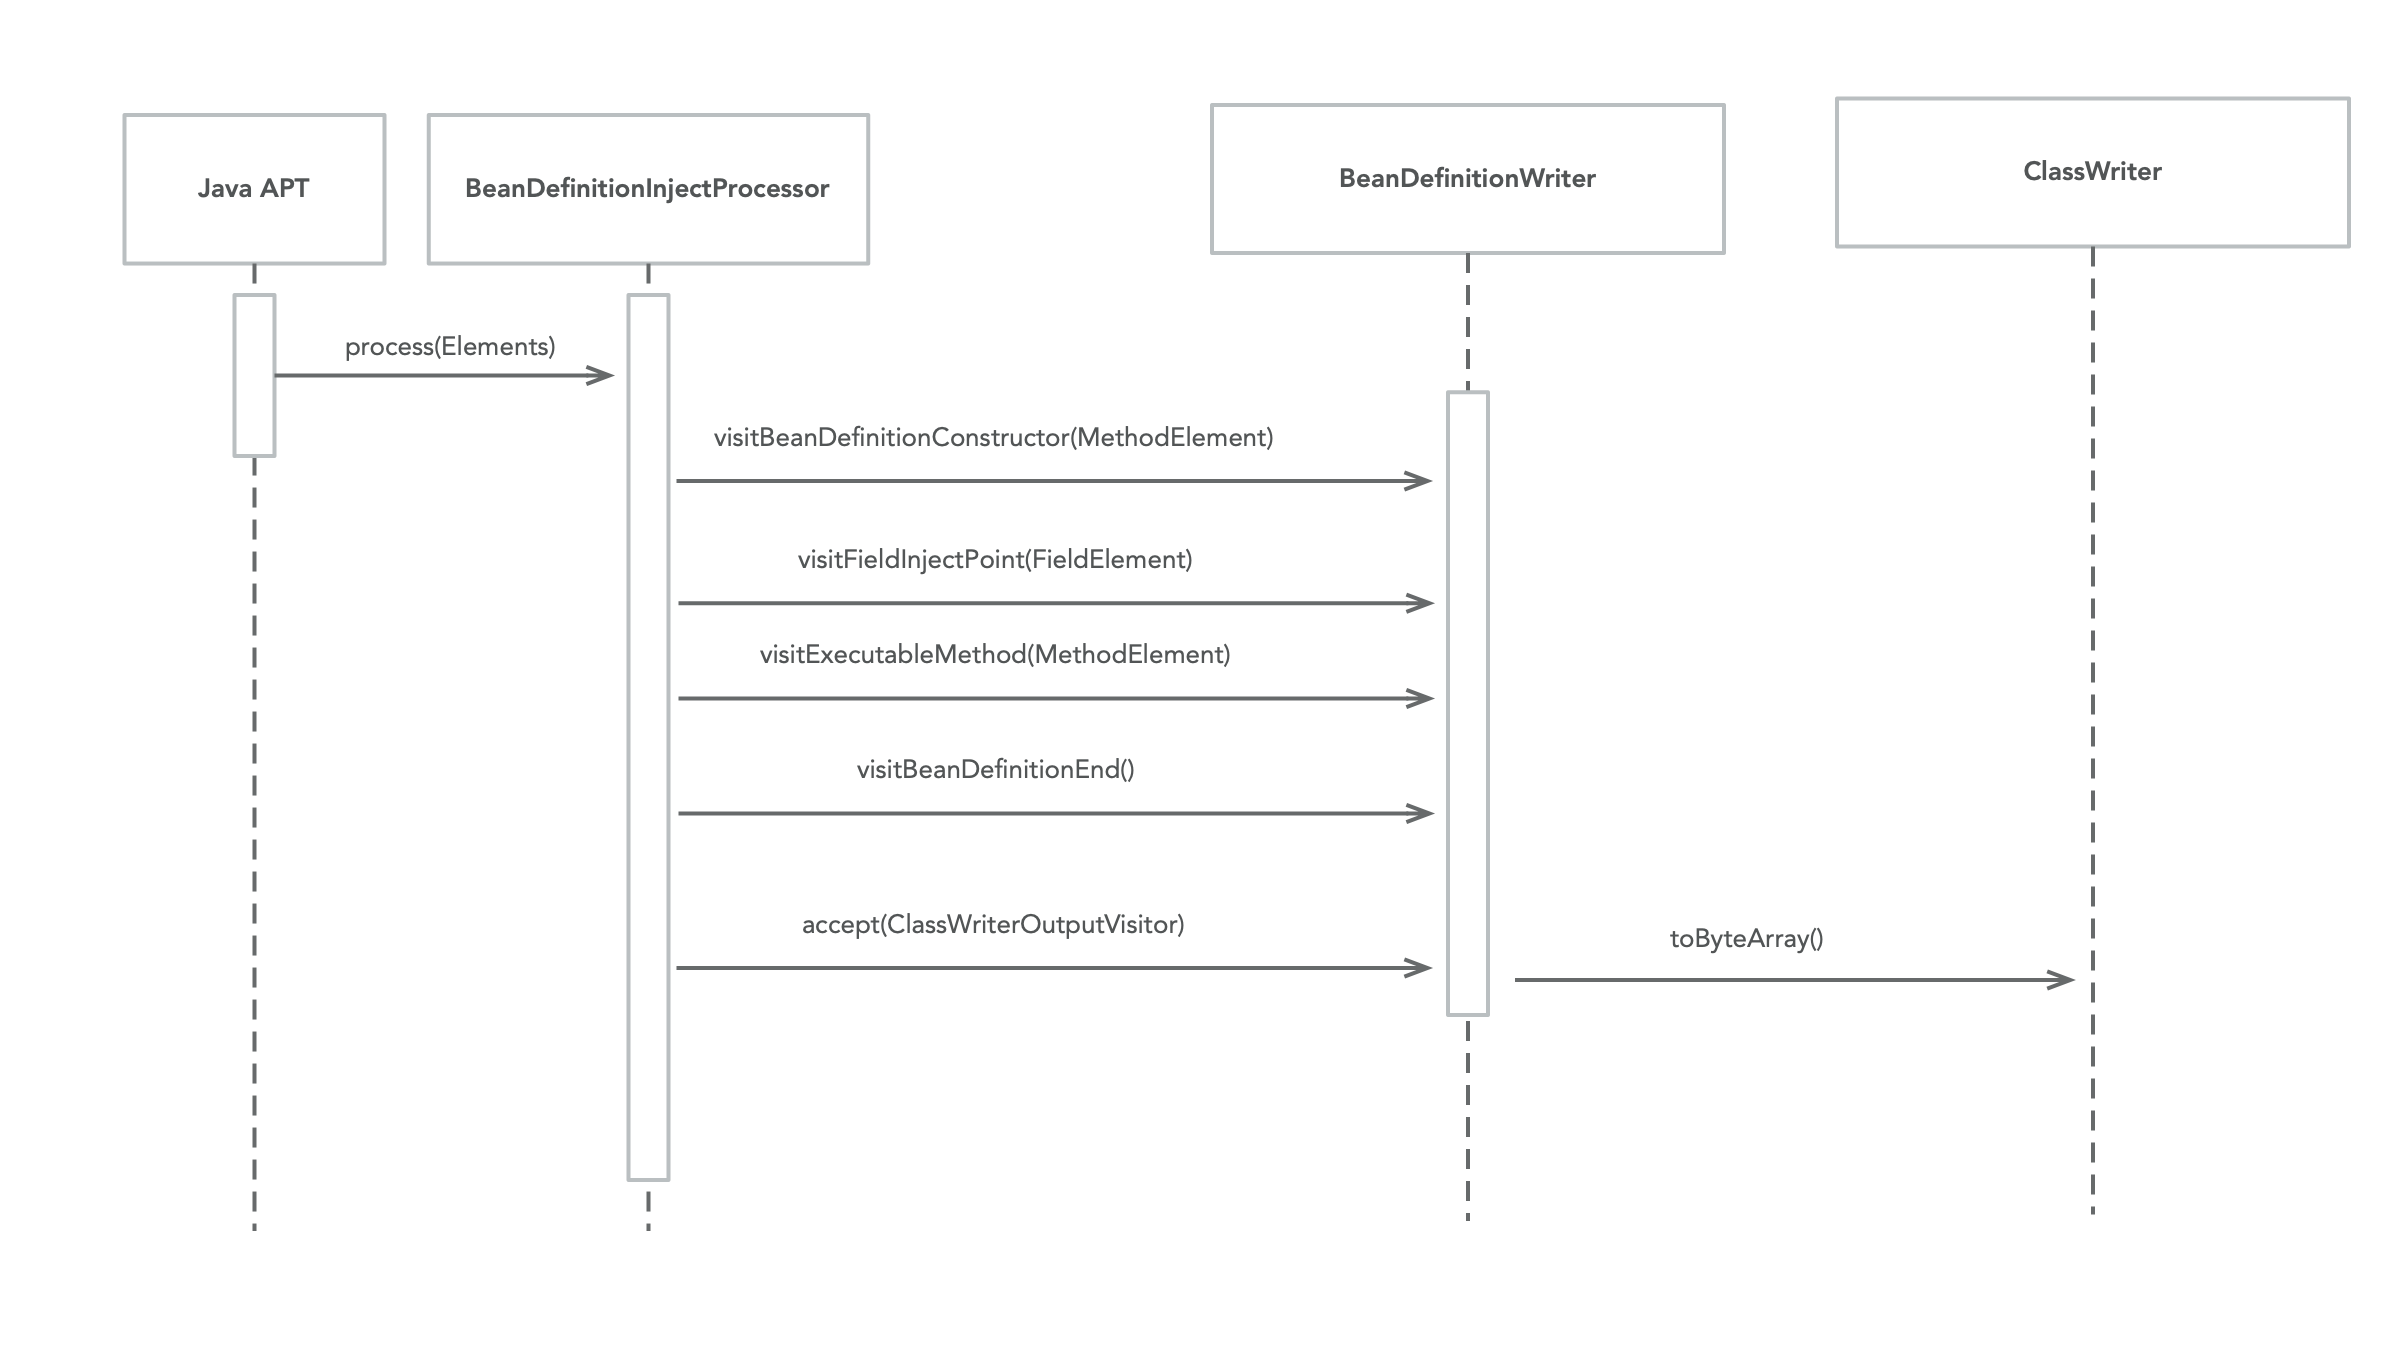
For example given the following type:
@Singleton
public class Vehicle {
private final Engine engine;
public Vehicle(Engine engine) {//
this.engine = engine;
}
public String start() {
return engine.start();
}
}The following is generated:
-
A
example.$Vehicle$Definition$Referenceclass that implements the BeanDefinitionReference interface that allows the application to soft load the bean definition without loading all metadata or the class itself (in the case where the introspected class is itself not on the classpath). Since references are loaded via ServiceLoader an entry in a generatedMETA-INF/services/io.micronaut.inject.BeanDefinitionReferencereferring to this type is also generated at compilation time. -
A
example.$Vehicle$Definitionwhich contains the actual BeanDefinition information.
A BeanDefinition is a type that holds metadata about the particular type including:
-
Class level AnnotationMetadata
-
The computed JSR-330
@Scopeand@Qualifier -
Knowledge of the available InjectionPoint instances
-
References to any ExecutableMethod defined
In addition, the BeanDefinition contains logic which knows how the bean is wired together, including how the type is constructed and fields and/or methods injected.
During compilation the ASM byte code library is used to fill out the details of the BeanDefinition, including a build method that, for the previous example, looks like:
|
Note
|
Special handling is required when a Java field or method has private access. In this case Micronaut has no option but to fall back to using Java reflection to perform dependency injection.
|
Configuration Properties Handling
The Micronaut Compiler handles beans declared with the meta-annotation @ConfigurationReader such as @ConfigurationProperties and @EachProperty distinctly to other beans.
In order to support binding Application Configuration to types annotated with one of the aforementioned annotations each discovered mutable bean property is dynamically annotated with the @Property annotation with the computed and normalized property name.
For example given the below type:
imports
import io.micronaut.context.annotation.ConfigurationProperties;
import jakarta.validation.constraints.Min;
import jakarta.validation.constraints.NotBlank;
import java.util.Optional;@ConfigurationProperties("my.engine") //
public class EngineConfig {
public String getManufacturer() {
return manufacturer;
}
public void setManufacturer(String manufacturer) {
this.manufacturer = manufacturer;
}
public int getCylinders() {
return cylinders;
}
public void setCylinders(int cylinders) {
this.cylinders = cylinders;
}
public CrankShaft getCrankShaft() {
return crankShaft;
}
public void setCrankShaft(CrankShaft crankShaft) {
this.crankShaft = crankShaft;
}
@NotBlank //
private String manufacturer = "Ford"; //
@Min(1L)
private int cylinders;
private CrankShaft crankShaft = new CrankShaft();
@ConfigurationProperties("crank-shaft")
public static class CrankShaft { //
private Optional<Double> rodLength = Optional.empty(); //
public Optional<Double> getRodLength() {
return rodLength;
}
public void setRodLength(Optional<Double> rodLength) {
this.rodLength = rodLength;
}
}
}The setManufacturer(String) method will be annotated with @Property(name="my.engine.manufacturer") the value of which will be resolved from the configured Environment.
The injectBean method of AbstractInitializableBeanDefinition is subsequently overridden with logic to handle looking up the normalized property name my.engine.manufacturer from the current BeanContext and inject the value if it is present in a reflection-free manner.
|
Note
|
Property names are normalized into kebab case (lower case hyphen separated) which is the format used to store their values. |
Micronaut supports annotation-based Aspect Oriented Programming (AOP) which allows decorating or introducing type behaviour through the use of interceptors defined in user code.
|
Note
|
The use of the AOP terminogy originates from AspectJ and historical use in Spring. |
Any annotation defined by the framework can be meta-annotated with the @InterceptorBinding annotation which supports different kinds of interception including:
-
AROUND- A annotation can be used to decorate an existing method invocation -
AROUND_CONSTRUCT- An annotation can be used to intercept the construction of any type -
INTRODUCTION- An annotation can be used to "introduce" new behaviour to abstract or interface types -
POST_CONSTRUCT- An annotation can be used to intercept@PostConstructcalls which are invoked after the object is instantiated. -
PRE_DESTROY- An annotation can be used to intercept@PreDestroycalls which are invoked after the object is about to be disposed of.
One or many instances of Interceptor can be associated with an @InterceptorBinding allowing the user to implement behaviour that applies cross-cutting concerns.
At an implementation level, the Micronaut Compiler will visit types that are meta-annotated with @InterceptorBinding and construct a new instance of AopProxyWriter which uses the ASM bytecode generation library to generate a subclass (or an implementation in the case of interfaces) of the annotated type.
|
Note
|
Micronaut at no point modifies existing user byte code, the use of build-time generated proxies allows Micronaut to generate additional code that sits alongside user code and enhances behaviour. This approach does have limitations however, for example it is required that annotated types are non-final and AOP advice cannot be applied to final or effectively final types such as Java 17 Records. |
For example given the following annotation:
When this annotation is used on a type or method, for example:
imports
import jakarta.inject.Singleton;@Singleton
public class NotNullExample {
@NotNull
void doWork(String taskName) {
System.out.println("Doing job: " + taskName);
}
}The compiler will visit the type and the AopProxyWriter will generate additional bytecode using the ASM bytecode generation library.
During compilation the AopProxyWriter instance essentially proxies the BeanDefinitionWriter (see Bean Definitions), decorating the existing bytecode generation with additional behaviour. This is illustrated with the below diagram:
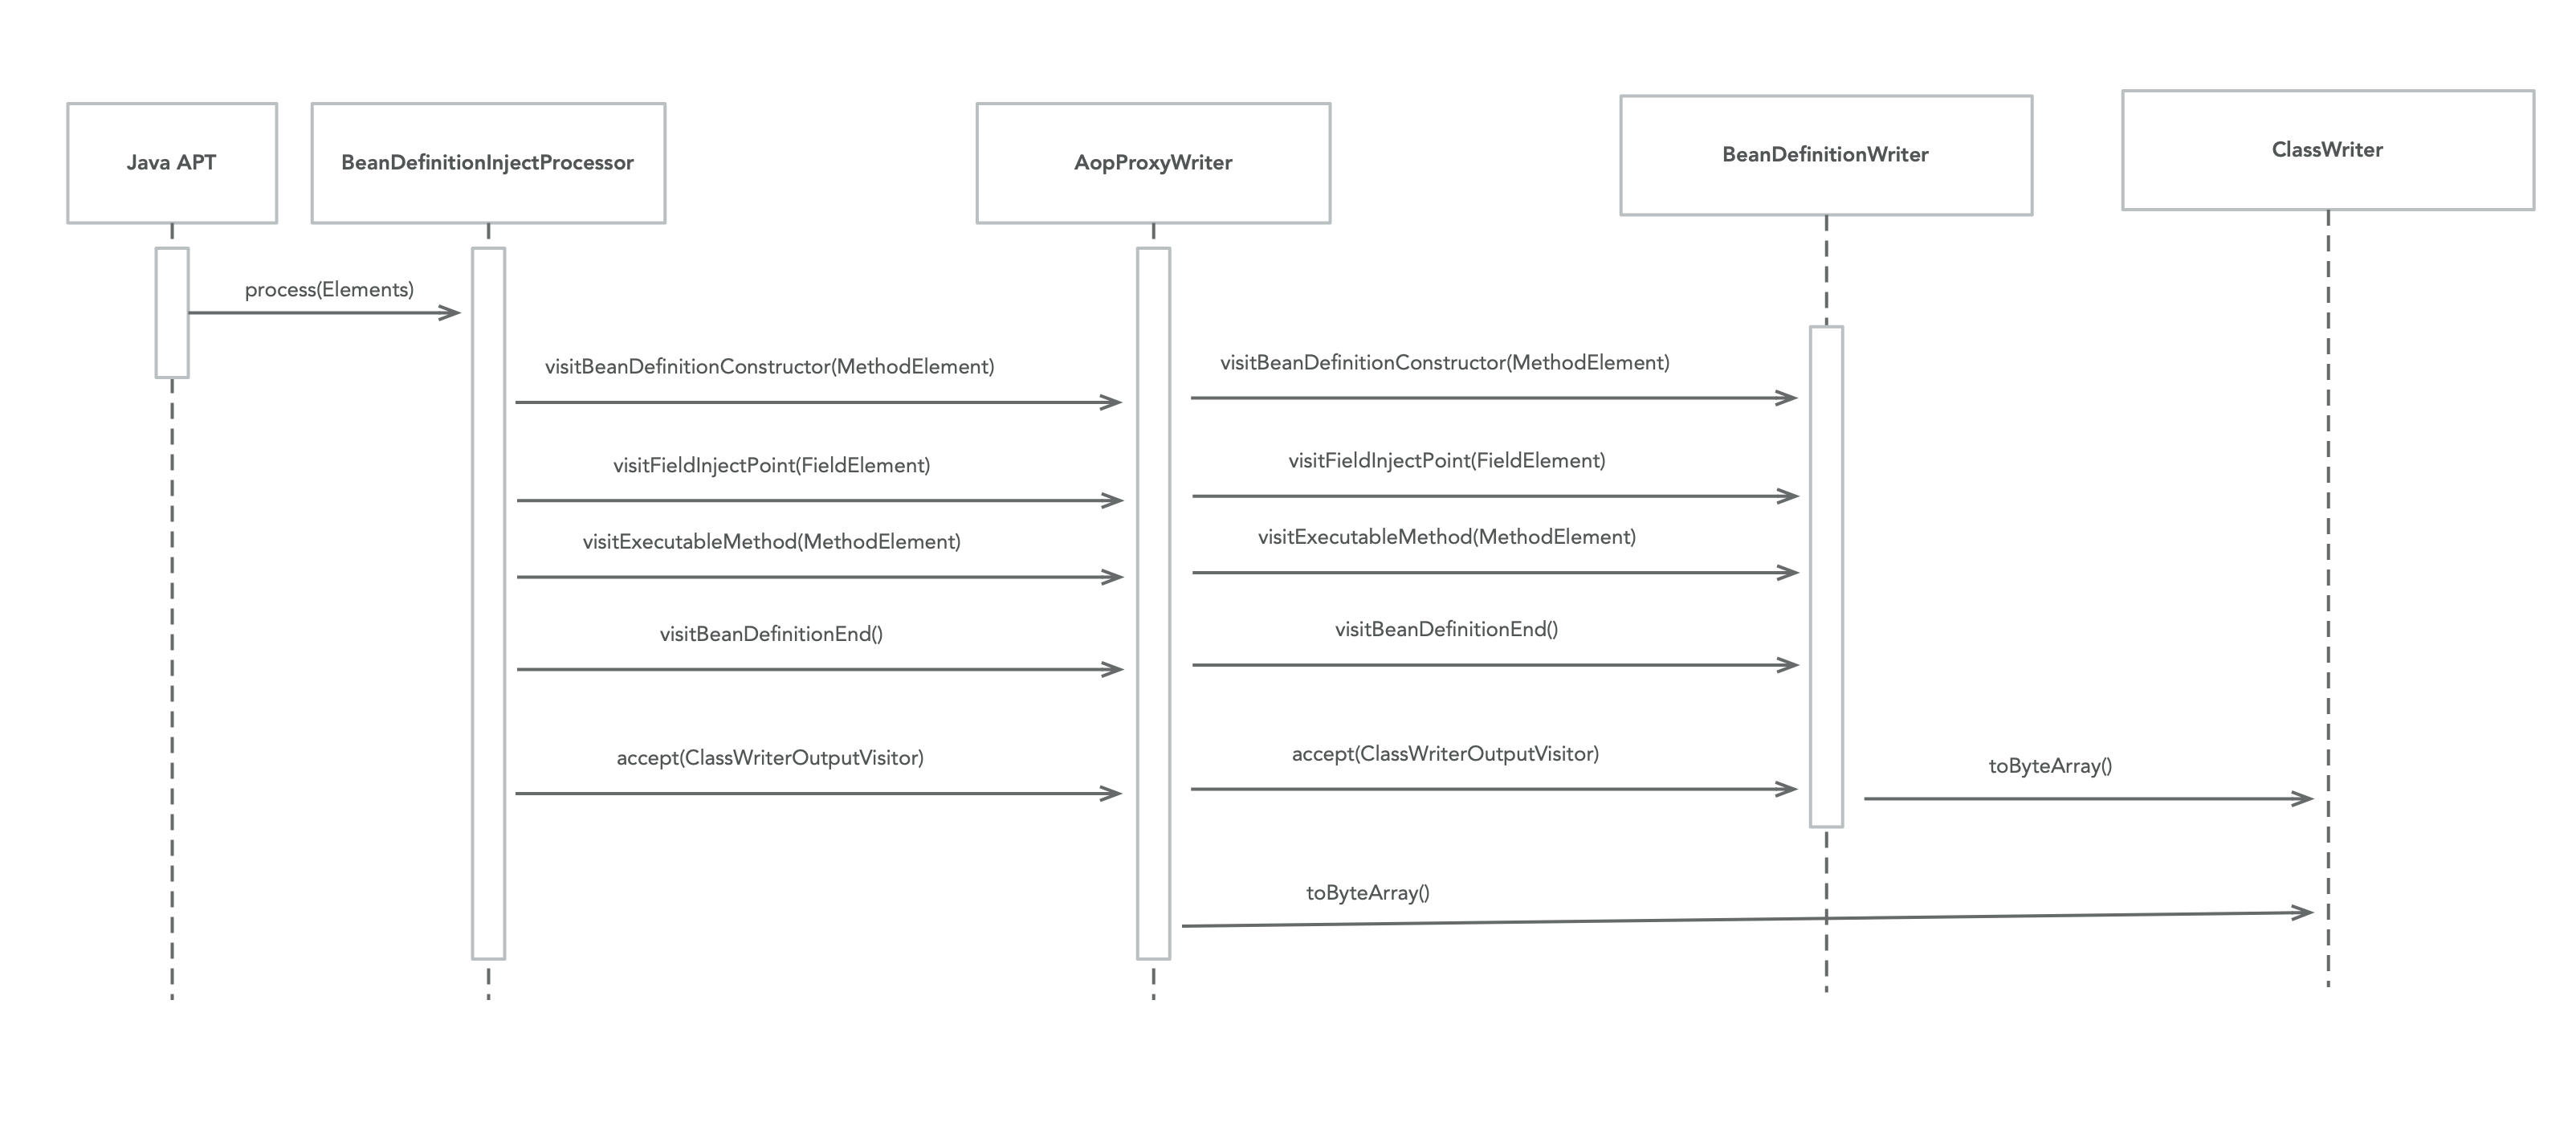
The BeanDefinitionWriter will generate the regular classes generated for every bean including:
-
$NotNullExample$Definition.class- The original undecorated bean definition (see Bean Definitions) -
$NotNullExample$Definition$Exec.class- An implementation of ExecutableMethodsDefinition containing logic that allows dispatching to each intercepted method without using reflection.
And the AopProxyWriter will decorate this behaviour and generate 3 additional classes:
-
$NotNullExample$Definition$Intercepted.class- A subclass of the decorated class that holds references to applied MethodInterceptor instances and overrides all the intercepted methods, constructing the MethodInterceptorChain instance and invoking the applied interceptors -
$NotNullExample$Definition$Intercepted$Definition.class- A BeanDefinition that subclasses the original undecorated bean definition. (see Bean Definitions) -
$NotNullExample$Definition$Intercepted$Definition$Reference.class- A BeanDefinitionReference that is capable of soft loading the intercepted BeanDefinition. (see Bean Definitions)
The majority of the classes generated are metadata for loading and resolving the BeanDefinition. The actual build time proxy is the class that ends with $Intercepted. This class implements the Intercepted interface and subclasses the proxied type, overriding any non-final and non-private methods to invoke the MethodInterceptorChain.
An implementation will create a constructor which is used to wire in the dependencies on the intercepted type that looks like:
Each non-final and non-private method of the proxied type that has an @InterceptorBinding associated with it (either type level or method level) is overridden with logic that proxies the original method, for example:
Note that the default behaviour of the @Around annotation is to invoke the original overridden method of the target type by calling the super implementation via a generated synthetic bridge method that allows access to the super implementation (in the above case NotNullExample).
In this arrangement the proxy and the proxy target are the same object, with interceptors being invoked and the call to proceed() invoke the original implementation via a call to super.doWork() in the case above.
However, this behaviour can be customized using the @Around annotation.
By setting @Around(proxyTarget=true) the generated code will also implement the InterceptedProxy interface which defines a single method called interceptedTarget() that resolves the target object the proxy should delegate method calls to.
|
Note
|
The default behaviour (proxyTarget=false) is more efficient memory wise as only a single BeanDefinition is required and a single instance of the proxied type.
|
The evaluation of the proxy target is eager and done when the proxy is first created, however it can be made lazy by setting @Around(lazy=true, proxyTarget=true) in which case the proxy will only be retrieved when a proxied method is invoked.
The difference in behaviour between proxying the target with proxyTarget=true is illustrated in the following diagram:
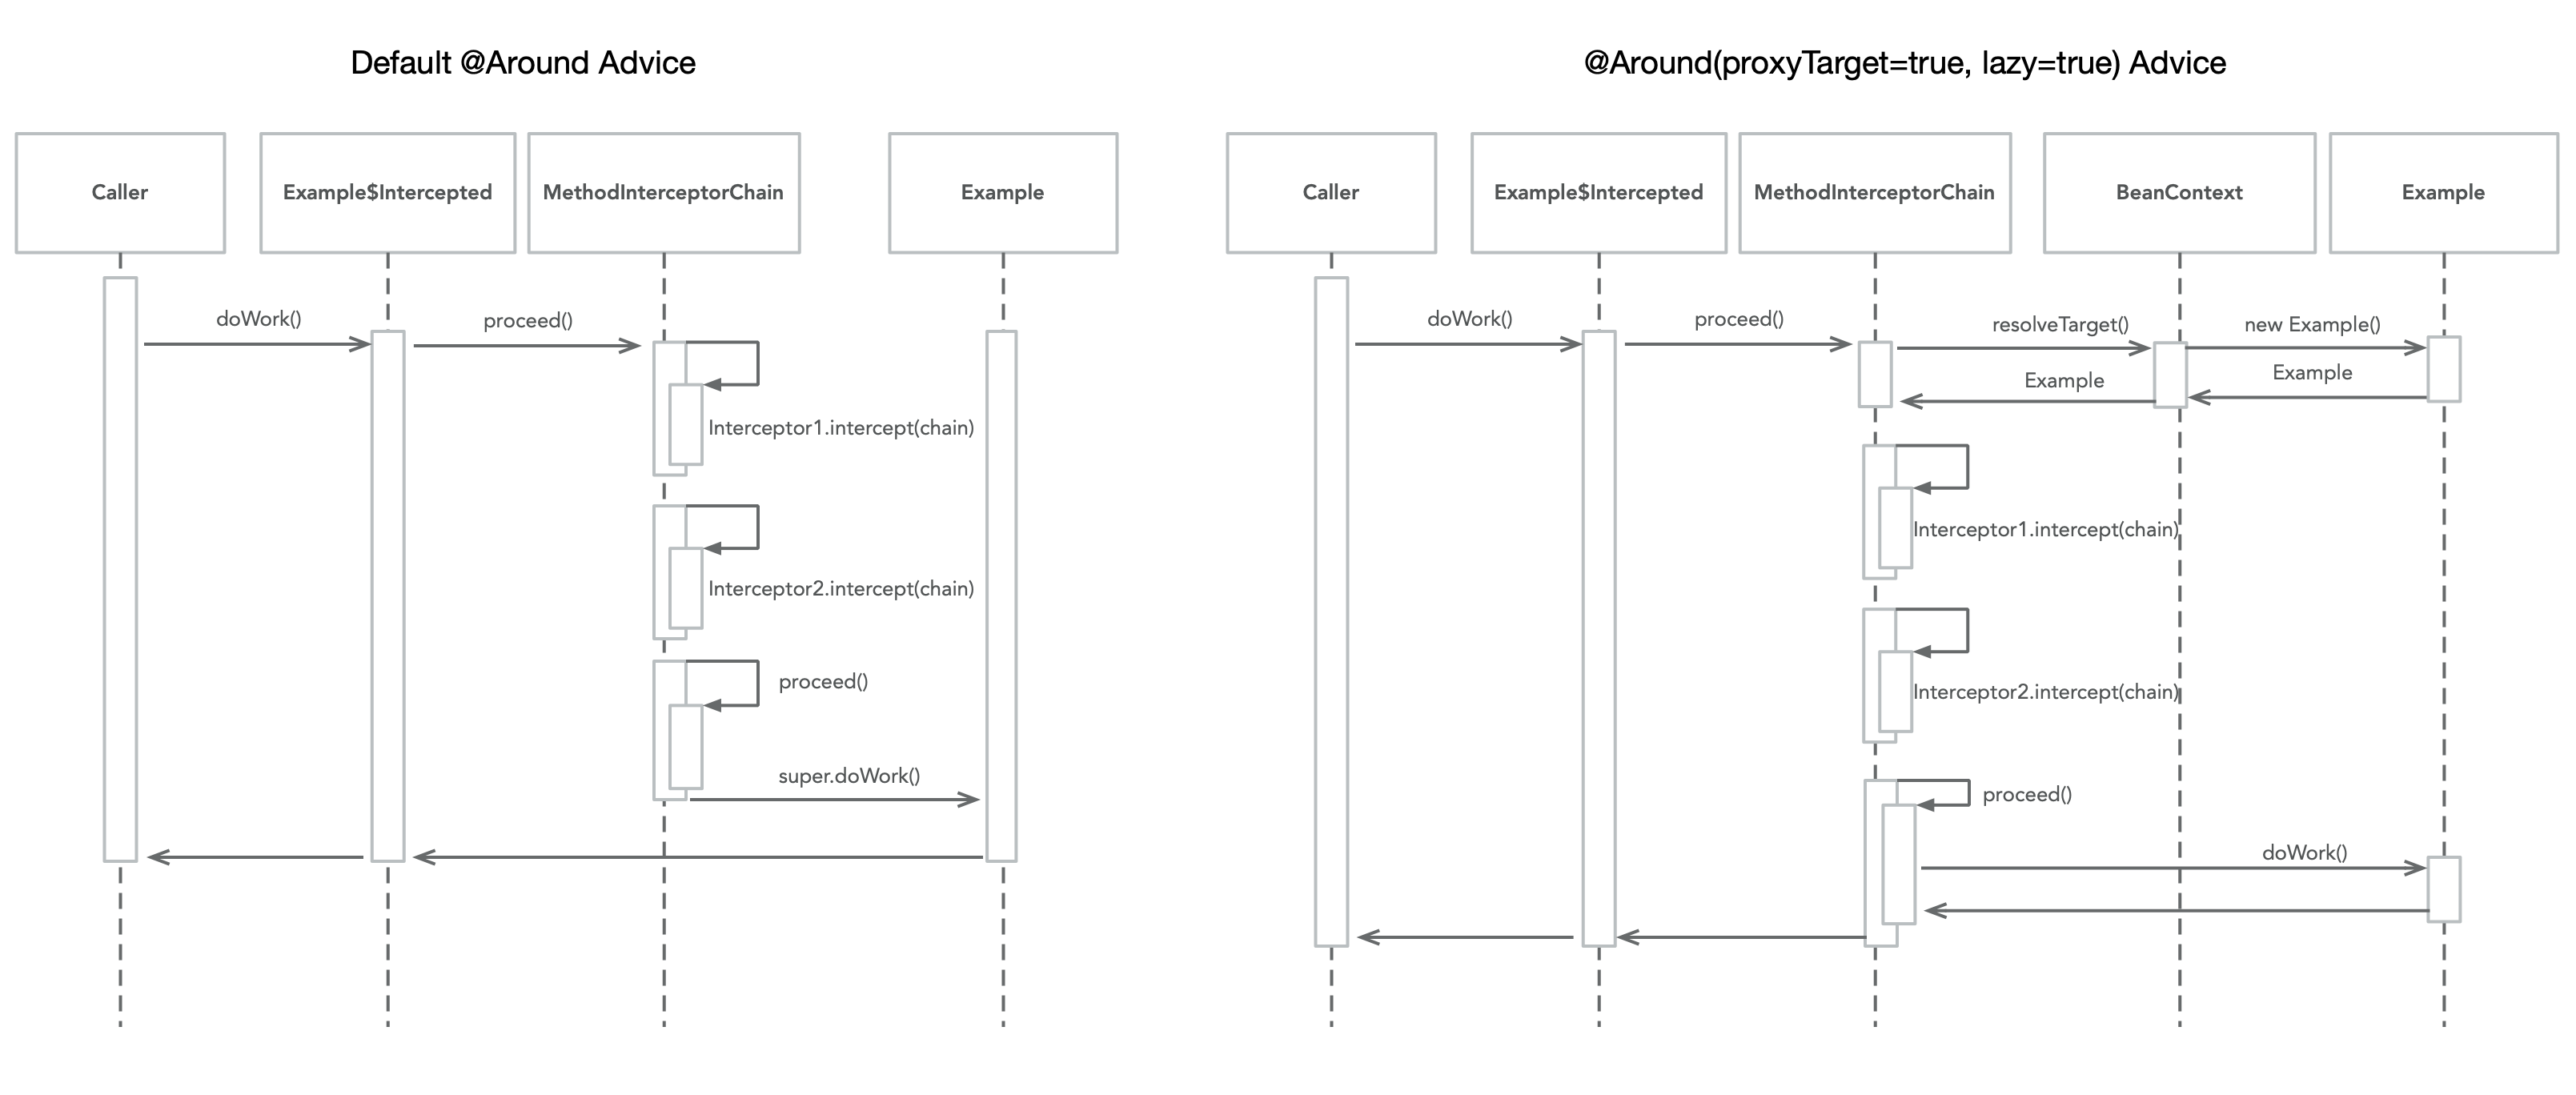
The sequence on the left hand side of the diagram (proxyTarget=false) invokes the proxied method via a call to super whilst the sequence on the right looks up a proxy target from the BeanContext and invokes the method on the target.
One final customization option is @Around(hotswap=true) which triggers the compiler to produce a compile-time proxy that implements HotSwappableInterceptedProxy which defines a single method called swap(..) that allows swapping out the target of the proxy with a new instance (to allow this to be thread safe the generated code uses a ReentrantReadWriteLock).
Security Considerations
Method interception via AROUND advice is typically used to define logic that addresses cross-cutting concerns, one of which is security.
When multiple Interceptor instances apply to a single method it may be important from a security perspective that these interceptors execute in a specific order.
The Interceptor interface extends the Ordered interface to enable the developer to control interceptor ordering by overriding the getOrder() method.
When the MethodInterceptorChain is constructed and multiple interceptors are present they are ordered with HIGHEST priority interceptors executed first.
To aid the developer who defines their own Around Advice the InterceptPhase enumeration defines various constants that can be used to correctly declare the value of getOrder() (for example security typically falls within the VALIDATE phase).
|
Tip
|
Trace level logging can be enabled for the io.micronaut.aop.chain package to debug resolved interceptor order.
|
Once the job of the Micronaut Compiler is complete and the required classes generated, it is up to the BeanContext to load the classes for runtime execution.
Whilst the standard Java service loader mechanism is used to define instances of BeanDefinitionReference, the instances themselves are instead loaded with SoftServiceLoader which is a more lenient implementation that allows checking if the service is actually present before loading and also allows parallel loading of services.
The BeanContext performs the following steps:
-
Soft load all BeanDefinitionReference instances in parallel
-
Instantiate all beans annotated with @Context (beans scoped to the whole context)
-
Run each ExecutableMethodProcessor for each discovered processed ExecutableMethod. A method is regarded as "processed" if it is meta-annotated with
@Executable(processOnStartup = true) -
Publish an event on type StartupEvent for when the context is started.
The basic flow is illustrated below:
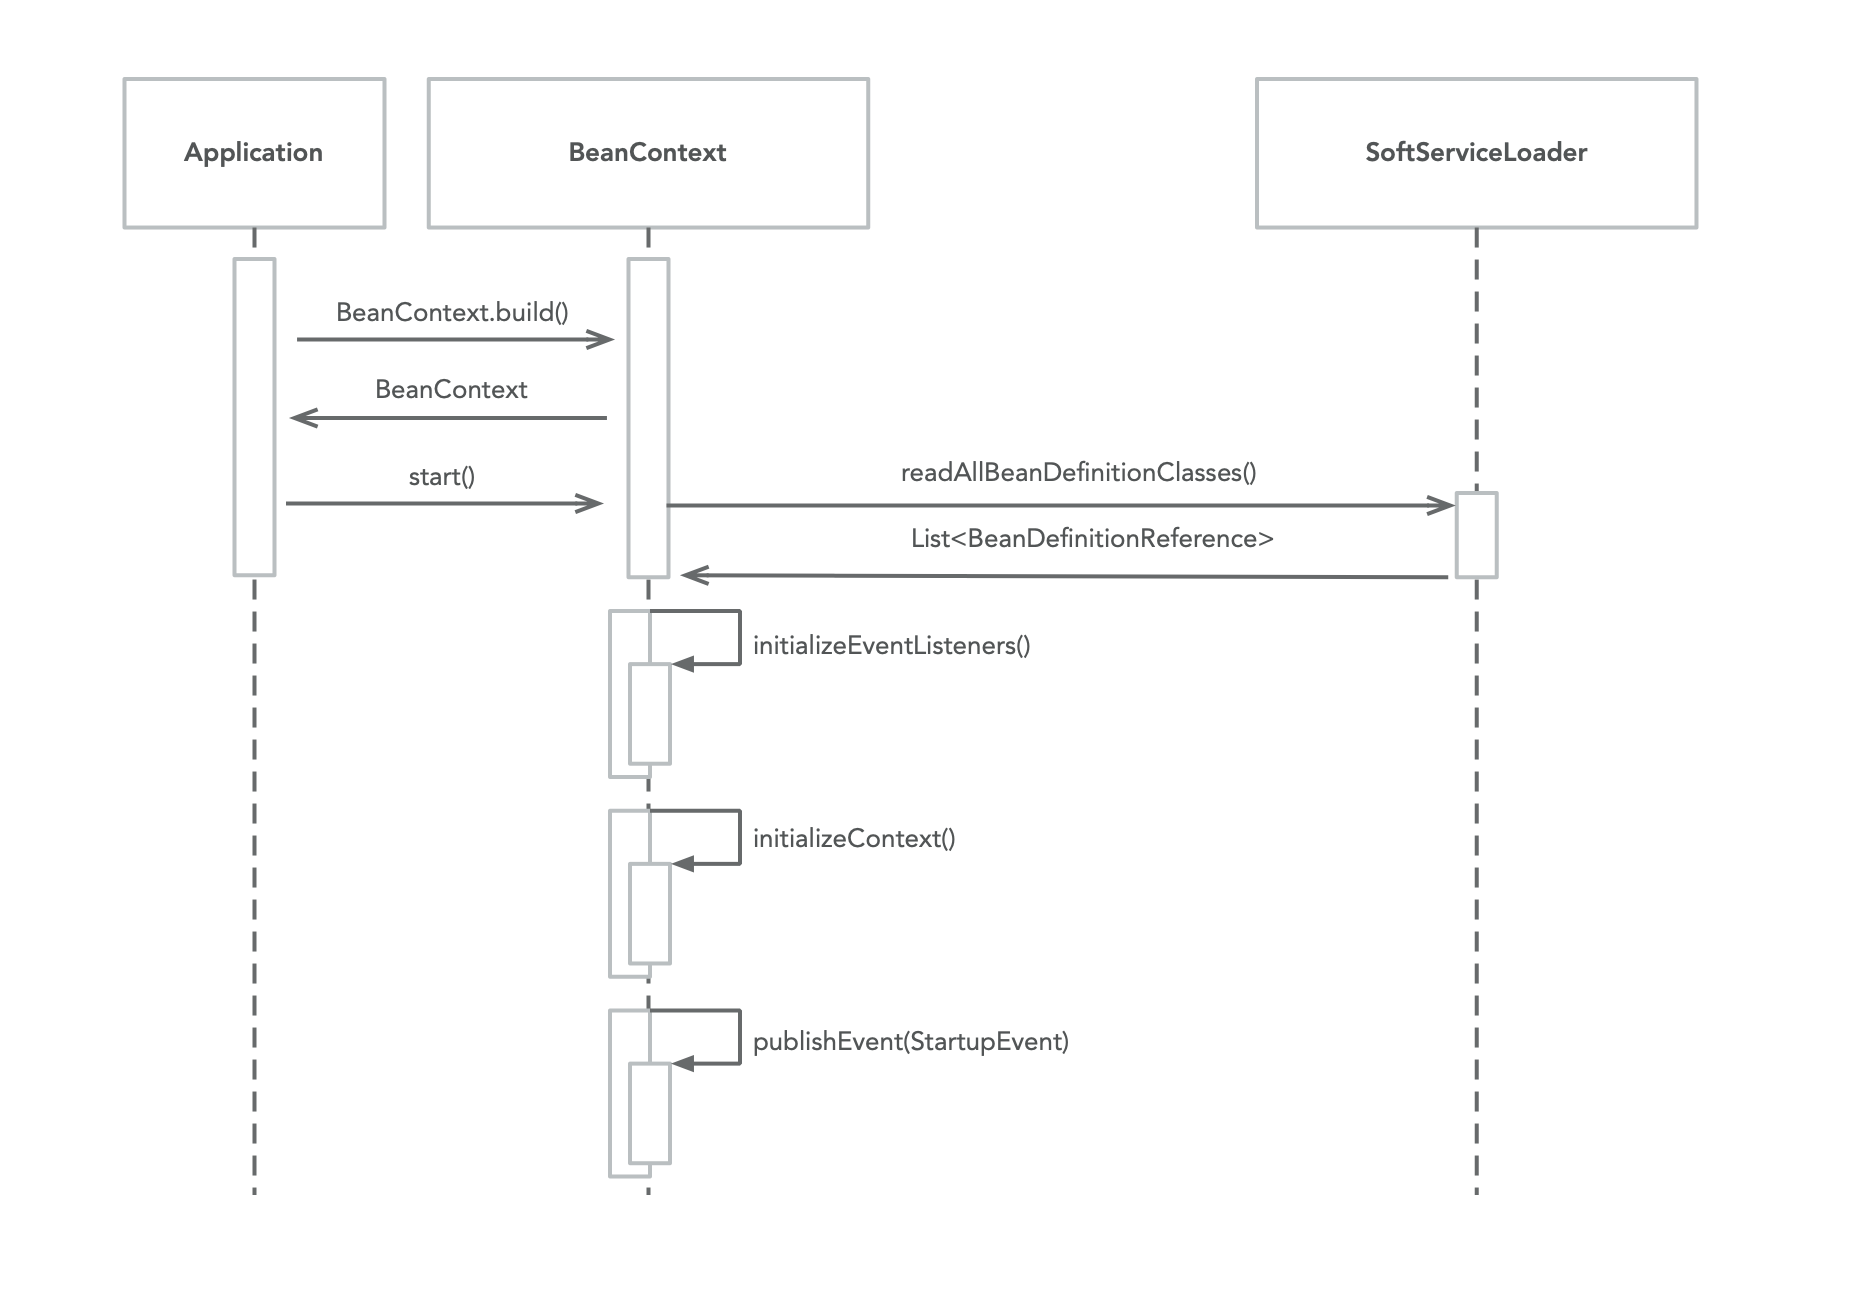
The ApplicationContext is a specialized version of the BeanContext that adds the notion of one or more active environments (encapsulated by Environment) and conditional bean loading based on this environment.
The Environment is loaded from one or more defined PropertySource instances that are discovered via the standard Java service loader mechanism by loading instances of PropertySourceLoader.
A developer can extend Micronaut to load a PropertySource through an entirely custom mechanism by adding another implementation and the associated META-INF/services/io.micronaut.context.env.PropertySourceLoader file referencing this class.
A high level different between a BeanContext and an ApplicationContext is illustrated below:
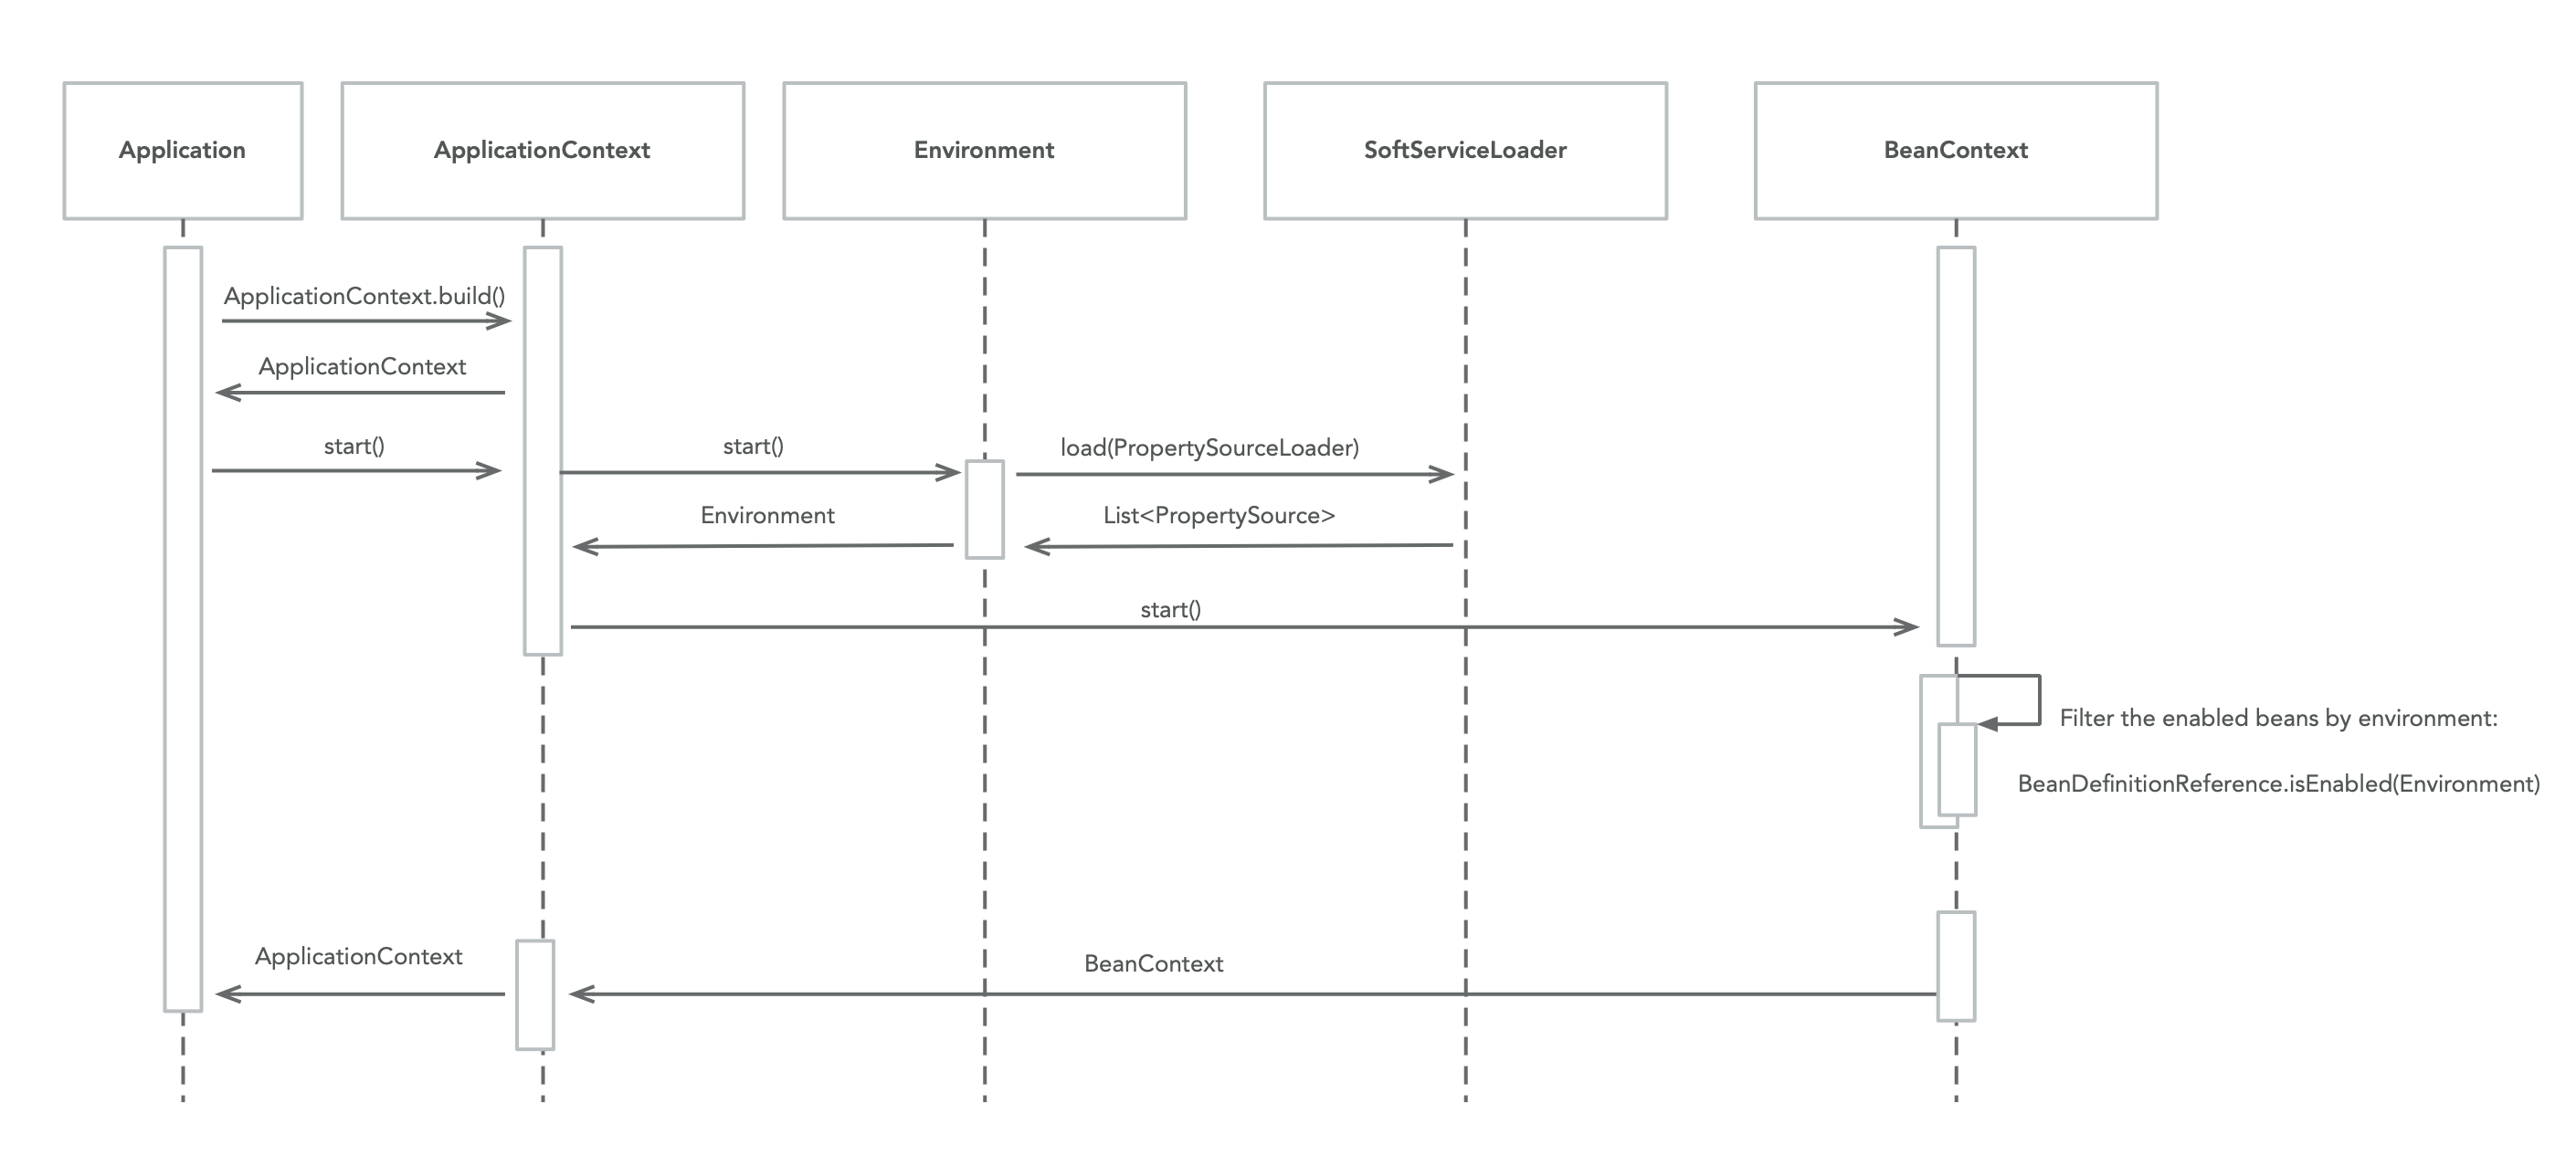
As seen above the ApplicationContext loads the Environment which is used for multiple purposes including:
-
Enabling and disabling beans through Bean Requirements
-
Allowing dependency injection of configuration via @Value or @Property
-
Allowing binding of Configuration Properties
The Micronaut HTTP server can be considered a Micronaut Module - that is a component of Micronaut that builds on the fundamental building blocks including Dependency Injection and the lifecycle of the ApplicationContext.
The HTTP server includes a set of abstract interfaces and common code contained with the micronaut-http and micronaut-http-server modules respectively (the former includes HTTP primitives shared across the client and the server).
A default implementation of these interfaces is provided based on the Netty I/O toolkit the architecture of which is described in the image below:
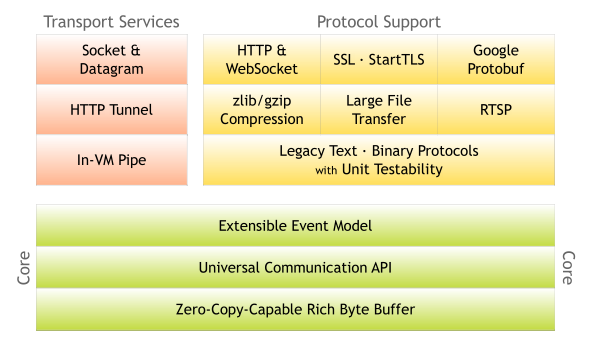
The Netty API is in general a very low-level I/O networking API designed for integrators to use to build clients and servers that present a higher abstraction layer. The Micronaut HTTP server is one such abstraction layer.
An architecture diagram of the Micronaut HTTP server and the components used in its implementation is described below:
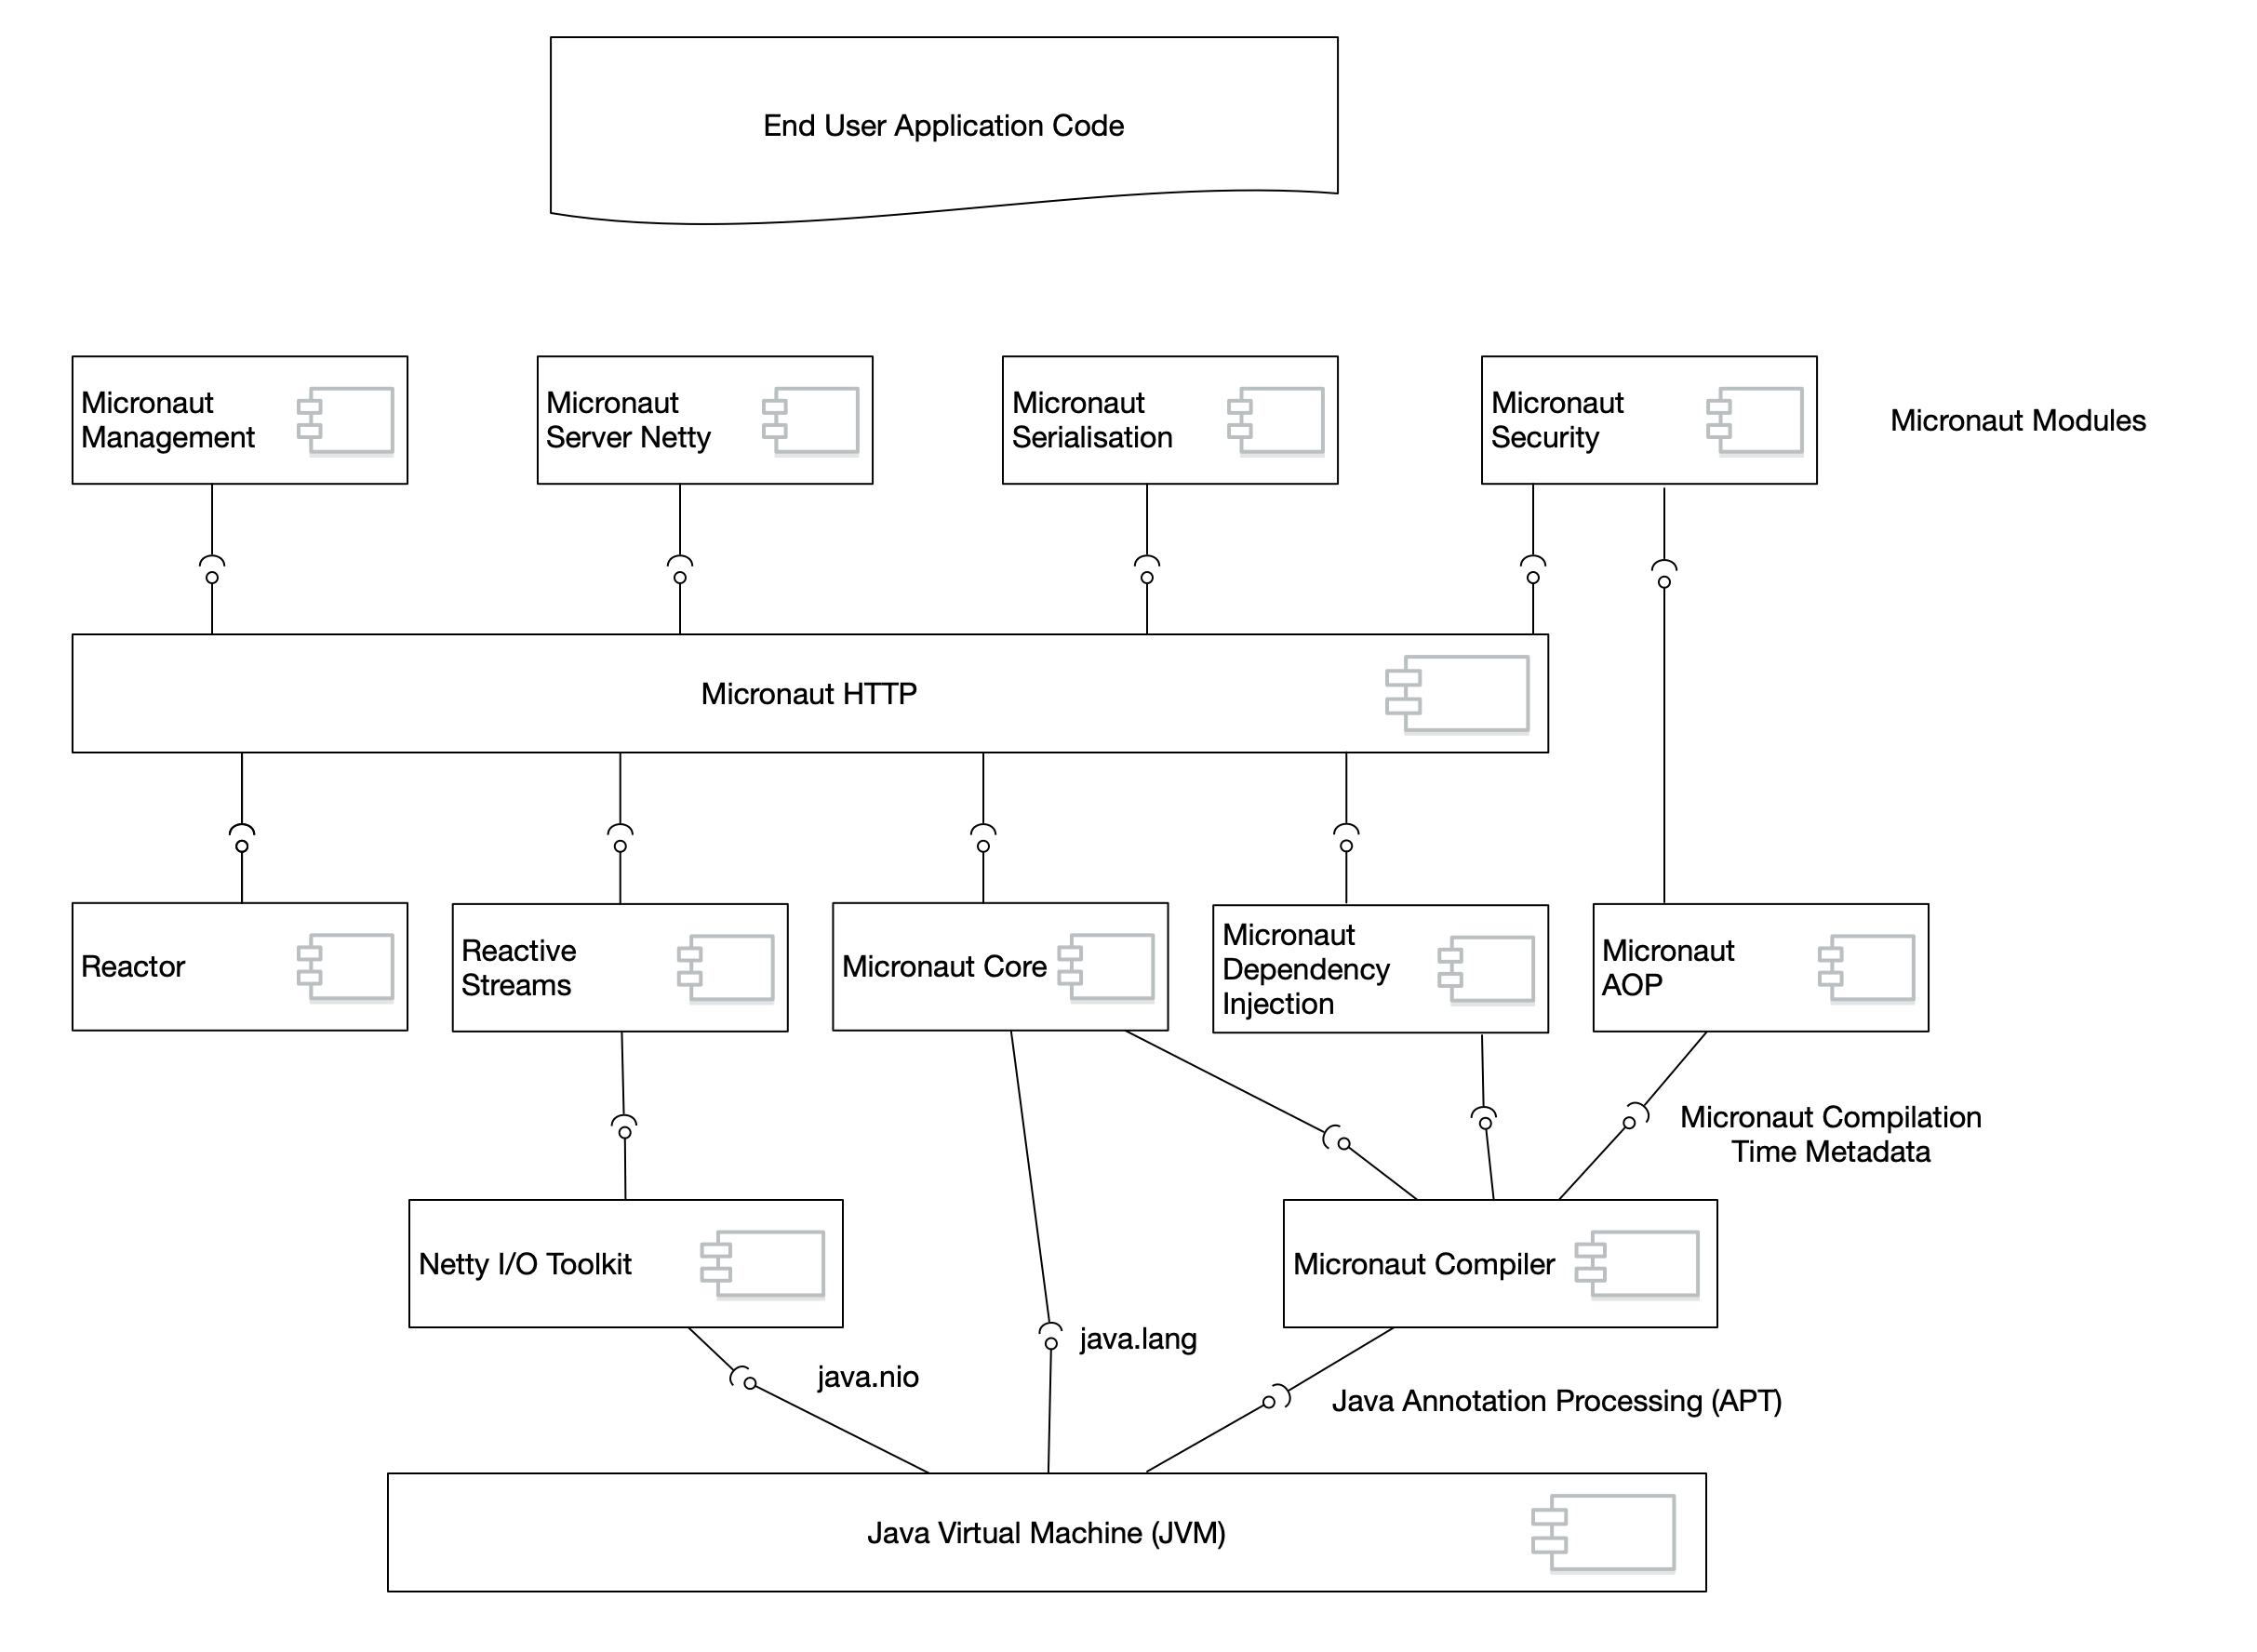
The main entry point for running the server is the Micronaut class which implements ApplicationContextBuilder. Typically, the developer places the following call into the main entry point of their application:
main entry pointpublic static void main(String[] args) {
Micronaut.run(Application.class, args);
}|
Note
|
The passed arguments a transformed into a CommandLinePropertySource and available for dependency injection via @Value. |
Executing run will start the Micronaut ApplicationContext with the default settings and then search for a bean of type EmbeddedServer which is an interface that exposes information about a runnable server including host and port information. This design decouples Micronaut from the actual server implementation and whilst the default server is Netty (described above), other servers can be implemented by third-parties simply by providing an implementation of EmbeddedServer.
A sequence diagram for how the server is started is illustrated below:
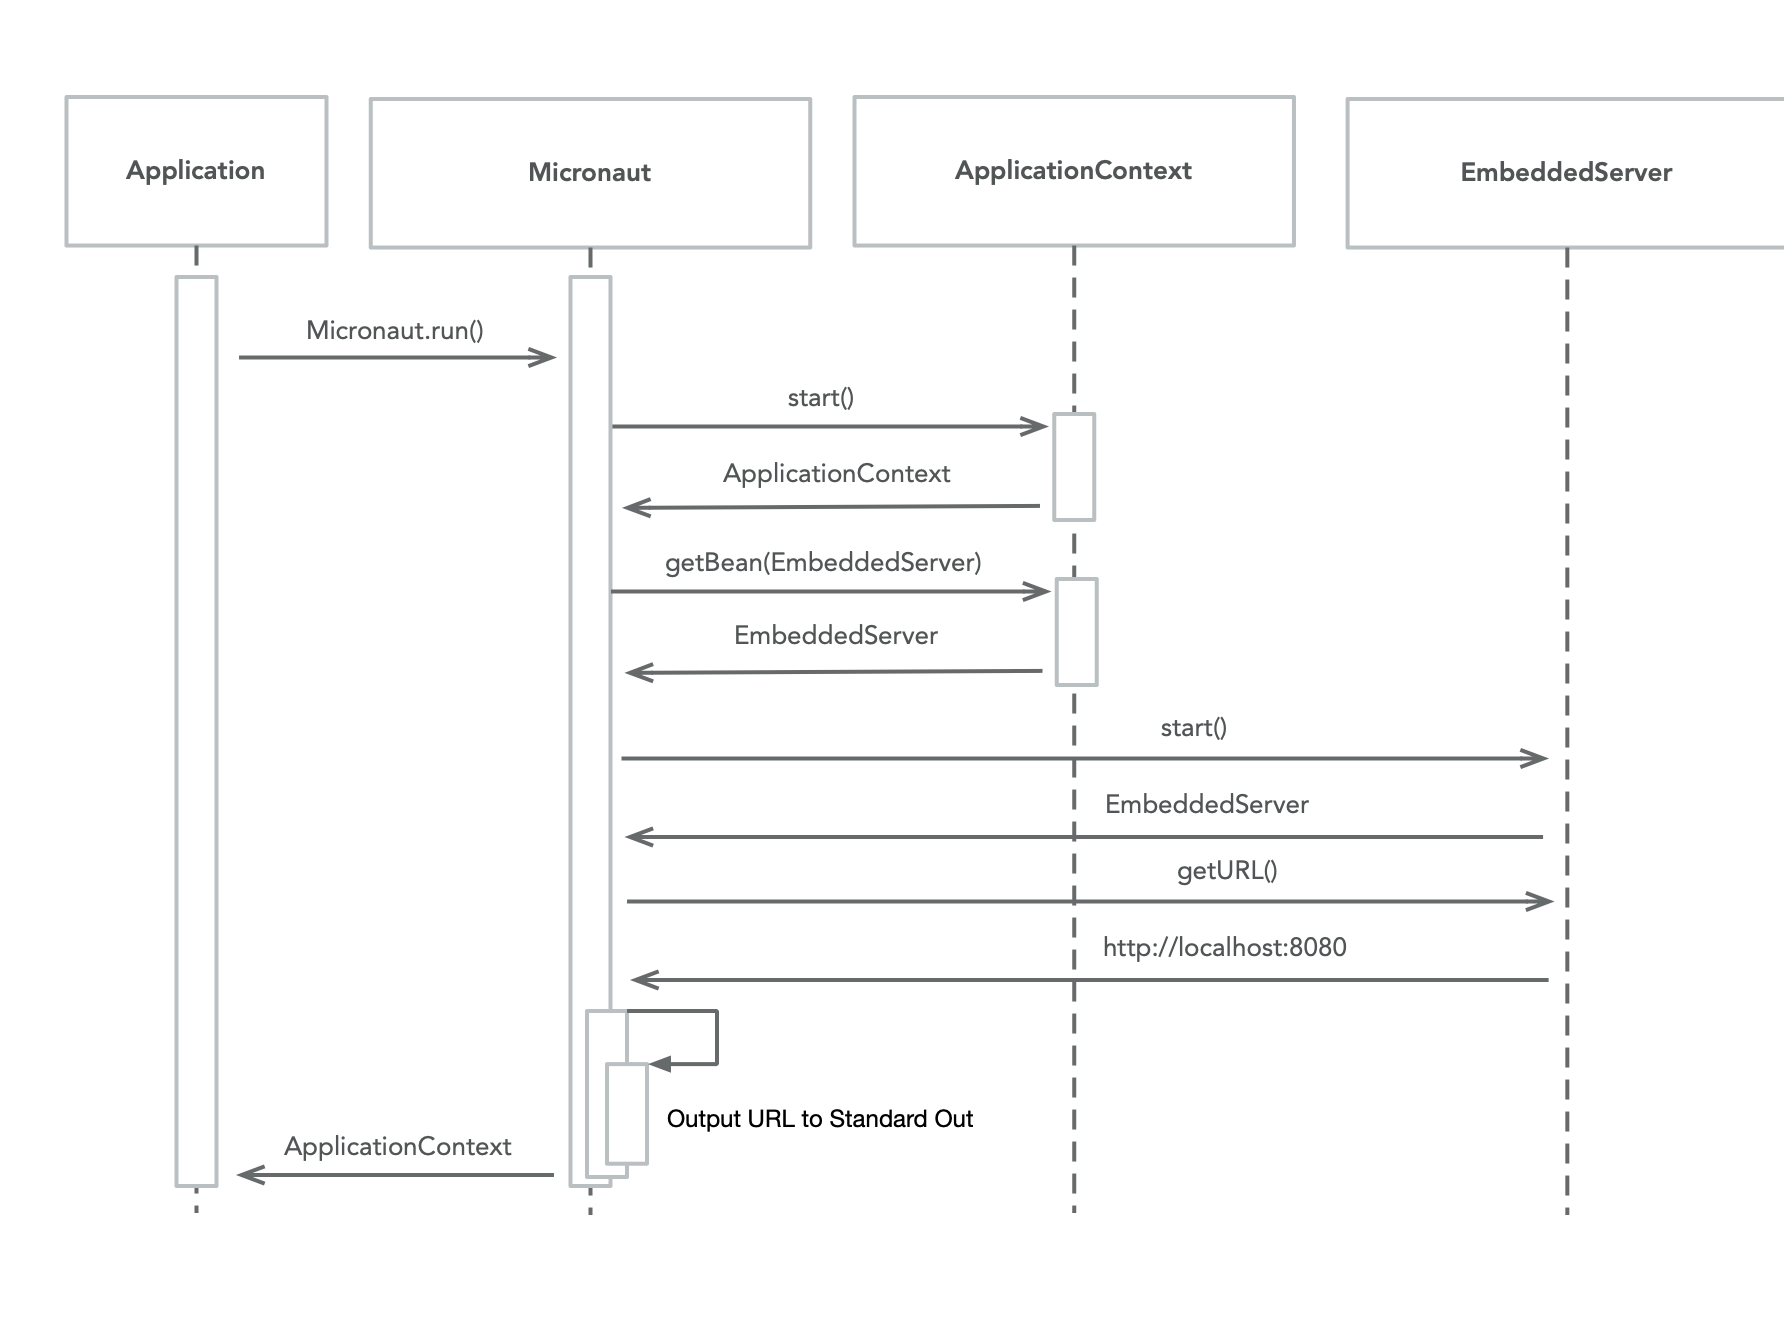
In the case of the Netty implementation the EmbeddedServer interface is implemented by NettyHttpServer.
Server Configuration
The NettyHttpServer reads the Server Configuration including:
-
NettyHttpServerConfiguration - An extended version of HttpServerConfiguration which defines Netty-specific configuration options beyond the host, port etc.
-
EventLoopGroupConfiguration - configures one or more Netty EventLoopGroup that can be configured to be either unique to the server or shared with one or more HTTP clients.
-
ServerSslConfiguration - Provides configuration for the ServerSslBuilder for to configure the Netty SslContext to use for HTTPS.
Server Configuration Security Considerations
Netty’s SslContext provides an abstraction which allows using either the JDK-provided javax.net.ssl.SSLContext or an OpenSslEngine that requires the developer to additionally add netty-tcnative as a dependency (netty-tcnative is a fork of Tomcat’s OpenSSL binding).
The ServerSslConfiguration allows configuring the application to a secure, readable location on disk where valid certificates exist to correctly configure the javax.net.ssl.TrustManagerFactory and javax.net.ssl.KeyManagerFactory by loading the configurtion from disk.
Netty Server Initialization
When the NettyHttpServer executes the start() sequence, it will perform the following steps:
-
Read the EventLoopGroupConfiguration and create the parent and worker EventLoopGroup instances required to start a Netty server.
-
Compute a platform specific ServerSocketChannel to use (depending on Operating System this could either be Epoll or KQueue, falling back to Java NIO if no native binding is possible)
-
Creates the instance of ServerBootstrap used to initialze the SocketChannel (the connection between client and server).
-
The
SocketChannelis initialized by a Netty ChannelInitializer that creates the customized Netty ChannelPipeline used to Micronaut to server HTTP/1.1 or HTTP/2 requests depending on configuration. -
The Netty ServerBootstrap is bound to one or more configured ports, effectively making the server available to receive requests.
-
Two Bean Events are fired, first ServerStartupEvent to indicate the server has started, then finally once all these events are processed a ServiceReadyEvent only if the property
micronaut.application.nameis set.
This startup sequence is illustrated below:
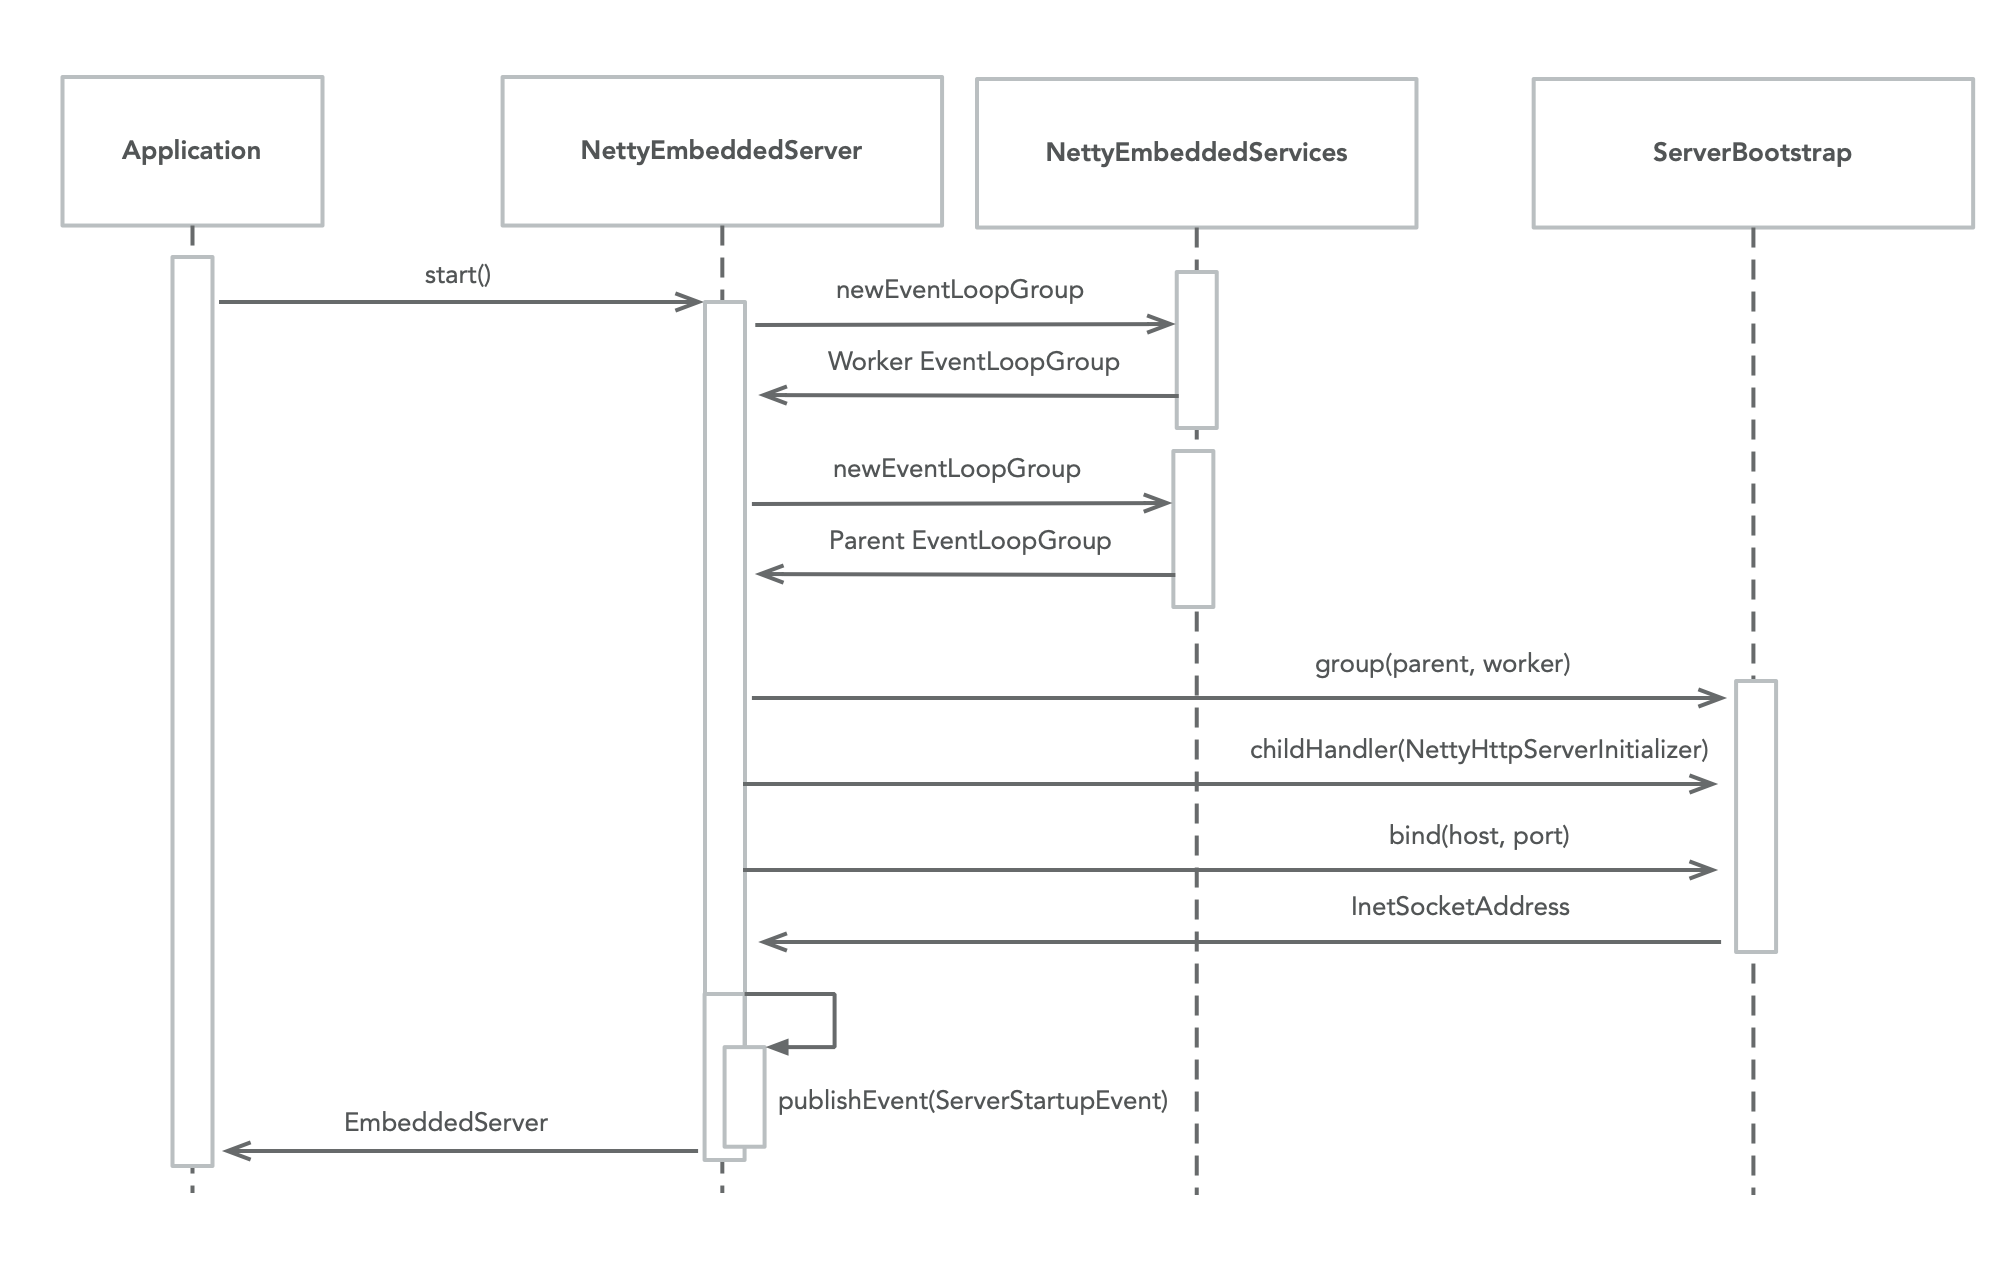
A NettyHttpServerInitializer class is used to initialize the ChannelPipeline that handles incoming HTTP/1.1 or HTTP/2 requests.
ChannelPipeline Security Considerations
The ChannelPipeline can be customized by the user by implementing a bean that implements the ChannelPipelineCustomizer interface and adding a new Netty ChannelHandler to the pipeline.
Adding a ChannelHandler allows performing tasks such as wire-level logging of incoming and outgoing data packets and may be used when wire-level security requirements are required such as validating the bytes of the incoming request body or outgoing response body.
Netty Server Routing
Micronaut defines a set of HTTP annotations that allow binding user code to incoming HttpRequest instances and customizing the resulting HttpResponse.
One or many configured RouteBuilder implementations construct instances of UriRoute which is used by the Router components to route incoming requests methods of annotated classes such as:
imports
import io.micronaut.http.MediaType;
import io.micronaut.http.annotation.Controller;
import io.micronaut.http.annotation.Get;@Controller("/hello") //
public class HelloController {
@Get(produces = MediaType.TEXT_PLAIN) //
public String index() {
return "Hello World"; //
}
}Request binding annotations can be used to bind method parameters to the HTTP body, headers, parameters etc. and the framework will automatically deal with correctly escaping the data before it passed to the receiving method.
An incoming request is received by Netty and a ChannelPipeline initialized by NettyHttpServerInitializer. The incoming raw packets are transformed into a Netty HttpRequest which is subsequently wrapped in a Micronaut NettyHttpRequest which abstracts over the underlying Netty request.
The NettyHttpRequest is passed through the chain of Netty ChannelHandler instances until it arrives at RoutingInBoundHandler which uses the aforementioned Router to match the request a method of an annotated @Controller type.
The RoutingInBoundHandler delegates to RouteExecutor for actual execution of the route, which deals with all the logic to dispatch to a method of an annotated @Controller type.
Once executed, if the return value is not null an appropriate MediaTypeCodec is looked up from the MediaTypeCodecRegistry for the response Content-Type (defaulting to application/json). The MediaTypeCodec is used to encode the return value into a byte[] and include it as the body of the resulting HttpResponse.
The following diagram illustrates this flow for an incoming request:
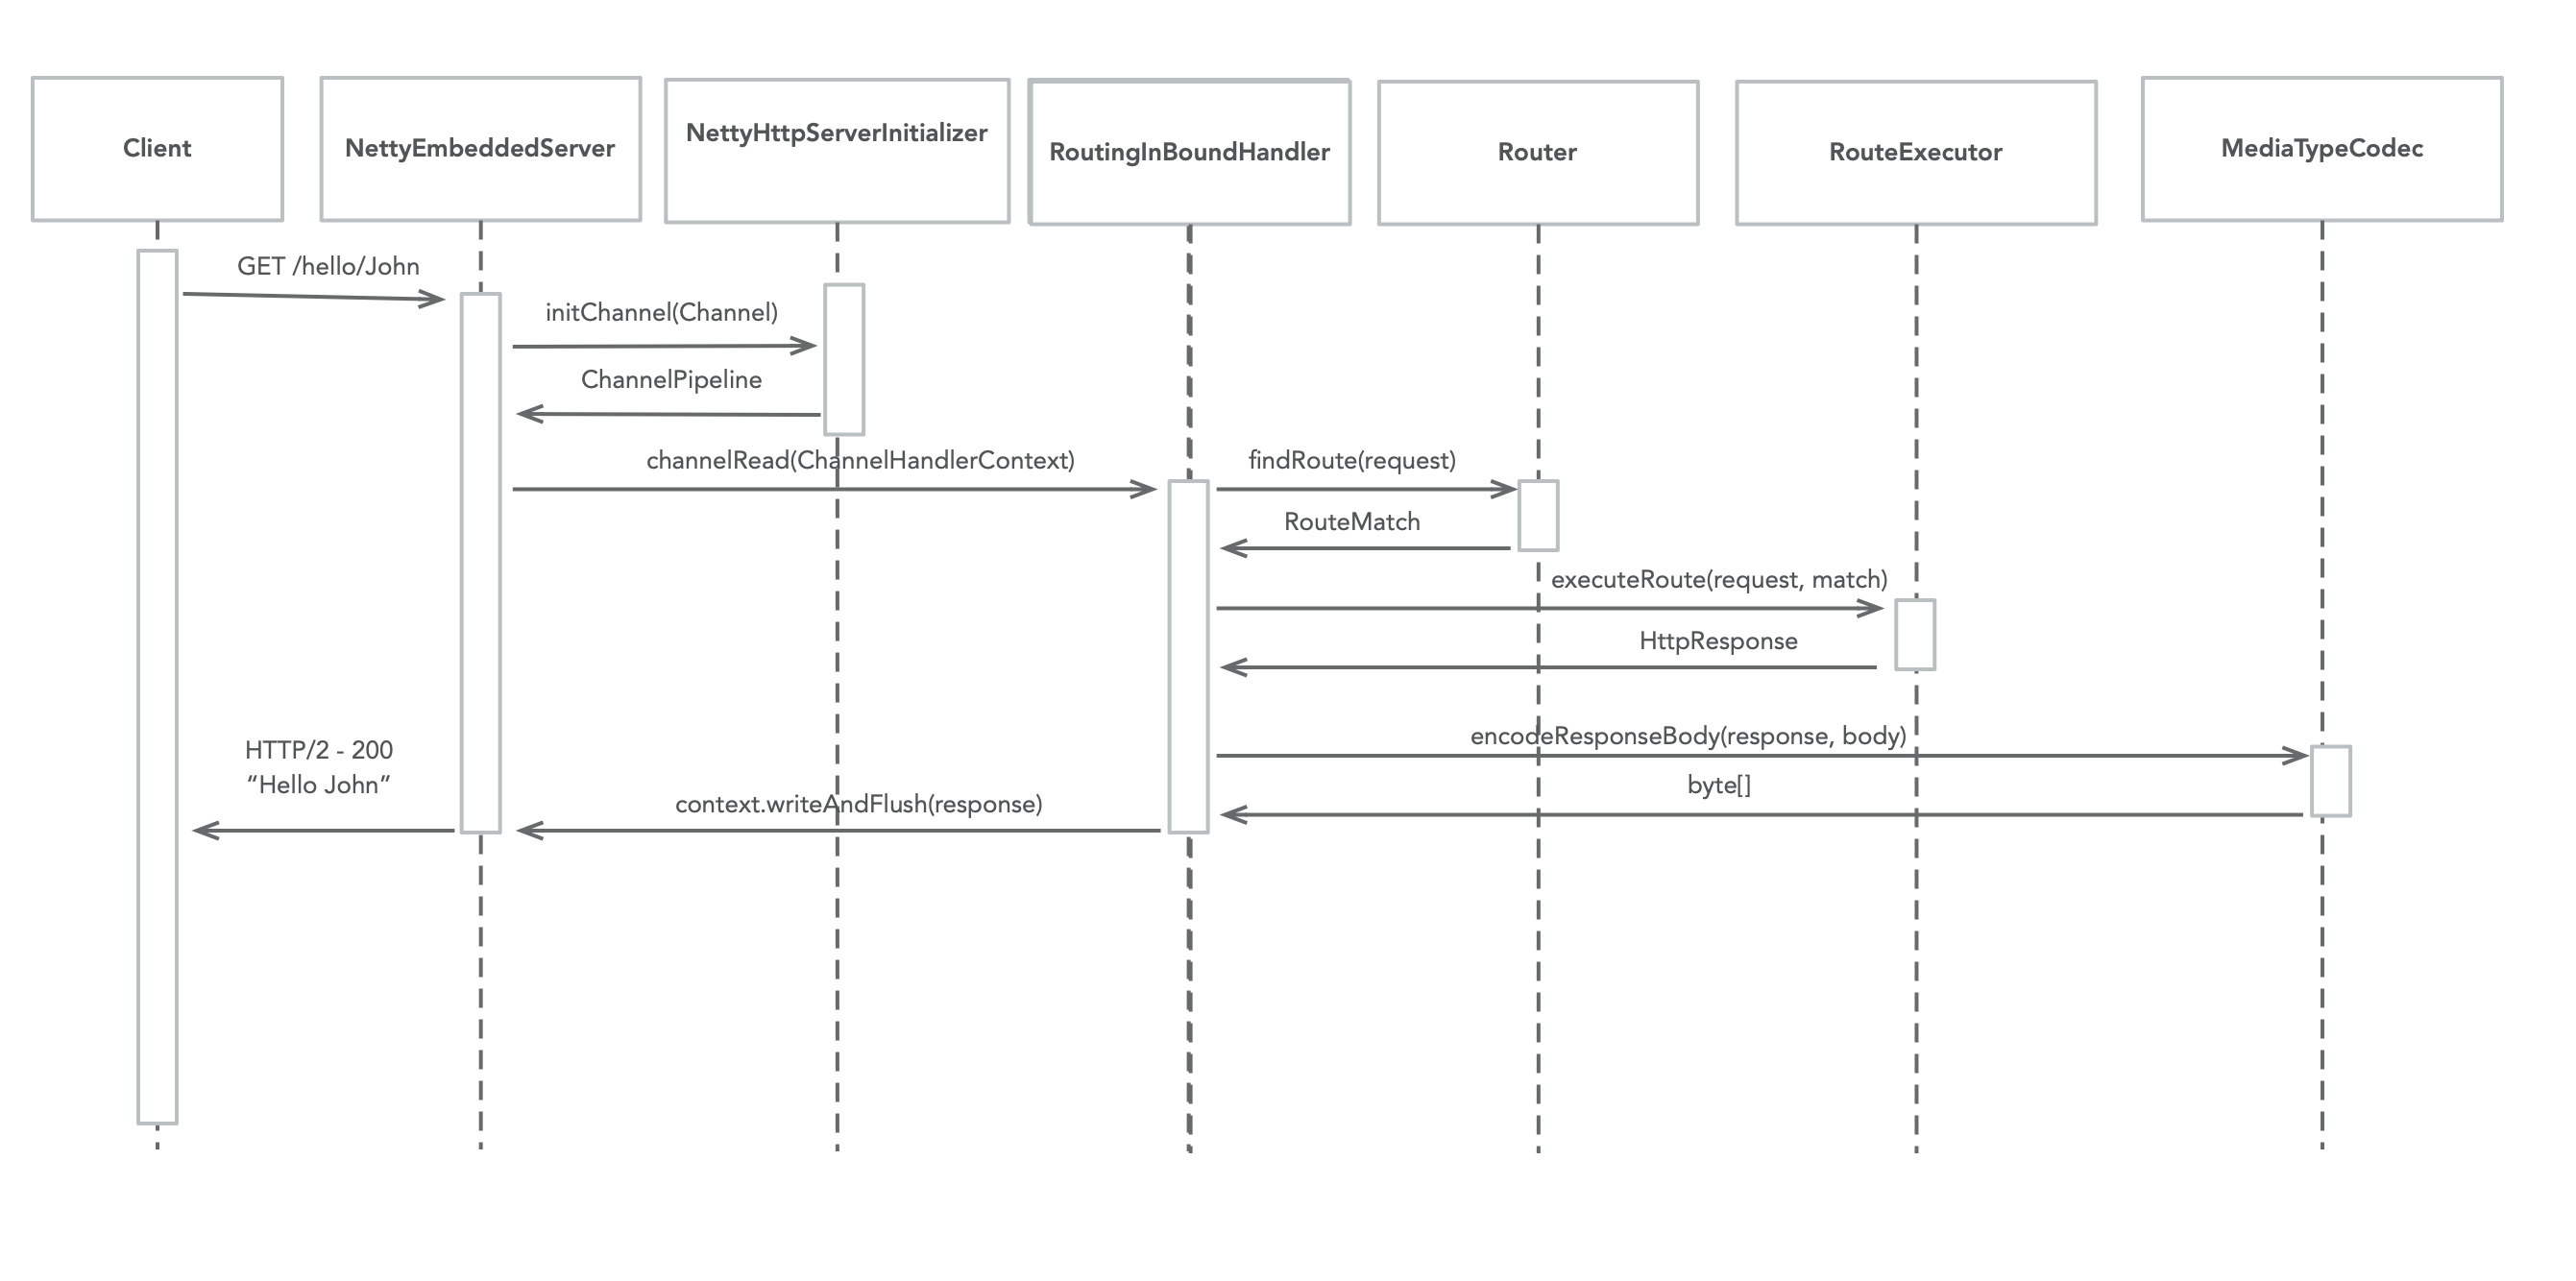
The RouteExecutor will construct a FilterChain to execute one or many HttpServerFilter prior executing the target method of an annotated @Controller type.
Once all of the HttpServerFilter instances have been executed the RouteExecutor will attempt to satisfy the requirements of the target method’s parameters, including any Request binding annotations. If the parameters cannot be satisfied then a HTTP 400 - Bad Request HttpStatus response is returned to the calling client.
Netty Server Routing Security Considerations
A HttpServerFilter instance can be used by the developer to control access to server resources. By not proceeding with the FilterChain an alternative response (such as a 403 - Forbidden) can be returned to the client barring access to sensitive resources.
Note that the HttpServerFilter interface extends from the Ordered interface since it is frequently the case that multiple filters exist within a FilterChain. By implementing the getOrder() method the developer can return an appropriate priority to control ordering. In addition, the ServerFilterPhase enum provides a set of constants developers can use to correctly position a filter, including a SECURITY phase where security rules are commonly placed.
The following section covers frequently asked questions that you may find yourself asking while considering to use or using Micronaut.
Does Micronaut modify my bytecode?
No. Your classes are your classes. Micronaut does not transform classes or modify the bytecode generated from the code you write. Micronaut produces additional classes at compile time in the same package as your original unmodified classes.
Why Doesn’t Micronaut use Spring?
When asking why Micronaut doesn’t use Spring, it is typically in reference to the Spring Dependency Injection container.
|
Note
|
The Spring ecosystem is very broad and there are many Spring libraries you can use directly in Micronaut without requiring the Spring container. |
The reason Micronaut features its own native JSR-330 compliant dependency injection is that the cost of these features in Spring (and any reflection-based DI/AOP container) is too great in terms of memory consumption and the impact on startup time. To support dependency injection at runtime, Spring:
-
Reads the bytecode of every bean it finds at runtime.
-
Synthesizes new annotations for each annotation on each bean method, constructor, field etc. to support Annotation metadata.
-
Builds Reflective Metadata for each bean for every method, constructor, field, etc.
The result is a progressive degradation of startup time and memory consumption as your application incorporates more features.
For Microservices and Serverless functions where it is critical that startup time and memory consumption remain low, the above behaviour is an undesirable reality of using the Spring container, hence the designers of Micronaut chose not to use Spring.
Does Micronaut support Scala?
Micronaut supports any JVM language that supports the Annotation Processor API. Scala currently does not support this API. However, Groovy also doesn’t support this API and special support has been built that processes the Groovy AST. It may be technically possible to support Scala in the future if a module similar to inject-groovy is built, but as of this writing Scala is not supported.
Can Micronaut be used for purposes other than Microservices?
Yes. Micronaut is very modular, and you can choose to use just the Dependency Injection and AOP implementation by including the micronaut-inject-java (or micronaut-inject-groovy for Groovy) dependency in your application.
In fact Micronaut’s support for Serverless Computing uses this exact approach.
What are the advantages of Micronaut’s Dependency Injection and AOP implementation?
Micronaut processes your classes and produces all metadata at compile time. This eliminates the need for reflection, cached reflective metadata, and the requirement to analyze your classes at runtime, all of which lead to slower startup performance and greater memory consumption.
In addition, Micronaut builds reflection-free AOP proxies at compile time, which improves performance, reduces stack trace sizes, and reduces memory consumption.
Why does Micronaut have its own Consul and Eureka client implementations?
The majority of Consul and Eureka clients that exist are blocking and include many external dependencies that inflate your JAR files.
Micronaut’s DiscoveryClient uses Micronaut’s native HTTP client, greatly reducing the need for external dependencies and providing a reactive API onto both discovery servers.
Why am I encountering a NoSuchMethodError occurs loading my beans (Groovy)?
Groovy by default imports classes in the groovy.lang package, including one named @Singleton, an AST transformation class that makes your class a singleton by adding a private constructor and static retrieval method. This annotation is easily confused with the jakarta.inject.Singleton annotation used to define singleton beans in Micronaut. Make sure you use the correct annotation in your Groovy classes.
Why is it taking much longer than it should to start the application
Micronaut’s startup time is typically very fast. At the application level however, it is possible to affect startup time. If you are seeing slow startup, review any application startup listeners or @Context scope beans that are slowing startup.
Some network issues can also cause slow startup. On the Mac for example, misconfiguration of your /etc/hosts file can cause issues. See the following stackoverflow answer.
Micronaut milestone and stable releases are distributed to Maven Central.
The following snippet shows how to use Micronaut SNAPSHOT versions with Gradle. The latest snapshot will always be the next patch version plus 1 with -SNAPSHOT appended. For example if the latest release is "1.0.1", the current snapshot would be "1.0.2-SNAPSHOT".
In the case of Maven, edit pom.xml:
The following section covers common problems developers encounter when using Micronaut.
Dependency injection is not working
The most common causes of Dependency Injection failing to work are not having the appropriate annotation processor configured, or an incorrectly configured IDE. See the section on Language Support for how to get setup in your language.
A NoSuchMethodError occurs loading beans (Groovy)
By default, Groovy imports classes in the groovy.lang package which includes a class called Singleton. This is an AST transformation annotation that makes your class a singleton by adding a private constructor and static retrieval method. This annotation is easily confused with the jakarta.inject.Singleton annotation used to define singleton beans in Micronaut. Make sure you use the correct annotation in your Groovy classes.
It is taking much longer to start my application than it should (*nix OS)
This is likely due to a bug related to java.net.InetAddress.getLocalHost() calls causing a long delay. The solution is to edit your /etc/hosts file to add an entry containing your host name. To find your host name, run hostname in a terminal. Then edit your /etc/hosts file to add or change entries like the example below, replacing <hostname> with your host name.
127.0.0.1 localhost <hostname>
::1 localhost <hostname>To learn more about this issue, see this stackoverflow answer
This section documents breaking changes between Micronaut versions
HTTP client redirect forwarding no longer retains authorization headers cross-origin by default
The Netty HTTP client no longer forwards Authorization, Proxy-Authorization, or Cookie headers on cross-origin redirects by default.
This applies to both normal redirects and preserve-body redirects (307 and 308).
If needed, this behavior can be customized through HttpClientConfiguration.
4.0.0
Core Changes
Further Micronaut Modularization
The micronaut-runtime module has been split into separate modules depending on the application’s use case:
Micronaut Discovery Core
micronaut-discovery-core - The base service discovery features are now a separate module. If your application listens for events such as ServiceReadyEvent or HeartBeatEvent this module should be added to the application classpath.
implementation("io.micronaut:micronaut-discovery-core")Micronaut Retry
micronaut-retry - The retry implementation including annotations such as @Retryable is now a separate module that can be optionally included in a Micronaut application.
In addition, since micronaut-retry is now optional declarative clients annotated with @Client no longer invoke fallbacks by default. To restore the previous behaviour add micronaut-retry to your classpath and annotate any declarative clients with @Recoverable.
To use the Retry functionality, add the following dependency:
implementation("io.micronaut:micronaut-retry")Calling registerSingleton(bean) no longer overrides existing beans
If you call registerSingleton(bean) on the BeanContext it will no longer override existing beans if the type and qualifier match; instead, two beans will exist which may lead to a NonUniqueBeanException.
If you require replacing an existing bean you must formalize the replacement using the RuntimeBeanDefinition API, for example:
context.registerBeanDefinition(
RuntimeBeanDefinition.builder(Codec.class, ()-> new OverridingCodec())
.singleton(true)
// the type of the bean to replace
.replaces(ToBeReplacedCodec.class)
.build()
);WebSocket No Longer Required
io.micronaut:micronaut-http-server no longer exposes micronaut-websocket transitively. If you are using annotations such as @ServerWebSocket, you should add the micronaut-websocket dependency to your application classpath:
implementation("io.micronaut:micronaut-websocket")Reactor Instrumentation Moved to Reactor Module
The instrumentation features for Reactor have been moved to the micronaut-reactor module. If you require instrumentation of reactive code paths (for distributed tracing for example) you should make sure your application depends on micronaut-reactor:
implementation("io.micronaut.reactor:micronaut-reactor")Validation Support Moved to Validation Module
The validation features have been moved to a separate module. Moreover, the new validation module requires you to use micronaut-validation-processor in the annotation processor classpath.
annotationProcessor("io.micronaut.validation:micronaut-validation-processor")implementation("io.micronaut.validation:micronaut-validation")Session Support Moved to Session Module
The Session handling features have been moved to their own module. If you use the HTTP session module, change the maven coordinates from io.micronaut:micronaut-session to io.micronaut.session:micronaut-session.
implementation("io.micronaut.session:micronaut-session")Kotlin Flow Support Moved to Kotlin Module
Support for the Kotlin Flow type has been moved to the micronaut-kotlin module. If your application uses Kotlin Flow you should ensure the micronaut-kotlin-runtime module is on your application classpath:
implementation("io.micronaut.kotlin:micronaut-kotlin-runtime")Compilation Time API Split into new module
In order to keep the runtime small all types and interfaces that are used at compilation time only (like the io.micronaut.inject.ast API) have been moved into a separate module:
implementation("io.micronaut:micronaut-core-processor")If you are using types and interfaces from this module you should take care to split the compilation time and runtime logic of your module into separate modules.
ASM No Longer Shaded
ASM is no longer shaded into the io.micronaut.asm package. If you depend on this library you should directly depend on the latest version of ASM.
Caffeine No Longer Shaded
Caffeine is no longer shaded into the io.micronaut.caffeine package. If you depend on this library you should directly depend on the latest version of Caffeine.
Environment Deduction Disabled by Default
In previous versions of the Micronaut framework, probes were used to attempt to deduce the running environment and establish whether the application was running in the Cloud. These probes involved network calls resulting in issues with startup performance and security concerns. These probes are disabled by default and can be re-enabled as necessary by calling ApplicationContextBuilder.deduceCloudEnvironment(true), setting the system property micronaut.env.cloud-deduction to true or setting the environment MICRONAUT_ENV_CLOUD_DEDUCTION to true if your application still requires this functionality.
Update to Groovy 4
Micronaut now uses Groovy 4. This means that Groovy 4 is now the minimum version required to run Groovy Micronaut applications. There have been several core differences in Groovy parsing and behavior for version 4 which can be found in the breaking changes section of the 4.0.0 release notes.
SnakeYAML no longer a direct dependency
SnakeYAML is no longer a direct dependency, if you need YAML configuration you should add SnakeYAML to your classpath explicitly
javax.annotation no longer a directory dependency
The javax.annotation library is no longer a directory dependency. Any references to types in the javax.anotation package should be changed to jakarta.annotation
Kotlin base version updated to 1.8.21
Kotlin has been updated to 1.8.21, which may cause issues when compiling or linking to Kotlin libraries.
Bean Introspection changes
Before, when both METHOD and FIELD were set as the access kind, the bean introspection would choose the same access type to get and set the property value. In Micronaut 4, the accessors can be of different kinds: a field to get and a method to set, and vice versa.
Annotations with retention CLASS are excluded at runtime
Annotations with the retention CLASS are not available in the annotation metadata at the runtime.
Interceptors with multiple interceptor bindings annotations
Interceptors with multiple interceptor binding annotations now require the same set of annotations to be present at the intercepted point. In the Micronaut 3 an interceptor with multiple binding annotations would need at least one of the binding annotations to be present at the intercepted point.
ConversionService and ConversionService.SHARED is no longer mutable
New type converters can be added to MutableConversionService retrieved from the bean context or by declaring a bean of type TypeConverter.
To register a type converter into ConversionService.SHARED, the registration needs to be done via the service loader.
ExceptionHandler with POJO response type no longer results in an error response
Previously if you had an ExceptionHandler such as:
@Singleton
public class MyExceptionHandler implements ExceptionHandler<MyException, String> {
@Override
public String handle(HttpRequest request, MyException exception) {
return "caught!";
}
}This would result in an internal server error response with caught! as the body.
This now returns an OK response.
If you want to return a POJO response as an error, you should use the HttpResponse type:
@Singleton
public class MyExceptionHandler implements ExceptionHandler<MyException, HttpResponse<String>> {
@Override
public HttpResponse<String> handle(HttpRequest request, MyException exception) {
return HttpResponse.badRequest("caught!");
}
}HttpContentProcessor superseded by MessageBodyHandler API
The netty-specific HttpContentProcessor API has been replaced by a new, experimental MessageBodyHandler API that
does not rely on netty and is more powerful. There is no compatibility layer, so the old HttpContentProcessor will stop
working and need to be rewritten.
@Body annotation on controller parameters
Before 4.0, the binding logic for controller parameters was more lax. A bare parameter, e.g. void test(String title),
could either match a part of the request body (foo if the request body is {"title":"foo"}), come from a query
parameter, or could bind to the full request body ({"x":"y"} if the request body is {"x":"y"}).
Binding from the full body to these bare parameters is no longer supported. If you wish to bind the full body, the
parameter must be annotated with @Body.
Additionally, it is no longer permitted to mix body component binding with full body binding. For example,
void test(@Body Bean bean, String title) will not work anymore if title needs to come from the
body that is already bound to bean.
These changes also apply to functions that are exposed using micronaut-function-web.
Delayed body access
When accessing the request body in two places, for example once as a normal controller @Body parameter and then in an
error handler, Micronaut HTTP is now stricter about allowed types. If in doubt, for the second body access, call
HttpRequest.getBody() and you will get the same body type the first access requested.
text/plain messages are more restrictive about allowed types
For text/plain request and response body reading and writing, in 3.x any type was allowed. For writing, the object
was converted using toString, and for reading, the object was converted using ConversionService. For
example, if you have a controller that returns an Instant as text/plain, it would write it using toString like
2023-05-25T13:25:02.925Z. In the other direction, if you have a controller with a @Body Instant instant
parameter, the same text would be converted to Instant using ConversionService.
This is not permitted anymore for 4.x, except for some restricted types. The recommended fix is to move to
application/json as the content type. toString is not a stable serialization format, JSON is more reliable.
Alternatively, you can set the micronaut.http.legacy-text-conversion configuration option to true to restore the
old behavior.
OncePerRequestHttpServerFilter removed
Since Micronaut 3.0 the OncePerRequestHttpServerFilter class was deprecated and marked for removal. This class is now removed. Implement HttpServerFilter instead, and replace any usages of micronaut.once attributes with a custom attribute name.
CORS support with the @CrossOrigin annotation
Micronaut Framework 4 changes @CrossOrigin behavior to match configuration-based CORS behavior. A method annotated with @CrossOrigin allows any origin if you don’t specify any value for the allowedOrigins and allowedOriginsRegex members.
@EachBean requires a `@Named qualifier
@EachBean throws a "multiple possible bean candidates found" exception if any parent bean lacks a name qualifier.
Manual Context Propagation
In Micronaut Framework 4, users need to extend the propagation context manually.
Micronaut 3 libraries not compatible with Micronaut 4 applications
In order for Micronaut 3 library beans to be discoverable in an application running Micronaut 4, the library must be recompiled with Micronaut 4 - https://github.com/micronaut-projects/micronaut-core/discussions/9758